This article contains affiliate links to products we’ve researched and recommend. If you purchase through our links, we may earn a small commission at no extra cost to you. This helps us create free content like this guide. We only recommend equipment we believe provides genuine value. Read our full disclosure policy
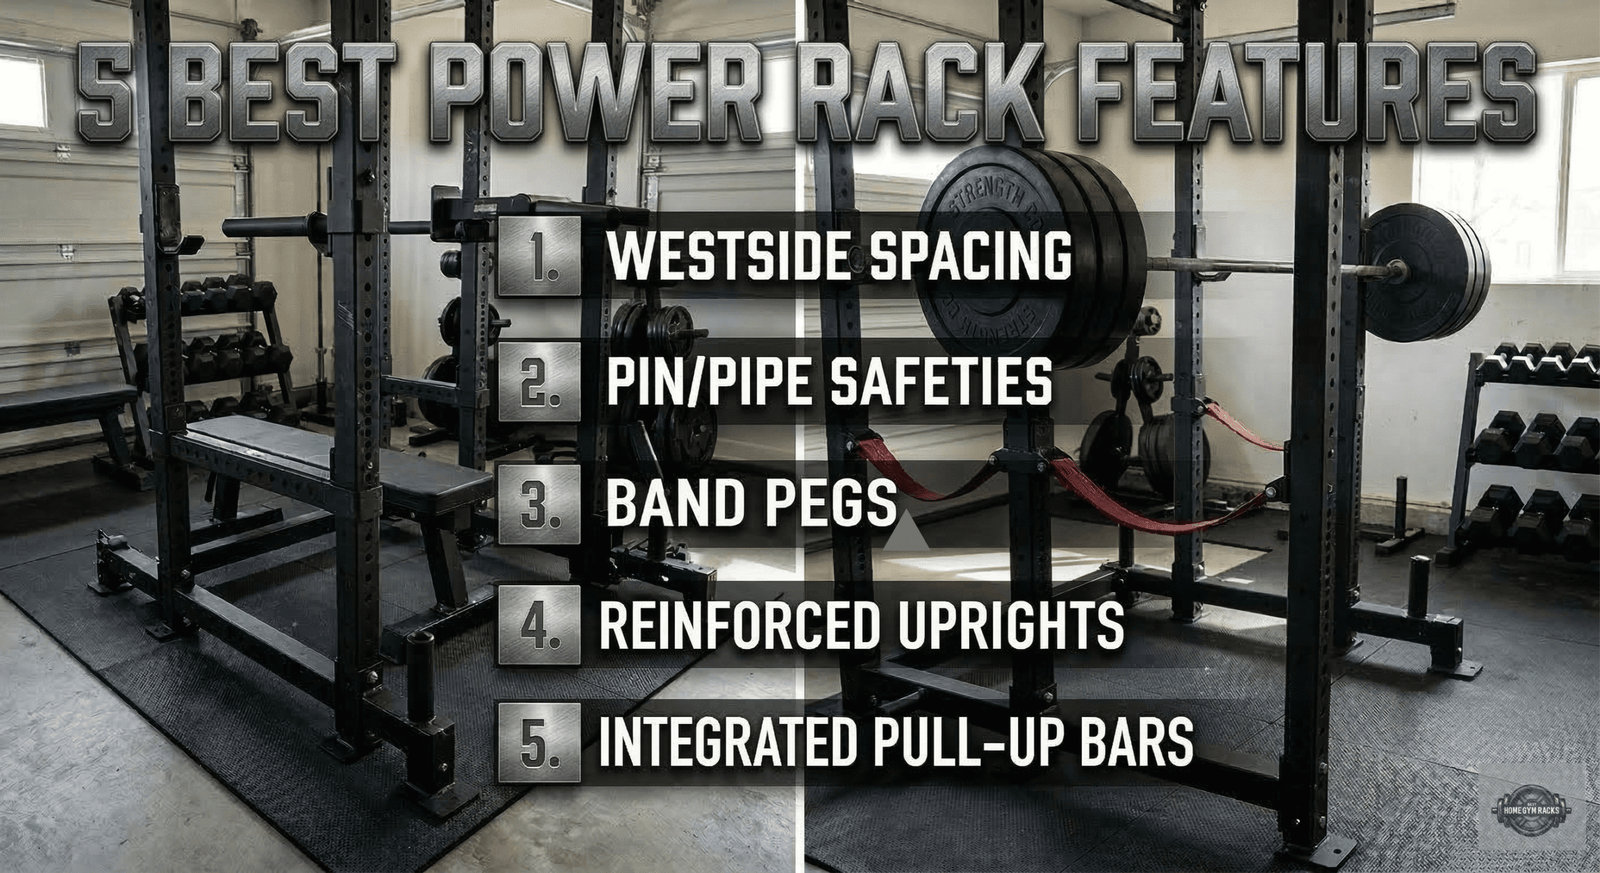
The 5 power rack features most buyers overlook:
- Safety system type (pin/pipe vs. straps vs. flip-down — they are not the same)
- Hole spacing and numbering (Westside spacing and laser-cut numbers matter more than they sound)
- Steel dimensions and gauge (2×3 vs. 3×3, and why 11-gauge is the minimum worth considering)
- Attachment ecosystem compatibility (buying a rack is really buying a platform)
- Weight capacity vs. actual stability (the number on the spec sheet is not the whole story)
Who this guide is for: Anyone setting up a serious home gym — whether you’re a garage gym powerlifter, a space-constrained apartment dweller, or a busy professional who wants to train efficiently at home without compromising on safety or longevity.
Introduction: The Rack I Almost Got Wrong
I have a friend who spent weeks obsessing over the weight capacity number on every rack he looked at. He found a budget model rated to 1,500 lbs, bought it immediately, and spent the next eight months training on a rack that wobbled during heavy squats, had J-cups he couldn’t reliably level, and offered zero upgrade path when he decided he wanted a cable attachment.
He didn’t buy the wrong rack because he didn’t research. He bought the wrong rack because he researched the wrong things.
That experience taught me something I’ve come back to every time someone asks me what to look for in a power rack: the features that dominate the marketing copy are rarely the ones that determine your long-term satisfaction. The features that matter are the ones that get quietly glossed over in the bullet points.
This guide is about those features. Not the headline specs. The overlooked ones. The ones that separate a rack you’ll still be training on in 15 years from one you’ll be posting on Facebook Marketplace in 18 months.
If you’re about to spend anywhere between $500 and $1,500 on the centerpiece of your home gym, this is worth your full attention.
If you’re still deciding between specific models and want a full spec-by-spec breakdown, our power rack buying guide covers every major rack category to help you narrow your shortlist before committing.” Anchor text: complete power rack buying guide
How We Evaluated These Features
Before we get into the list, it’s worth being transparent about the framework behind it. These five features were selected based on three criteria:
- Frequency of buyer regret — these are the specs that come up most consistently in post-purchase conversations among serious home gym lifters
- Long-term impact — features that affect your training safety, convenience, and expandability over the years, not just in the first few weeks
- Across-the-board relevance — whether you’re in a 2-car garage in the suburbs or a studio apartment with 80 inches of ceiling clearance, these features affect you
What’s deliberately not on this list: weight capacity, pull-up bar type, and price. Not because they don’t matter — they do — but because they’re the features every buyer already looks at. This guide is about what you’re probably not looking at closely enough.
Feature #1: Your Safety System Is Not an Afterthought
Let’s start here because it’s the most important and the most misunderstood of all the critical power rack features.
Most buyers glance at “includes safeties” in the spec list and move on. What they don’t realize is that safety systems vary dramatically in how they work, how they perform under a real failed lift, and how much they cost the barbell and the rack over time.
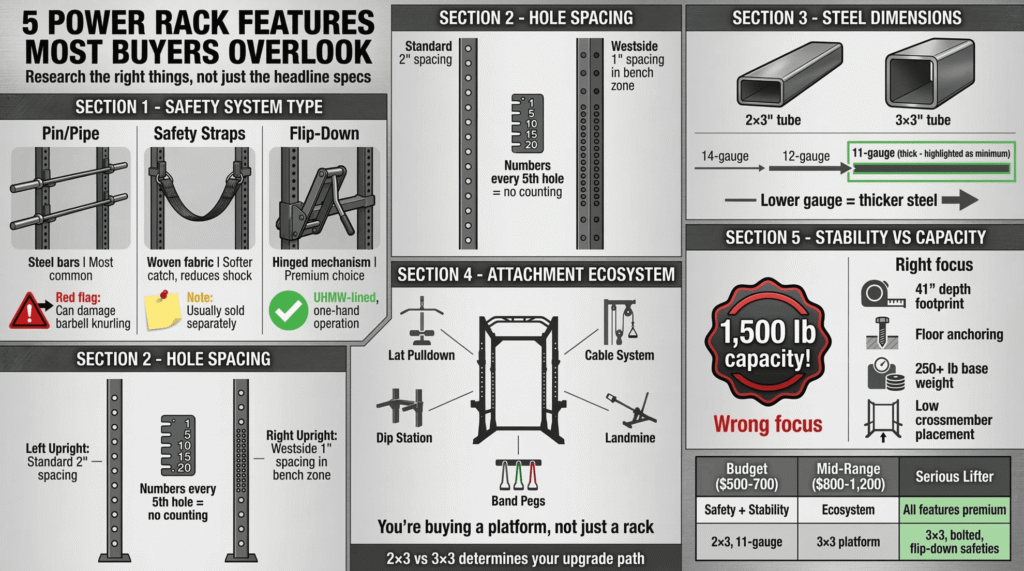
The Three Types Worth Understanding
Pin and pipe safeties are the most common. They’re steel horizontal bars that slot into the uprights at your chosen height. Simple, sturdy, and reliable. The downside: when a loaded barbell drops onto steel pipes, it can damage your bar’s knurling and finish over time. On a bar you’ve invested $300+ in, that matters.
Safety straps (also called spotter straps or nylon safeties) use heavy-duty woven fabric to catch the bar. They’re softer on the barbell, they allow for a slight give on impact, which reduces shock load on the rack, and many experienced solo lifters strongly prefer them. The trade-off is that strap safeties are typically an add-on purchase rather than standard equipment.
Flip-down safeties represent the premium option. They swing out of the way when not in use and fold back into position with one hand. They’re lined with UHMW plastic (ultra-high-molecular-weight polyethylene, a dense plastic that protects both the bar and the rack surface), they’re fast to set up, and they’re the preferred choice of most serious solo lifters. REP Fitness’s flip-down safeties are frequently cited as the best on the market at the price point.
The critical takeaway: neither the Titan T3 nor most mid-range racks include safeties as standard. They’re a separate line item. Budget for them upfront. If you’re training alone, they are not optional.
As Dr. Christopher Mohr, PhD, RD, noted in BarBend’s rack guide: “Using a power rack during strength training can strengthen the muscles around the joints, providing better support and reducing stress on the joints themselves” — but only if the safety system is correctly set and appropriate for your training style.
What to Look For
When evaluating any rack’s safety system options, ask:
- Does the base configuration include safeties, or are they sold separately?
- What material are the safeties made from, and will they damage my barbell?
- Are UHMW-lined options available for the rack I’m considering?
- How quickly can I adjust safety height mid-session?
Don’t overlook your safety system budget. Whether you choose pin and pipe, straps, or flip-down safeties, build them into your total rack cost from day one. Check current safety accessory options and pricing for your chosen rack before you commit. [Browse Safety System Options for Your Rack →]
Feature #2: Hole Spacing and Laser-Cut Numbers
This sounds like the kind of detail only an engineer would care about. It isn’t. It’s one of the power rack features that affects every single training session, and most buyers never think to check it before purchasing.
Westside Hole Spacing: What It Is and Why It Matters
Standard power racks use 2-inch hole spacing throughout the entire upright. That means your J-cups and safety bars can only be set in 2-inch increments across the full height of the rack.
Westside hole spacing refers to a zone in the middle of the uprights (roughly corresponding to your bench press and squat setup range) where the holes are spaced at 1-inch intervals instead of 2 inches. This tighter spacing gives you more precise positioning of your barbell height during the bench press, a lift where an inch of J-cup height can meaningfully change your setup mechanics and shoulder comfort.
For tall or short lifters, especially, this isn’t a minor convenience. It’s a genuine ergonomic advantage that reduces the chance of training in a compromised position.
Most quality racks in the $500+ range now include Westside spacing as standard. If a rack at that price point doesn’t offer it, that’s a signal worth noting.
Laser-Cut Numbers: Small Detail, Real-World Impact
Here’s a scenario. You squat with your J-cups at hole 17. Then you move to bench press, which requires hole 23. Then you add a safety bar at hole 15. Then you want to go back to squatting.
On a rack with no numbering on the uprights, you’re counting holes by hand every single time. Every. Single. Time. It sounds trivial until you’ve done it 400 times.
Laser-cut numbers (etched directly into the upright steel, typically at every fifth hole) eliminate this entirely. You remember your numbers, you dial them in instantly, and you move on to actually training.
Our BarBend testers noted the same thing in their REP PR-5000 review: “Laser-cut numbers make it easy to switch your J-cups and barbell when going from squatting to bench pressing. I really like how simple it makes the process, essentially eliminating the need to mark your preferred slots.”
The Titan T3 does not include laser-cut numbers. The REP PR-4000 and PR-5000 do. If you train multiple movements in a single session and value efficiency, this feature alone can influence a purchasing decision.
Practical workaround if your rack lacks numbering: a paint pen or a small piece of colored tape at your preferred heights costs almost nothing and solves the problem immediately. But knowing this before you buy beats discovering the frustration afterward.
Feature #3: Steel Dimensions and Gauge (The Spec That Actually Predicts Longevity)
Every rack lists its steel specs. Very few buyers know what those numbers actually mean for their training experience.
The Three Numbers to Know
Gauge refers to the thickness of the steel wall. Counter-intuitively, lower gauge numbers mean thicker steel. 11-gauge steel (approximately 1/8″ thick) is the industry standard for quality home gym racks. 12-gauge is thinner. 14-gauge is thinner still. Any rack advertising capacity numbers but using 12-gauge or 14-gauge steel is using thinner walls to hit a lower price point. Under heavy dynamic loading (think aggressive kipping pull-ups or eccentric drops), the difference becomes tangible.
11-gauge is the minimum worth considering for any rack you intend to train seriously on for more than a few years.
Upright dimensions tell you the cross-section of the steel tube. The two most common formats in the home gym market are:
- 2×3 inches (rectangular): Used by Titan T3, Rogue R-3 (Monster Lite), and most mid-range racks. Proven, reliable, and supports a wide attachment ecosystem.
- 3×3 inches (square): Used by REP PR-4000, Titan X-3, Rogue Monster, and premium platforms. Stiffer under load, supports a broader range of attachments, and has become the standard on racks designed for serious long-term use.
For the vast majority of home gym lifters, 2×3 11-gauge steel is absolutely sufficient. If you’re squatting under 400 lbs and not planning to add a cable tower attachment system, the practical difference between 2×3 and 3×3 during a training session is negligible.
Where 3×3 earns its premium: attachment compatibility. Most high-end accessories (functional trainers, cable systems, kipping bars, monolift arms) are designed around the 3×3 standard. If you’re building a long-term platform and intend to expand over time, 3×3 is the more future-proof investment.
A Quick Case Study
Tom built his first home gym on a 2×3 rack and trained on it happily for four years. When he decided to add a cable attachment, he discovered that the system he wanted required 3×3 uprights. He sold his rack, upgraded to a 3×3 platform, and added the cable system six months later. His conclusion: “I wish I’d just bought 3×3 the first time. The upgrade cost me more than the price difference would have.”
That story plays out regularly in the home gym community. It doesn’t mean everyone needs 3×3. It means the decision is worth making consciously, not accidentally.
If you’re weighing up two of the most popular 11-gauge racks in the home gym space right now, our Titan T3 vs REP PR-4000 comparison breaks down every spec that matters across both platforms.” Anchor text: Titan T3 vs REP PR-4000 comparison.
Feature #4: The Attachment Ecosystem (You’re Not Just Buying a Rack)
This is the power rack feature that causes the most buyer regret, and it’s almost never discussed upfront in rack marketing.
When you buy a power rack, you’re not just buying the steel frame in the box. You’re buying into an ecosystem of compatible accessories that will determine what your rack can become over the next 5, 10, or 15 years.
Why Ecosystem Matters More Than the Base Rack
A bare power rack supports squats, bench presses, overhead presses, and pull-ups. That’s a solid foundation. But most serious home gym lifters eventually want more. Lat pulldowns and cable rows. Dip stations. Landmine attachments. Band peg systems. Monolift arms for equipped lifters. A functional cable trainer.
The question is not “does this rack have accessories available?” Almost every rack does. The question is how deep the ecosystem is, how well the attachments integrate, and how cross-compatible they are with third-party options?
The Compatibility Trap
Here’s where it gets specific. Attachment compatibility is governed by two things: upright hole diameter (5/8″ is standard for most quality racks, though some brands use different sizing) and upright dimensions (2×3 vs. 3×3).
A 2×3 rack is compatible with other 2×3 accessories from various brands, offering reasonable cross-brand shopping flexibility.
A 3×3 rack opens up the broader premium attachment market (Rogue Monster, REP Fitness, Bells of Steel) but narrows your budget accessory options since fewer cheap accessories are made to 3×3 spec.
One practical note on hole spacing: US-made racks like Rogue use imperial hole spacing. Many imported racks (including some REP configurations) use metric spacing, which can cause alignment issues with dual-pin attachments even when upright dimensions match. Single-pin attachments generally work fine across brands. Verify compatibility before purchasing any third-party accessory.
The Modular Platform Approach
The home gym brands that have gained the most loyal followings in recent years (REP Fitness, Bells of Steel, Rogue) have all moved toward treating their rack lines as modular platforms. REP’s Rack Builder tool lets you configure every element of your PR-4000 before ordering. Bells of Steel’s Hydra Rack supports 27 different compatible attachments. Rogue’s Monster system has been expanding for over a decade.
When evaluating any rack, ask yourself this: Where do you want this gym to be in five years? The answer should influence which ecosystem you buy into today.
Feature #5: Weight Capacity vs. Real-World Stability
And here it is. The feature most buyers focus on exclusively is misunderstood almost universally.
Weight capacity on a power rack spec sheet is a static load rating. It tells you how much the rack can theoretically hold when weight is placed on it slowly and evenly. It does not tell you how the rack behaves under dynamic loading, how it absorbs impact, how it feels during a heavy squat, or whether it will walk across your floor when you unrack 315 lbs aggressively.
What Stability Actually Depends On
Several factors contribute to real-world stability that the weight capacity number doesn’t capture:
Footprint and depth. A rack with 41″ depth crossmembers is inherently more stable than one with 24″ crossmembers at the same weight capacity. The deeper the footprint, the harder it is to tip the rack in any direction. Budget racks often hit impressive weight capacity numbers but use shallow footprints that compromise stability under real lifting conditions.
Floor anchoring. Most quality rack manufacturers recommend bolting the rack to the floor for maximum stability. Some racks (like Titan’s X-3 flat foot version) are designed to be used unbolted. The distinction matters if you’re renting, training on a wooden floor, or simply unwilling to drill concrete.
Base weight of the rack itself. A rack that weighs 150 lbs is going to behave differently under load than one that weighs 250 lbs, even at the same rated capacity. Mass provides inertia. Inertia means stability.
Crossmember placement and design. Front and rear crossmembers that run close to floor level create a more stable triangle than crossmembers placed higher up. Check the geometry, not just the spec sheet number.
The Budget Rack Warning
This is worth saying plainly: a rack rated to 1,500 lbs using 14-gauge 2×2 steel with a 20″ depth footprint is not a safe rack for serious training. The capacity number is technically accurate as a static load measurement. But under dynamic loading — the actual conditions of a real training session — the rack will wobble, potentially walk, and create genuine safety risks.
The home gym community has learned this lesson collectively and repeatedly. As one widely cited home gym reviewer put it: “Don’t buy the least expensive rack you can. Cheap racks are not stable. The specs will make them look capable, but capacity is only one of many qualities you should look for.”
Spend enough to get 11-gauge steel, a footprint of at least 24″ depth, and a rack from a company with a real warranty and real customer support. That floor is approximately $500 for a new rack from Titan, REP, or similar established brands.
If ceiling height is a constraint in your space, stability becomes even more important as you evaluate lower-profile configurations — our guide to the best power racks for low ceilings covers what to prioritize when overhead clearance is limited.
Quick-Reference Comparison: What to Look For in Each Feature
| Feature | Minimum Standard | Better | Best |
|---|---|---|---|
| Safety System | Pin/pipe included | UHMW-lined pin/pipe or strap safeties | Flip-down safeties with UHMW lining |
| Hole Spacing | 2″ standard spacing | Westside (1″ bench zone) | Westside + laser-cut numbers every 5th hole |
| Steel | 2×3 12-gauge | 2×3 11-gauge | 3×3 11-gauge |
| Attachment Ecosystem | Basic brand-specific accessories | Growing attachment library | Deep modular platform (27+ accessories) |
| Stability | Rated capacity only | 24″+ depth, rated for dynamic loading | 41″+ depth, floor anchor, or flat-foot design with mass |
Buying Guide: Matching Features to Your Situation
Not every lifter needs every feature at the premium level. Here’s how to think about it based on who you are:
If you’re building your first home gym on a budget ($500–$700 for the rack): Focus hard on Feature #1 (safety system) and Feature #5 (real stability). Get at least 11-gauge 2×3 steel, Westside hole spacing, and buy strap safeties separately. Don’t overspend on the rack at the expense of your barbell and plates. The Titan T3 is the right frame here.
If you’re building a long-term platform ($800–$1,200): Feature #4 (attachment ecosystem) becomes your most important consideration. Buy the 3×3 platform with the deeper attachment library now. The REP PR-4000 and Titan X-3 both belong in this conversation.
If you’re a serious strength athlete training near your limits, Features #1, #3, and #5 are non-negotiable at their highest level. Flip-down safeties, 3×3 11-gauge steel, bolted-down installation, and a rack from a company with a lifetime warranty. Don’t compromise here.
If you’re space-constrained (apartment, small room, shared space): Feature #5 stability becomes complex because bolting to the floor may not be possible. Look for flat-foot designs with deep footprints specifically engineered for unbolted use. Check the ceiling height carefully against the pull-up bar height of your chosen model before ordering.
Frequently Asked Questions
What is the most important feature of a power rack?
For solo lifters, the safety system. No other feature matters more to your safety during a failed lift. Every other feature affects the quality of your training. The safety system affects whether you walk away from a missed rep without injury.
Do I need to bolt my power rack to the floor?
Most manufacturers recommend floor anchoring for maximum safety and stability. If you cannot bolt down (renting, wooden floors), look for racks specifically designed for unbolted use with deep footprints and significant base mass, such as the Titan X-3 flat-foot configuration.
What does 11-gauge steel mean on a power rack?
Gauge refers to the thickness of the steel wall. 11-gauge is approximately 1/8″ thick and is the industry standard for quality home gym power racks. Lower numbers mean thicker steel. Racks using 12 or 14-gauge steel have thinner walls, which affects rigidity and long-term durability under heavy use.
What is Westside hole spacing?
Westside spacing uses 1-inch hole increments through the bench zone of the uprights (vs. 2-inch standard spacing used elsewhere). This gives you more precise barbell height adjustments for bench pressing, which is particularly beneficial for lifters at the tall or short ends of the height spectrum.
Are 2×3 and 3×3 racks cross-compatible with attachments?
Partially. Both formats typically use 5/8″ hole hardware, which allows some accessory crossover. However, many premium cable systems and functional trainers are designed specifically for 3×3 uprights and won’t fit 2×3 racks. Verify compatibility for any specific attachment before purchasing.
What is a realistic budget for a quality home gym rack with safeties?
For a solid first home gym rack with appropriate safeties, budget $600–$750 minimum (rack + safeties + shipping). For a long-term platform with expandability, $1,000–$1,400 is a realistic all-in figure for the rack, safeties, and one or two foundational attachments.
Does a higher weight capacity mean a safer rack?
Not necessarily. Weight capacity is a static load rating, not a measure of real-world stability under dynamic loading. A rack rated at 800 lbs with a 41″ depth, 11-gauge 3×3 steel, and floor anchoring will outperform a 1,500 lb-rated rack built with 14-gauge 2×2 steel and a 20″ footprint in real training conditions.
Final Thoughts: Buy the Rack You’ll Never Have to Replace
Here’s the thing about all five of these power rack features: they’re not exciting. Nobody puts a photo of their safety strap on Instagram. Nobody writes a caption about their laser-cut hole numbers. But the lifters who are still training on the same rack they bought ten years ago? They got these things right the first time.
The home gym space has never been better supplied with quality options at accessible price points. The information to make a genuinely great decision is available. The only thing standing between you and a rack you’ll train on for the next two decades is taking the time to look past the headline spec sheet and into the details that actually determine the quality of your experience.
You’ve done that now. Go build something great.
Ready to find the right rack for your home gym? Use our comparison guides to match the features above to specific models that fit your space, budget, and training goals. [See Our Full Power Rack Recommendations →]
A Final Word
Every squat rep, every press, every pull-up you do in your home gym compounds over time. The rack holding the bar through all of it deserves more than a five-minute spec comparison. It deserves the kind of attention you’d give to any tool you’re going to rely on, in a high-stakes environment, for the next decade or more. The five features in this guide won’t make the decision for you. But they’ll make sure you’re asking the right questions when you do.