This article contains affiliate links to products we’ve researched and recommend. If you purchase through our links, we may earn a small commission at no extra cost to you. This helps us create free content like this guide. We only recommend equipment we believe provides genuine value. Read our full disclosure policy
Power Rack Safety Systems: What You Need to Know
Power rack safety systems are your mechanical spotter for solo home training.
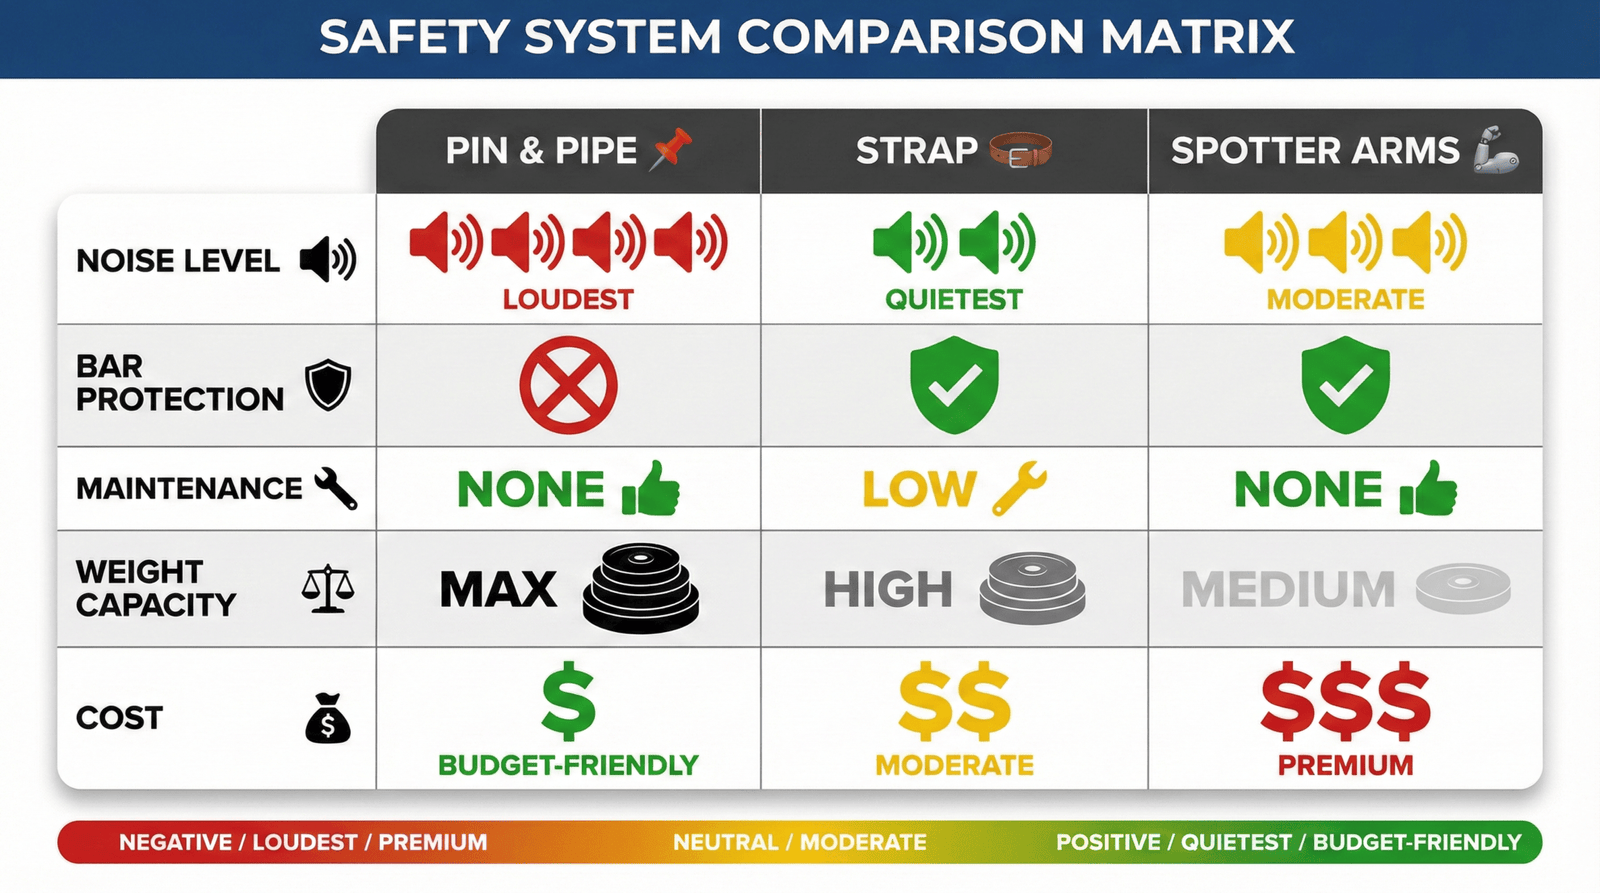
Three main types exist: pin-and-pipe safeties (traditional steel bars, extremely reliable, loud, can damage barbells), strap safeties (industrial webbing, 15-20 decibels quieter, protects barbell knurling, requires eventual replacement), and spotter arms (cantilevered design, best for specialized movements, easier entry/exit).
Budget racks ($300-600) typically include basic pin-and-pipe only.
Mid-range racks ($600-1,200) offer choices or both systems. J-hooks with UHMW plastic liners protect your barbell during every racking contact and should be considered essential, not optional.
Proper safety positioning matters: squats need safeties 2-3 inches below deepest depth, bench press needs them 1-2 inches above chest.
Most home lifters benefit from strap safeties for bench press (quiet, gentle on equipment) and pin-and-pipe for squats (maximum confidence). The “best” system depends on your training style, living situation, and equipment budget rather than one universal winner.
Power Rack Safety Systems Introduction
The bar felt heavier than usual that Tuesday evening. I was three reps into my fourth set of squats, pushing through 365 pounds, when my legs simply gave out at the bottom. No warning, no gradual weakening. Just instant failure. The loaded barbell dropped onto my power rack safety systems with a metallic clang that echoed through my garage. I stepped forward, heart racing, and watched the bar settle safely on the strap safeties two inches below where I’d been stuck.
That moment crystallized something I’d understood intellectually but never felt viscerally: power rack safety systems aren’t optional accessories or marketing features. They’re the mechanical spotter that makes solo home training possible without accepting catastrophic risk.
Here’s what most buyers don’t realize until their first failed rep: the safety system you choose affects every single training session for the next decade. Loud metal-on-metal crashes wake sleeping family members. Damaged barbell knurling costs hundreds to replace. Improperly positioned safeties either fail to protect you or limit your range of motion. These aren’t hypothetical concerns. They’re daily realities that separate well-designed power rack safety features from poorly conceived afterthoughts.
The stakes extend beyond convenience. According to the Consumer Product Safety Commission, weight-training equipment sends approximately 25,000 people to emergency rooms in the United States each year.
Many of these injuries involve unsupported barbell exercises where proper power rack safeties would have prevented serious harm. When you’re pinned under 300+ pounds with no training partner present, equipment quality matters in ways that transcend price comparisons.
This guide examines the three primary safety systems for power racks: traditional pin-and-pipe safeties, modern strap systems, and versatile spotter arms. We’ll explore how each design works, when specific systems excel or disappoint, and the practical considerations that matter more than marketing specifications.
Whether you’re researching your first rack purchase or questioning whether your current setup adequately protects you, you’ll understand exactly which power rack safety systems match your training style, living situation, and risk tolerance.
Understanding safety systems requires context about how they integrate into the overall rack design and your complete home gym rack selection.
Understanding Why Safety Systems Define Your Rack
The Reality of Training Alone
Training without a spotter fundamentally changes your relationship with heavy weights. In commercial gyms, you can ask someone for a spot during challenging sets. That safety net lets you push closer to genuine failure, knowing another person stands ready to assist if needed.
Home training eliminates that backup. You’re alone with the iron, making every decision about when to push and when to stop. Power rack safety systems become your permanent training partner, the reliable presence that catches you when ambition exceeds current capability.
I spent my first six months of home training using squat stands without integrated safeties. I told myself I’d simply rack the bar if anything went wrong, that I knew my limits well enough to stay safe. Then, on one Saturday morning, while attempting a modest PR, I got stapled at the bottom of a squat. The stands had no safeties. I was forced into an awkward forward dump of the loaded barbell, which crashed to the floor, barely missing my foot. The noise was horrendous. The risk was unnecessary. The embarrassment of my poor planning? That lasted considerably longer than the bruised ego.
Quality power rack safety features prevent these scenarios. They create a sense of psychological freedom to train intensely because you know protection is in place if things go wrong. This confidence directly translates into better training outcomes. Research published in the Journal of Strength and Conditioning Research demonstrates that lifters with reliable safety systems train significantly closer to true muscular failure compared to those limited by safety concerns, resulting in superior strength gains over time.
Not sure where to position your safeties?
Our free Safety Height Calculator determines your exact measurements based on body dimensions and exercise type. [Calculate My Safety Heights →]
🔒 Safety Height Calculator
Dial in your perfect safety bar height for maximum protection and optimal range of motion. Never guess again.
What Actually Happens During Failed Reps
Understanding failure mechanics helps you appreciate why safety system design matters so much.
Squat failures typically occur at the bottom of the movement, where mechanical leverage is weakest. You descend into the hole, start driving upward, and realize halfway up that you're not making it. Gravity takes over. The bar moves downward, slowly at first, then increasingly fast as your muscles fatigue further under the continuing load.
Bench press failures happen differently. You lower the bar to your chest during a normal rep, begin pressing, and discover your triceps won't extend the weight. The bar stops moving upward. Then it slowly sinks toward your chest as your arms fatigue. Without safeties, that 225-pound barbell can pin you helplessly to the bench.
Overhead press failures involve the bar dropping from overhead toward your face and upper chest as shoulder strength gives out. This represents perhaps the most dangerous failure mode, as the bar falls from the greatest height with nothing but your head in the impact zone.
Effective power rack safeties must accommodate these different failure patterns. Squat safeties need precise height adjustment to catch the bar just below your bottom position without limiting depth. Bench press safeties must position close enough to your chest to prevent injury, but not so high that they interfere with the full range of motion. Overhead press safeties require positioning that protects you during the descent without blocking your pressing path.
The system you choose affects how gracefully, quietly, and safely it performs these critical catching functions during your worst moments under the bar.
Pin-and-Pipe Safeties: The Proven Standard
How Traditional Safeties Work
Pin-and-pipe safety systems consist of solid steel bars (typically 1 to 1.5 inches in diameter) that slide horizontally through holes in opposing uprights. Metal pins drop through additional holes to lock the bars in position. This creates a spanning platform that catches the barbell from beneath during failed lifts.
The design elegance lies in its simplicity. No moving parts beyond the removable pins. No webbing that might fray. No complicated adjustment mechanisms. Just steel bars supported by steel uprights, locked in place by steel pins. If the uprights can support your loaded barbell (which they obviously can, since you're training inside the rack), then the safeties can catch that same weight during failures.
Traditional safeties position approximately 2-4 inches below your lowest position for each exercise. For squats, you set them just below your bottom depth. For bench press, position them 1-2 inches above your chest when the bar touches. This narrow margin provides protection without interfering with the normal range of motion.
I still use pin-and-pipe power rack safety bars for squats despite owning strap safeties. The solid, unyielding platform they create inspires maximum confidence during heavy singles and challenging sets. When I'm attempting a new PR squat, knowing those steel bars wait beneath me removes any psychological hesitation about getting stapled. I can descend with full commitment, trusting the safeties completely if my legs don't cooperate.
The Pros: Reliability and Strength
Pin-and-pipe safeties offer several compelling advantages that explain their continued popularity despite newer alternatives:
Absolute reliability: Metal bars supported by rack structure cannot slip, stretch, or fail unless the entire rack fails. There's no "what if the strap breaks?" concern during heavy training. The physics are straightforward. Steel bars spanning between uprights support the load. This mechanical certainty matters during maximal attempts where psychological confidence affects physical performance.
No maintenance required: Once installed, traditional safeties serve indefinitely without inspection, adjustment, or replacement. You never wonder whether they've degraded, whether they need replacing, or whether you should have checked something before this set. They simply work, session after session, year after year.
Maximum weight capacity: Quality pin-and-pipe systems easily handle 1,000+ pounds. The limitation comes from your rack's structural capacity, not the safeties themselves. If your rack supports the weight, these safeties catch it.
Consistent catching height: The rigid bars provide uniform support across their entire width. The bar contacts the safety at the exact same height, whether it falls in the center or toward one side. This predictability helps you position safeties precisely for different exercises.
The weight ratings of your safety systems directly correlate with your rack's overall power rack weight capacity ratings and load-bearing specifications.
The Cons: Noise and Barbell Wear
Traditional safeties create two significant challenges that frustrate many home gym owners:
Noise during catches: When a loaded barbell drops onto the metal safety bars, the impact produces a loud sound. We're talking 90-100 decibels, equivalent to a motorcycle or power tools. In attached garages, this wakes sleeping family members. In apartments, it disturbs neighbors. In basement gyms, it travels through floor joists to rooms above.
I learned this lesson during a Friday evening bench press session when I failed a rep while my wife hosted a video conference in the adjacent room. The metallic crash of 275 pounds hitting the safeties interrupted her meeting spectacularly. Her expression when she came to the garage afterward communicated clearly that my training schedule needed adjustment around her work calls.
Barbell knurling damage: Metal-on-metal contact between safeties and your barbell gradually wears the knurling. Each caught rep creates friction and impact that flattens the knurling peaks. Over hundreds of contacts, you'll notice smooth, shiny patches developing on your bar where it repeatedly contacts safeties.
This matters more with expensive barbells. A $300 competition power bar with aggressive knurling deserves protection. A $100 economy bar? The knurling wear proves less concerning. Consider your barbell investment when evaluating whether traditional safeties suit your situation.
Limited exercise versatility: The rigid bars spanning between uprights can interfere with exercise setup for certain movements. Rack pulls from various heights become awkward when safeties occupy multiple hole positions. Some dynamic movements find the spanning bars inconvenient.
Strap Safeties: The Modern Alternative
Design and Material Technology
Strap safeties for power racks use industrial webbing, similar to materials in seatbelts and climbing harnesses, suspended between metal brackets attached to opposing uprights. High-tensile nylon or polyester provides the catching surface, typically rated for 2,000-3,000+ pounds of tensile strength.
The brackets attach to uprights through the standard hole pattern, just like traditional safety pins. The straps hang between brackets, creating a slightly flexible catching surface that yields an inch or two under impact before arresting the bar's downward movement. This "give" creates fundamental performance differences compared to rigid metal bars.
Quality strap safety systems use straps measuring 2-4 inches wide and 36-48 inches long, with industrial-stitching at attachment points. Budget versions might use thinner webbing or less robust attachment methods. The quality differences matter significantly for longevity and reliability.
The Advantages That Changed My Training
After living with pin-and-pipe safeties for two years, I added strap safeties to my equipment arsenal. The performance differences immediately justified the $120 investment:
Dramatically quieter operation: When a loaded barbell contacts strap safeties, the webbing absorbs much of the impact energy that would otherwise create sound. Instead of a sharp metallic clang, you hear a heavy thud. The difference measures 15-20 decibels, transforming ear-damaging crashes into manageable bumps.
This changed when I could train. Previously, heavy squat and bench sessions needed to happen when family members were awake and expecting noise. Strap safeties let me train early in the morning or late at night without disturbing anyone. For those of us sharing homes with partners, children, or roommates, this flexibility proves invaluable.
Barbell protection: The webbing creates a soft landing surface that protects knurling from wear. Even hundreds of caught reps create minimal barbell damage. My competition bar, which I now use exclusively with strap safeties, shows no knurling wear after three years of regular use, including numerous failed reps.
Quick height adjustment: Many strap safety designs allow height changes without removing the straps from the brackets. You release tension, move brackets to new holes, and retension the straps. This takes 15-20 seconds versus 30-40 seconds for traditional pin-and-pipe removal and reinstallation. Small time savings per adjustment compound across hundreds of training sessions.
More forgiving catches: The slight give when straps catch the bar creates a less jarring sensation during failed reps. This subjective difference matters more for bench press than for squats, but the gentler catch feels more controlled and less violent than a rigid metal bar.
The Limitations You Should Know
Strap safeties aren't perfect. Several meaningful limitations affect their suitability for different training situations:
Maintenance and inspection requirements: Unlike maintenance-free traditional safeties, straps require periodic inspection for fraying, stitching damage, or material degradation. You're checking for problems that could lead to failure. This adds a small ongoing responsibility to your training routine.
How often should you inspect? Before every training session seems excessive, but monthly checks make sense for heavy users. Look for frayed edges, loose stitching at attachment points, or discoloration indicating material breakdown. Any concerning signs warrant immediate replacement.
Floor contact concerns: Strap length matters relative to your rack height and safety positioning. If straps drag on the floor when installed at lower holes, the webbing abrading against concrete or rubber mats accelerates wear. Some racks include multiple strap lengths to prevent floor contact at different positioning heights.
Eventual replacement may be needed: Even high-quality straps degrade over years of use, especially with frequent failed reps at heavy weights. Expect to replace strap safeties every 5-10 years, depending on usage intensity. This creates an ongoing cost that maintenance-free traditional safeties avoid. Replacement strap sets typically cost $80-150, which feels substantial for something that pin-and-pipe safeties never require.
Slight uncertainty: The flexibility of straps means you can't predict the exact catching height with the same precision as with rigid bars. The bar sinks slightly into the strap based on drop height and weight. For most exercises, this doesn't matter, but it creates minor ambiguity compared to the absolute predictability of metal bars.
Limited ceiling height affects not only power racks designed for low ceilings but also safety bar positioning and exercise variety.
Spotter Arms: Versatility for Specialized Training
Understanding the Design Difference
Spotter arms (also called safety spotter arms or adjustable spotters) cantilever outward from one side of the rack rather than spanning between opposing uprights, as with traditional safeties. These L-shaped arms attach to uprights through the standard hole pattern, projecting 16-24 inches outward to catch the barbell.
The independent arms let you adjust each side to different heights if needed (though you typically keep them level), and they make entry and exit from the rack easier since you're not stepping over spanning safety bars. This design flexibility creates advantages for certain exercises and training styles.
Spotter arm construction typically features heavy-gauge steel with UHMW plastic top surfaces to protect barbells. Quality arms include secure locking pins that prevent accidental movement or detachment under load. Weight ratings commonly reach 500-1,000 pounds per arm, adequate for serious home training, though often lower than traditional safety capacities.
When Spotter Arms Excel
Certain training scenarios make spotter arms for power racks the superior choice over spanning safety systems:
Rack-position exercises: Pin squats, pin presses, and rack pulls all start with the bar resting on a support surface at specific heights. Spotter arms excel here because you position them precisely at your desired starting height, load the bar, set up underneath, and lift from a dead stop. The cantilevered design makes bar loading easier than loading a bar resting on spanning safeties between tight uprights.
Asymmetric movements: Single-arm work or exercises where you don't want safety coverage on both sides benefit from spotter arm flexibility. You can position one arm as needed while leaving the other side open. This proves useful for landmine variations, certain unilateral pressing movements, or when training around injuries.
Frequent safety repositioning: If your training involves constantly changing safety heights between exercises (switching from squats to bench to rack pulls in the same session), spotter arms typically adjust faster than removing and reinstalling spanning safeties. The cantilevered design means you only need one attachment point per arm, rather than threading bars through opposing uprights.
Mobility or entry challenges: Stepping over traditional safety bars requires decent hip mobility and balance, especially when moving around weights placed inside your rack. Older lifters, those with mobility limitations, or anyone recovering from lower-body injuries might find the open entry/exit of spotter arm setups more accommodating.
The Trade-offs to Consider
Spotter arms create their own limitations that affect suitability for different buyers:
Shorter catching surface: The 16-24 inch projection doesn't span the rack's full width like traditional bars. If your bar lands off-center or rolls during a catch, it might miss the spotter arm entirely. This requires more precise bar control during reps and failures. For well-executed lifts with controlled descent onto safeties, this isn't problematic. But it creates a slightly higher risk during truly unexpected failures, where the bar might land at angles.
Asymmetric rack loading: The cantilevered design places uneven forces on the rack structure. Weight catching on one spotter arm transfers load primarily to that side's upright. This matters less for bolted-down racks but can affect the stability of free-standing setups. Quality racks handle this fine, but cheaper models might shift or rack under uneven spotter arm loading.
If you're training in a tight space, safety selection becomes even more important — our guide to compact power racks for small spaces explains how reduced footprints affect stability and spotter coverage.
Cost considerations: Adjustable spotter arms typically cost $150-300 per pair, substantially more than $60-100 for traditional pin-and-pipe safeties or $100-150 for strap systems. This premium price reflects the more complex construction and increased machining required. For budget-conscious buyers, traditional safeties deliver comparable protection at a lower cost.
Compatibility questions: Not all racks support spotter arms. Some manufacturers design racks exclusively for spanning safety systems. Verify spotter arm compatibility before purchasing racks or arms separately.
J-Hooks and Barbell Protection
Why J-Hooks Matter for Safety
While safeties catch failed reps, J-hooks protect your barbell during every successful rep through the racking and unracking process. You contact J-hooks dozens of times per session, thousands of times yearly. The interface between metal hooks and your barbell can either provide protective support or cause gradual equipment damage.
Bare metal J-hooks create harsh contact between steel brackets and your barbell's steel shaft. Each racking event grinds metal on metal, slowly wearing away the carefully machined knurling that provides grip. Over months and years, you'll develop smooth, polished patches on your barbell where it repeatedly contacts J-hooks.
I damaged a perfectly good Ohio Power Bar this way during my first year of home training. My budget rack included basic metal J-hooks without any protective lining. After 200+ training sessions, the bar's knurling showed visible wear patterns exactly where it contacted hooks. The aggressive diamond knurling I'd loved had become smooth and slippery in those contact zones. A $5 UHMW liner would have prevented $300 in barbell damage.
UHMW Liners: The Simple Solution
UHMW plastic (ultra-high molecular weight polyethylene) creates a protective buffer between J-hooks and barbells. This incredibly durable plastic, similar to cutting board material, protects both surfaces from wear while dramatically reducing racking noise.
Quality power rack J-hooks include factory-installed UHMW liners. The plastic covering typically measures 6-10mm thick, providing substantial cushioning while maintaining stable bar support. Well-designed liners cover the entire contact area where barbells rest, with a secure attachment that prevents the plastic from loosening or falling out during use.
The performance difference proves immediately noticeable. Racking becomes quieter, smoother, and gentler on the equipment. The harsh metallic clang gives way to a soft thud. Your barbell's knurling remains pristine through thousands of contacts. The minimal cost of UHMW (manufacturers pay $2-5 per liner) delivers extraordinary value in equipment protection.
Sandwich J-hook construction represents a premium implementation. These designs sandwich UHMW plastic between two metal plates, creating the most secure, durable, and stable attachment for liners. The plastic can't shift, compress unevenly, or fall out. These J-hooks cost $60-120 per pair versus $30-50 for basic UHMW-lined hooks, but provide noticeably superior performance.
Roller J-Hooks: Luxury or Necessity?
Roller J-hooks take barbell protection to its maximum expression through bearing-mounted rollers that eliminate friction during racking and unracking. These premium designs cost $150-250+ per pair, making it difficult to create a compelling value proposition for most home gym owners.
The rollers do exactly what they promise: provide absolutely friction-free bar contact that protects knurling perfectly while enabling smooth bar movement during setup and breakdown. For competitive powerlifters who use expensive specialty bars frequently, or for equipment enthusiasts who want the absolute best regardless of cost, roller J-hooks deliver tangible benefits.
For most home lifters, training 3-5 times weekly with standard barbells? Quality UHMW-lined J-hooks provide 95% of the protection at 40% of the cost. The incremental benefit of rollers rarely justifies their substantial premium for typical home gym applications.
Setting Up Safety Systems Correctly
Choosing the right safety system matters, but improper positioning renders even the best equipment ineffective. The difference between protection and disaster often measures just 2-3 inches.
Too high, and safeties interfere with full range of motion, forcing compromised movement patterns. Too low, and they fail to catch you before injury occurs during failed reps.
Getting these measurements right doesn't require guesswork.
Use our safety height calculator below to determine your exact safety positioning based on your body dimensions, exercise type, and rack specifications:
🔒 Safety Height Calculator
Dial in your perfect safety bar height for maximum protection and optimal range of motion. Never guess again.
Squat Safety Positioning
Proper squat safety height balances protection against range of motion. Position safeties 2-3 inches below your deepest squat depth. This narrow margin catches you if you fail while allowing full-depth squatting without contacting safeties during normal reps.
Finding the right height requires testing with empty barbells:
- Set safeties at an estimated height
- Perform several squat reps to your normal depth
- Verify the bar clears safeties with room to spare (1-2 inches minimum)
- Deliberately descend slightly deeper to test whether safeties catch appropriately
- Adjust height if needed and retest
The safeties should catch the bar before it pins you in the bottom position, but not so high that you contact them during any normal-depth rep. This testing process takes 10 minutes and prevents training sessions from being disrupted by improperly positioned protection.
For box squats or pin squats where you intentionally contact safeties during every rep, position them at exactly your desired bottom height. The box or pins become part of the exercise rather than emergency protection.
Proper safety installation begins during the power rack assembly process and requires attention to alignment and secure fastening.
Bench Press Safety Setup
Bench press safeties require more precise positioning than squat safeties because the margin between "protective" and "interfering with the lift" measures just 1-2 inches.
Position safeties so the bar contacts them 1-2 inches above your chest when the bar would touch your torso during a normal press. This means the safeties catch a failed rep before the bar pins you, while still allowing full range of motion during successful lifts.
Testing procedure:
- Set up on your bench with the bar on J-hooks
- Lower the bar to your normal touch point on the chest
- Note where the bar sits relative to safeties
- Adjust safety height so they're 1-2 inches below the bar at your touch point
- Test with light weight to verify safeties don't interfere
Some lifters, particularly those with large chest development or long arms, find it impossible to position safeties that both protect adequately and allow a full range of motion. This limitation reflects body proportions rather than equipment problems. In these cases, training with a partner or using spotter arms positioned outside the bar path works better than compromising on safety positioning.
Common Setup Mistakes
Setting safeties too high: The most common error is setting them so high that they contact the bar during normal reps. This forces you into partial-range-of-motion training, which defeats the purpose of full-range compound movements. The psychological disruption of occasionally hitting safeties during regular sets also affects training quality.
Setting safeties too low: Conservative positioning that provides excessive clearance below your deepest position offers insufficient protection. If you get stapled in a squat, you need safeties to catch you quickly, not after you've collapsed another 4-6 inches lower. The extra descent distance increases injury risk and impact forces.
Forgetting to adjust between exercises: Different exercises require different safety heights. Don't squat with safeties positioned for bench press, or bench with safeties positioned for squats. Take the 30 seconds to adjust between movements. This simple habit prevents the horrible realization mid-set that your protection sits at the completely wrong height.
Choosing Your Safety System
Budget-Based Recommendations
Entry-level racks ($300-600): These typically include only basic pin-and-pipe safety bars. The good news? Traditional safeties work reliably regardless of rack price. The less-good news? You probably won't get UHMW-lined J-hooks, strap safety compatibility, or options beyond basic metal bars and pins.
This limitation proves acceptable for beginners. Start with included equipment, develop your training practice, and upgrade to strap safeties later if noise or barbell protection concerns emerge. Many lifters train successfully for years using basic traditional safeties without feeling limited.
Mid-range racks ($600-1,200): This category often includes a choice between pin-and-pipe or strap safeties, with UHMW-lined J-hooks standard. Some manufacturers include both safety types, giving you flexibility to use different systems for different exercises. This versatility matches most home lifters' needs perfectly.
Premium racks ($1,200-2,500+): Top-tier equipment typically includes multiple power rack safety options: traditional bars, strap safeties, and spotter arms, plus premium sandwich or even roller J-hooks. The question becomes which system to use rather than which system your rack supports.
Training Style Considerations
Your training approach significantly affects which safety systems for power racks work best:
Heavy powerlifting (squats and deadlifts exceeding 500 lbs): Traditional pin-and-pipe systems provide maximum psychological confidence and weight capacity. The absolute reliability matters more at extreme loads where a safety system failure would prove catastrophic.
High-frequency training (5-7 days weekly): Strap safeties protect your barbell investment better over thousands of training sessions. The noise reduction also proves valuable when training daily at various hours.
Varied programming (Olympic lifting, CrossFit-style training): Spotter arms offer adjustment flexibility for frequently changing exercises and movement patterns. The easier entry/exit suits dynamic training styles.
Shared living spaces (apartments, attached garages): Strap safeties become nearly mandatory for noise-sensitive environments. The 15-20 decibel noise reduction transforms disturbing crashes into acceptable thuds.
Your safety system needs align closely with overall rack selection criteria including space constraints and intended use when choosing the right power rack for your garage gym.
Still Not Sure Which Safety System Fits Your Training?
You've learned about pin-and-pipe safeties (reliable but loud), strap systems (quiet and gentle on equipment), and spotter arms (versatile for specialized work).
But which combination actually matches your specific situation? Most home gym owners benefit from different safety systems for different exercises.
Our interactive quiz analyzes your training environment, equipment budget, noise sensitivity, and lifting style to recommend the optimal safety setup for your needs.
Take our 60-second quiz to get your personalized recommendation:
Which Safety System Should You Choose?
Answer 6 quick questions to find your perfect rack safety setup
Why This System Works For You:
Top Recommended Products:
Over 8,000 home gym owners have used this quiz to dial in their safety system choices and avoid expensive mismatches between equipment and training needs.
Final Thoughts
The power rack safety system you choose profoundly affects your training experience, equipment longevity, and ultimately whether your home gym proves sustainable long-term. This decision deserves careful consideration based on your specific circumstances rather than defaulting to whatever equipment is included.
After five years of home training with various safety configurations, I've settled into using strap safeties for bench press and overhead work (protecting my competition bar while keeping noise reasonable), pin-and-pipe safeties for squats (maximum confidence during heavy singles), and spotter arms for specialized movements like rack pulls and pin presses. This mixed approach might seem complicated, but it reflects how different exercises and intensities benefit from different safety characteristics.
The broader lesson? There's no single "best" safety system that wins universally. The optimal choice depends on your training loads, movement selection, living situation, equipment budget, and even personal psychology around what makes you feel safe during challenging lifts.
What safety considerations matter most in your training situation? Are you primarily concerned about noise levels, barbell protection, maximum weight capacity, or adjustment convenience? Share your thoughts and experiences below. Your specific circumstances might help other readers identify factors they hadn't considered while researching their own equipment decisions.
Frequently Asked Questions
What's the difference between pin-and-pipe safeties and strap safeties?
Pin-and-pipe power rack safety bars use solid steel bars spanning between opposing uprights, locked in position with pins. They're extremely reliable, maintenance-free, and handle the maximum weight capacity, but can be loud when catching bars and can damage barbell knurling. Strap safeties use industrial webbing suspended between brackets, offering much quieter operation (15-20 decibels quieter), better barbell protection, and slightly faster adjustment, but require periodic inspection and eventual replacement after 5-10 years of heavy use.
Are strap safeties as strong as traditional safety bars?
Quality strap safety systems rated for 2,000-3,000 pounds provide more than adequate strength for any home training scenario. The limitation comes from your rack's structural capacity, not the straps themselves. However, traditional pin-and-pipe safeties typically handle 3,000+ pounds with absolute certainty and zero degradation over time. For typical home gym training (squats under 600 pounds), both systems provide reliable protection. Elite powerlifters who squat 700+ pounds might prefer traditional safeties for maximum confidence.
How often should I replace strap safeties?
Inspect strap safeties monthly for signs of fraying, stitching damage, or material degradation. With normal home use (3-5 training sessions weekly), quality straps last 5-10 years before requiring replacement. Heavy use with frequent failed reps at high weights, or straps that drag on the floor, creating abrasion, may need replacement sooner. Visible fraying, loose stitching at attachment points, or material discoloration indicate it's time for new straps. Replacement sets typically cost $80-150.
What are spotter arms best used for?
Spotter arms for power racks excel at rack-position exercises (pin squats, pin presses, rack pulls), situations requiring frequent safety-height changes between exercises, asymmetric movements, and easier rack entry/exit for those with mobility limitations. They work reliably for standard training but create shorter catching surfaces (16-24 inches) compared to spanning safety bars, and cost more ($150-300 per pair versus $60-100 for traditional safeties). Best for lifters doing varied specialized training rather than primarily squats and bench press.
Do I need UHMW-lined J-hooks?
Yes, absolutely. UHMW plastic liners on J-hooks protect your barbell's knurling from wear during thousands of racking contacts. The plastic costs manufacturers $2-5 to include, but prevents hundreds of dollars in barbell damage over the years of training. Bare metal J-hooks gradually wear away knurling through metal-on-metal friction, creating smooth, slippery patches that compromise your grip. Quality racks include UHMW-lined J-hooks standard. Budget racks with bare-metal hooks should have aftermarket UHMW liners installed immediately ($15-30) to protect your barbell investment.
How do I know if my safety bars are positioned correctly?
Proper power rack safety positioning varies by exercise. For squats, safeties should sit 2-3 inches below your deepest squat depth, catching you if you fail while allowing full range during normal reps. For bench press, position safeties 1-2 inches above your chest when the bar touches during a press. Test positioning with empty barbells: perform normal reps to verify safeties don't interfere, then deliberately descend slightly deeper to confirm safeties catch appropriately. Adjust and retest until positioning protects without limiting range of motion.
Can I use different safety systems for different exercises?
Many experienced home gym owners use multiple power rack safety systems for different training needs. Strap safeties work excellently for bench press (quiet, protects expensive barbells), while pin-and-pipe safeties might feel more confident for heavy squats (absolute reliability). Spotter arms are suited for specialized movements like rack pulls. If your rack supports multiple safety types and budget permits ($200-400 total for both traditional and strap systems), using different safeties for different exercises optimizes performance across varied training. Most mid-range and premium racks accommodate this flexibility.
Are roller J-hooks worth the extra cost?
Roller J-hooks ($150-250+ per pair) provide absolutely friction-free bar contact through bearing-mounted rollers, protecting knurling perfectly and enabling smooth bar movement. For competitive powerlifters who use expensive specialty bars frequently, or for equipment enthusiasts wanting the absolute best, they deliver meaningful benefits. For most home lifters training 3-5 times weekly with standard barbells, quality UHMW-lined sandwich J-hooks ($60-120 per pair) provide 95% of the protection at less than half the cost. The incremental benefit rarely justifies the substantial premium for typical home training.
Here's the final wrap-up paragraph to add after the FAQ section:
Wrapping Up: Your Safety System Decision
Choosing the right power rack safety systems represents one of those equipment decisions that quietly affects every training session for years to come. Unlike flashy accessories or the latest training gadgets, safety systems work in the background, unnoticed during successful sets but absolutely critical during challenging moments when your strength reaches its limits.
After years of training with various configurations, I've come to appreciate that the "perfect" safety system doesn't exist in isolation. It's the one that matches your specific circumstances: the training partner who never judges your failed reps, never complains about early morning sessions, and never takes a day off. Whether you choose the proven reliability of pin-and-pipe systems, the quiet convenience of strap safeties, the versatility of spotter arms, or some combination of all three, what matters most is that you've made an informed decision based on your actual needs rather than marketing claims or arbitrary budget constraints.
The best investment you can make isn't necessarily the most expensive safety system. It's the one you'll use correctly, adjust properly, and trust completely when pushing your training limits. That psychological freedom to train intensely without fear transforms home gym training from a compromise into a legitimate alternative to commercial facilities. Your future self, grinding through a PR attempt or fighting through the last rep of a challenging set, will thank you for choosing wisely today.
Now get out there and train safely. Your gains are waiting, and you've got the mechanical spotter to help you achieve them.