This article contains affiliate links to products we’ve researched and recommend. If you purchase through our links, we may earn a small commission at no extra cost to you. This helps us create free content like this guide. We only recommend equipment we believe provides genuine value. Read our full disclosure policy
Thinking about how to assemble a power rack can feel intimidating because most people approach it expecting a simple furniture-style build, only to learn they’re actually constructing a precision-engineering structure that needs to safely handle 500+ pounds of asymmetrical loading. When you understand how these frames actually work instead of just following pictures in a manual, you can avoid the common mistakes that create wobble, binding attachments, or actual safety hazards.
If you’re still deciding which rack design, footprint, or mounting style makes sense for your space, start with our complete guide to home gym racks before moving into assembly.
Quick Overview: What You’ll Learn
By the end of this guide, you’ll know how to:
- Prepare your tools, workspace, and expectations for a 3–4-hour build.
- Assemble the base, uprights, and crossmembers in the right order.
- Square and tighten the rack so it feels rock-solid under heavy load.
- Adapt your approach for folding, wall-mounted, and free-standing racks.
- Fix wobble, binding J-hooks, and other common assembly failures.
Tools and Setup (Read This First)
Most manufacturers throw in basic wrenches that are either too small for leverage or the wrong size entirely, and they often claim 60–90 minutes for assembly when real-world builds run 3–4 hours.
Essential Tools
You’ll want these ready before you start:
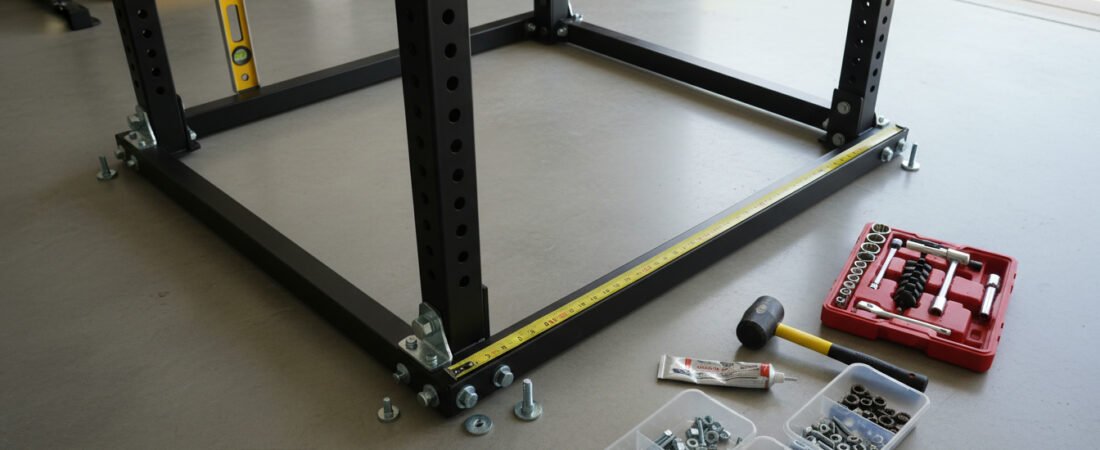
- Socket set with 15/16-inch (24 mm) sockets for main structural bolts.
- 7/16-inch or 36-mm sockets for secondary hardware.
- 4-foot level for verifying uprights.
- Measuring tape at least 12 feet long (a rigid model like a Stanley FatMax that extends to ~11 feet helps with diagonals).
- Rubber mallet and a step ladder if your rack is taller than 7 feet.
Apply a very thin layer of anti-seize lubricant to bolt threads before assembly to prevent corrosion from locking bolts in place while still allowing future adjustments; too much can actually reduce bolt tension.
Environment and Floor Conditions
Temperature and humidity affect assembly more than most people talk about. If you assemble in a cold garage and move the rack to a warmer space, bolt tension can increase by 8–12% as the metal expands, potentially compressing washers or stripping threads over time.
- Reassess bolt tightness 24–48 hours after the rack reaches its final temperature environment.
- Expect your concrete floor not to be perfectly flat, and be ready with thin shims or adhesive rubber pads to stabilize any lifting corners.
If you’re still deciding which rack configuration fits your space and training style, this breakdown of power rack types and use cases helps you avoid buying something that’s harder to assemble or stabilize than necessary.
Understanding What You’re Actually Building
A power rack consists of four vertical uprights connected by horizontal crossmembers at the base and top, forming a rectangular prism in which all angles must be exactly 90 degrees and all corresponding measurements must match within about 1/4 inch. This sounds straightforward until you consider that metal components have manufacturing tolerances, bolt holes aren’t always perfectly aligned, and your floor almost certainly isn’t as flat as you think.
These three variables interact during assembly to create the difference between a solid rack and one that wobbles under load.
The frame needs to distribute hundreds of pounds of asymmetrical loading without deflection, twisting, or tipping. That precision starts during assembly, not after.
Power racks are engineered to withstand significant asymmetric loading and are typically evaluated against recognized safety benchmarks such as the EN 957 fitness equipment standard, which governs structural integrity and load behavior for stationary strength equipment.
Proper assembly directly affects power rack weight capacity, because even a small alignment error changes how load is distributed through the frame under heavy lifts.
Every power rack works on the same basic principle regardless of brand.
You’re connecting a base frame, attaching vertical uprights, securing upper crossmembers, and then squaring the entire structure before final tightening. The challenge isn’t the concept; it’s the execution details that manufacturers gloss over in their manuals.
Assembly happens in stages, not all at once. You cannot tighten bolts as you go.
You must hand-tighten everything first, verify squaring, then systematically tighten in sequence.
Skipping this creates problems that need to be finished disassembling to fix. I’ve seen people three hours into assembly realize their rack is 3/4 inch out of square and have to start over because they fully tightened the base before checking measurements.
The biggest mistake people make is treating this like assembling a bookshelf. With furniture, you can eyeball alignment, and things still work fine.
With a power rack, being off by half an inch creates binding J-hooks, uneven loading patterns, and reduced structural capacity.
The difference matters when you’re under 300 pounds during a failed squat rep.
How to Assemble a Power Rack: The Five Critical Phases
Phase One: Base Frame Construction
Lay out your base crossmembers on the floor exactly where the rack will sit. Connect them with hand-tight bolts only, so you can still move components with moderate effort.
Use your level to verify that the floor itself is reasonably flat.
If you’re seeing more than 1/4 inch variation across the base footprint, you’ll need shims later.
The mistake here is tightening the base fully before the uprights attach. This locks in whatever alignment you have, which is almost never perfect.
Keep everything loose enough to adjust.
I recommend hand-tightening each bolt until there’s about 1/4 inch of thread visible past the nut. This gives you enough hold so parts won’t shift, but enough play so you can still make adjustments.
Verify that the base frame is actually rectangular by measuring both diagonals. They should match within 1/8 inch at this stage.
If they don’t, loosen everything and adjust until they do.
Fixing this now takes two minutes. Fixing it after the uprights are attached takes an hour.
Phase Two: Upright Installation
This is where solo assembly gets really challenging. Each upright weighs 40-60 pounds and needs to be held perfectly vertical while you align bolt holes and thread hardware.
If you’re working alone, you need creative solutions like cardboard boxes stacked to the right height, or a second person’s help for just this 15-minute window.
The technique that works best is to position the upright at a slight angle, align the bottom bolts first, then use one hand to hold the upright steady while the other hand threads the bolts. Don’t worry about getting them tight; just get them started enough that the upright won’t fall.
Once the bottom two bolts are threaded, the upright becomes stable enough to let go briefly while you grab the next bolt.
Bolt holes rarely align perfectly on the first try. This is completely normal and happens even with premium racks from Rogue or Rep Fitness.
Do not force it.
If a bolt won’t thread easily with finger pressure, something is misaligned. Back off, slightly adjust the upright position, and try again. Cross-threading happens when you try to force misaligned holes, and it accounts for about 30% of all assembly damage I’ve seen. Once threads are stripped, you’re dealing with a warranty claim and weeks of delay.
Here’s a specific technique that helps: when aligning bolt holes, look straight down through the hole in the upright to the hole in the base. You can see when they’re close to aligned. Make tiny adjustments until you can see through both holes clearly, then thread the bolt from the top down.
This takes an extra 30 seconds per bolt but prevents almost all cross-threading issues.
Phase Three: Upper Crossmember Attachment
You’re now working overhead with components that weigh 30-50 pounds. Ladder safety matters here.
Three points of contact always, and never reach beyond your center of gravity.
If you’re stretching to align a bolt hole, reposition the ladder. I know this sounds obvious, but I’ve personally watched someone fall off a ladder because they were trying to save 20 seconds by not repositioning.
The crossmembers often include the pull-up bar or top cross-beams. These need to be level, which you can only verify after they’re attached. But if your uprights aren’t perfectly vertical, the crossmember won’t be level even if everything is tightened correctly.
This is why the squaring step comes next and why you can’t skip it.
When lifting crossmembers into position, use your legs and keep your back straight. Hold the crossmember close to your body as you climb the ladder.
Once you’re at the right height, rest one end on top of an upright while you align and thread the first bolt.
This gives you a stable platform to work from, rather than trying to hold 40 pounds with one hand while threading bolts with the other.
Phase Four: Squaring the Structure
This is the step that separates racks that work from racks that fail under load. Measure diagonally from corner to corner on both diagonals.
If the measurements match within 1/4 inch, you’re square.
If they don’t, you need to adjust.
The adjustment process involves loosening all bolts slightly, then physically pushing or pulling the frame until diagonal measurements equalize. This sounds crude, but it’s exactly how professional installers do it.
You’re not damaging anything by applying reasonable force to shift the frame.
The bolts are loose enough to allow movement.
Here’s the advanced technique almost nobody knows about: measure from the exact center point of your rack to each corner. This catches asymmetrical warping that a simple diagonal-only measurement misses.
The center-to-corner distances should all match within about 1/8 inch.
If they don’t, your rack has subtle warping that will show up as binding J-hooks or uneven loading.
Finding the center point takes 30 seconds. Measure the width and depth of your rack, divide each by two, and mark that spot on the floor with tape.
Now measure from that center point to each of the four base corners.
Write down all four measurements. If one corner is noticeably farther or closer than the others, you’ve found your problem area.
To fix asymmetrical warping, you need to push or pull the specific corner that’s out of alignment. If one corner measures 1/2 inch longer than the others, push that corner toward the center while someone else checks measurements.
Make small adjustments and re-measure after each one.
This is tedious work, but it matters tremendously for long-term performance.
How Do I Know if My Power Rack is Square?
Rack Squareness Verification
Pick one option below. You do not need to do both.
Choose your check
Result
—
Enter measurements to see your status.
Phase Five: Sequential Tightening
Start at the base, work upward, and alternate sides. First pass brings bolts to snug where gaps between components close, but bolts aren’t tight.
The second pass brings them to firm with moderate hand pressure on the wrench.
The third pass is the final torque, which should be about 30-40 foot-pounds for most racks.
For reference, the 30–40 foot-pound torque range used for most power rack hardware aligns with common structural fastener torque guidance published in standard bolt torque reference tables used across mechanical and steel-frame assemblies.
The pattern matters because random tightening creates uneven pressure distribution that reduces frame rigidity by 15-25%. You won’t see this visually, but you’ll feel it under heavy load as subtle movement or deflection.
The systematic approach ensures even pressure across all connection points, maximizing structural integrity.
Here’s the specific sequence I use: start with the bottom-left base connection, then the bottom-right, then the top-left, then the top-right. Complete all four corners before moving to any middle connections.
This creates an even pull across the entire frame.
For the second pass, follow the same pattern but apply more torque. For the final pass, the same pattern again with full torque.
What does proper torque feel like? With a 12-inch wrench and moderate forearm pressure, you should feel solid resistance but not strain. If you’re using both hands and your full body weight, you’re definitely over-tightening.
The bolt should feel snug and solid without requiring extreme force.
Use Our Power Rack Bolt Tightening Sequence to Track Your Progress
Power Rack Bolt Tightening Sequence
Follow this order for even frame tension and maximum rack stability.
or press Mark Complete.
Real Installation Example
I watched someone assemble a Rogue RML-390F last month. They're experienced with tools, working solo, and follow the manual exactly.
Total time was 3 hours and 45 minutes.
The first hour was unpacking, organizing hardware, and laying out components. The second hour was base and upright assembly.
The third hour was crossmembers and initial squaring.
The final 45 minutes were re-squaring after discovering 5/8 inch diagonal discrepancy, then sequential tightening.
What made this successful was patience during squaring. The first diagonal measurement was 113.25 inches, and the second was 113.875 inches.
That 5/8-inch difference seems small, but it creates real problems.
They loosened everything, pushed the frame at the top corner, re-measured, adjusted again, and finally got both diagonals to 113.5 inches. The rack has been in use for three weeks now with zero wobble or binding.
The lesson here is that assembly time estimates are wildly optimistic. Plan for at least three hours, even if you're experienced. Plan for four to five hours if this is your first rack.
Rushing leads to mistakes that take longer to fix than just doing it right the first time.
Common Assembly Failures
Over-Tightening Damage
Most people think tighter means safer. The reality is that over-tightening by just 10% creates stress fractures in welds that fail catastrophically weeks later.
You won't see the damage during assembly.
The fractures are microscopic. But under heavy loading, they propagate, and suddenly you have structural failure.
The prevention is understanding what proper torque feels like. If you're using a 12-inch wrench and applying moderate forearm pressure, you're probably in the right range.
If you're using both hands and your full body weight, you're definitely over-tightening.
The goal is to compress the connection fully without stressing the surrounding metal.
I've seen bolts sheared completely off because someone used an impact driver on full power. Impact drivers are convenient for deck screws, but they're terrible for structural assembly because they deliver sudden shock loads that exceed proper torque by 200-300%.
Use hand tools for final tightening.
Power tools are fine for initial threading, but switch to manual for the final passes.
Skipping the Squaring Step
About 40% of DIY assemblers skip proper squaring verification. They eyeball it, decide it looks straight, and move on.
Then they load the rack and learn J-hooks bind at certain heights, or the safety bars don't slide smoothly, or there's a subtle wobble during heavy squats.
During assembly, you'll install various safety components including J-hooks, safety bars, or strap systems depending on your rack model—understand different safety system types to ensure proper installation.
All of these trace back to the rack being out of square by 1/2 to 3/4 inch.
The fix needs partial disassembly, which nobody wants to do after spending 3-4 hours on initial assembly. Take the extra 10 minutes to measure diagonals properly and adjust as needed. Those 10 minutes save hours of frustration later.
I can't stress this enough: every single wobble or binding problem I've diagnosed has come back to improper squaring during assembly.
Ignoring Floor Conditions
Your garage floor isn't flat. Commercial gym floors aren't flat either.
Concrete settles unevenly, develops low spots, and rarely maintains a consistent level across an 8-foot span.
If you assemble a perfectly square rack on an uneven floor, the rack will wobble because one corner doesn't contact the ground.
The solution is shims. Place thin shims under whichever corner lifts off the ground when you rock the rack.
Keep adding shims until all four corners maintain firm contact and the rack doesn't wobble under firm pushing pressure.
Some installers use adhesive rubber pads, which work well and protect the floor from scratches.
Test for wobble by pushing hard on one corner while watching the opposite corner. If that opposite corner lifts even slightly, you need shims.
Keep testing and adjusting until all four corners stay planted regardless of where you push.
This might take 10-15 minutes of testing and adjusting, but it's worth it for a stable rack.
Adapting for Different Rack Types
Folding Racks
Wall-mounted folding racks add complexity because you have to address structural anchoring before assembly. You need to locate wall studs, drill precise holes, and confirm the mounting bracket is perfectly level before you ever attach the rack components.
The rack itself still needs squaring verification, even though it's wall-mounted.
The critical difference is that wall studs decide your spacing, not the rack design. If your studs don't align with the rack's mounting hole spacing, you need to add blocking between studs or use a mounting board that spans many studs.
Never mount to drywall alone, regardless of anchor type.
Drywall anchors are rated for static loads like picture frames, not dynamic loads like failed squat reps.
I prefer mounting a 3/4 inch plywood backer board across at least three studs, then mounting the rack to the plywood. This distributes force across a larger area and gives you flexibility in positioning.
Paint the plywood the same color as your wall, and it looks professional while providing superior strength.
Free-Standing vs. Bolted
Free-standing racks need at least 350 pounds of mass to resist tipping during dynamic movements. If your rack weighs less, either bolt it down or add weight by attaching plate storage to the base.
The physics here are straightforward: the center of gravity must remain within the footprint under any loading scenario.
Bolting down increases effective capacity by 10-15% by preventing micro-movements that accumulate over time. Those micro-movements stress welds and bolts in ways that free-standing racks don't.
Commercial facilities almost always bolt down for this reason, as well as liability concerns.
If you're bolting to concrete, use proper concrete anchors rated for the load. Tapcon screws work for light-duty applications, but I prefer wedge anchors or sleeve anchors for anything holding more than 500 pounds.
Drill holes to the exact depth specified, clean out all concrete dust with a shop vac, and tighten anchors to manufacturer specifications.
Building Toward Long-Term Success
Understanding assembly builds a foundation for everything else. When you know how the structure goes together, you understand why certain attachments fit where they do, why hole spacing matters for exercise variety, and why some modifications work while others compromise structural integrity.
Assembly quality directly correlates with equipment longevity. A rack assembled with attention to squaring, proper torque, and systematic tightening will last decades with minimal maintenance.
A rack thrown together in a rushed afternoon will develop problems within months.
Those problems manifest as loose bolts, binding attachments, uneven wear on the powder coating, and eventually structural issues.
This knowledge transfers to evaluating used equipment, too. When you look at a used rack, you can spot assembly errors by checking diagonal measurements, testing for wobble, and examining bolt conditions.
You'll notice when J-hooks bind at certain heights, indicating the rack was never properly squared. You can make informed decisions about whether used equipment is worth purchasing or if you're inheriting someone else's assembly mistakes.
The first week after assembly is critical. Check all bolts after the first workout.
Check them again after three days.
Check them again after a week. Hardware settles during initial use as micro-movements compress the washers and fully seat the bolts.
This settling is normal and expected. After the first week, quarterly checks are sufficient unless you notice any changes in how the rack feels.
Frequently Asked Questions
How long does it take to assemble a power rack by yourself?
Plan for 3-4 hours working solo if you're experienced with tools and mechanical assembly. First-time assemblers should budget 4-5 hours.
The manufacturer's estimate of 60-90 minutes assumes two people working together who've assembled racks before, which doesn't match most home gym situations.
Can you assemble a power rack without help?
Yes, but the upright installation phase is significantly harder alone. Each upright weighs 40-60 pounds and needs to be held vertically while threading bolts.
Use cardboard boxes or sawhorses as temporary supports, or ask someone to help for just that 15-minute window.
The rest of the assembly can be done solo without major difficulty.
Do I need to bolt my power rack to the floor?
Free-standing racks work fine if they weigh at least 350 pounds total, including stored weight plates. Lighter racks should be bolted down for safety.
Bolting also increases effective capacity by 10-15% and prevents micro-movements that stress welds over time.
Commercial facilities almost always bolt down regardless of rack weight.
What tools do I actually need to assemble a power rack?
You need a socket set with 15/16-inch and 7/16-inch sockets, a 4-foot level, a measuring tape at least 12 feet long, a rubber mallet, and a ladder if your rack is taller than 7 feet. The tools included with most racks are inadequate.
Don't use power tools for final tightening; they over-torque bolts and damage threads.
How do you know if a power rack is properly squared?
Measure both diagonals from corner to corner. They should match within 1/4 inch.
Also, measure from the center point to each corner; those distances should match within 1/8 inch.
If measurements are off, loosen all bolts, physically adjust the frame by pushing or pulling, and re-measure until all dimensions are fixed.
Why do my J-hooks bind at certain heights?
Binding J-hooks almost always show that the rack is out of square. Even 1/2 inch of misalignment creates enough deflection that attachments don't slide smoothly.
You'll need to partially disassemble, verify squaring with diagonal measurements, adjust the frame, and retighten everything properly.
How tight should power rack bolts be?
Use moderate forearm pressure on a 12-inch wrench. You should feel solid resistance but not strain. If you're using both hands and full body weight, you're over-tightening.
Proper torque is typically 30-40 foot-pounds for main structural bolts, which feels firm but not extreme.
What causes a power rack to wobble after assembly?
Wobble comes from either improper squaring during assembly or uneven floor contact. Check diagonal measurements first; if they're off, the rack needs adjustment.
If measurements are fixed, test each corner for floor contact and add shims under any corner that lifts when you rock the rack.
How do you fix an uneven floor for power rack installation?
Place thin shims under whichever corners lift off the ground when you push on the opposite corner.
Keep testing and adding shims until all four corners maintain solid contact regardless of where you apply pressure.
Adhesive rubber pads work well and also protect the floor from scratches.
Should you use thread locker on power rack bolts?
No, use anti-seize lubricant instead. Thread locker prevents future disassembly and isn't necessary if bolts are properly torqued.
Anti-seize prevents corrosion from locking threads together over time while still allowing adjustments or disassembly when needed.
Key Takeaways
Assembly time averages 3-4 hours for experienced DIYers, not the 60-90 minutes manufacturers claim. Plan accordingly and don't rush the process.
Squaring the rack is non-negotiable and needs actual measurement with both diagonals matching within 1/4 inch. Visual estimation doesn't work.
Hand-tighten everything first, verify squaring, then systematically tighten in sequence from base to top, alternating sides for even pressure distribution.
Over-tightening causes more long-term damage than under-tightening because it creates invisible stress fractures in welds that fail catastrophically under load.
Re-check bolt tightness after the first week of use as hardware settles during initial training sessions, then quarterly thereafter.
Floor conditions affect stability more than rack assembly quality in many cases; shimming uneven corners prevents wobble that continues despite perfect assembly.
Solo assembly is possible but takes 25-50% longer than two-person assembly, with upright installation being the most challenging solo phase.
Temperature changes between assembly location and final location affect bolt tension by 8-12%, requiring re-verification 24-48 hours after the rack reaches operating temperature.