This article contains affiliate links to products we’ve researched and recommend. If you purchase through our links, we may earn a small commission at no extra cost to you. This helps us create free content like this guide. We only recommend equipment we believe provides genuine value. Read our full disclosure policy
Home Gym Power Rack Guide Introduction
I still remember the moment my budget squat stand tipped forward during heavy pull-ups. The bar didn’t fall, I wasn’t hurt, but that split-second of instability changed everything. Within a week, I’d spent three months’ worth of research on home gym racks compiled into a single weekend, ordered my first proper power rack, and transformed my garage into a legitimate training facility.
That was four years ago. Since then, I’ve helped dozens of friends navigate this same decision, and I’ve learned something critical: most buying guides either push you toward the most expensive option or assume you’re training for a powerlifting meet. The reality? Most of us just want to lift heavy, stay safe doing it alone, and avoid buying a massive piece of equipment we regret six months later.
The North American home gym power racks market in 2024 was 286.08 million USD, recognizing what veteran lifters have known for decades: this single piece of equipment transforms basements, garages, and spare rooms into complete strength training facilities. But here’s what most buyers don’t realize until after purchase: the difference between a $400 rack and a $1,200 rack isn’t just price.
It’s the steel gauge that determines whether uprights flex during heavy squats. It’s the hole spacing that makes bench press positioning comfortable or awkward every single session. It’s the safety system that either protects your expensive barbell or damages it with every failed rep.
These specifications directly impact your training experience for the next 10-20 years—because that’s genuinely the timeline we’re talking about. A quality rack, even a budget one, should last a decade minimum with proper care.
This guide cuts through marketing claims to explain what actually matters. I’m not talking about which rack has the highest weight capacity on paper. I’m talking about understanding what you’ll genuinely use, what your space can realistically accommodate, and where your money creates the most value versus where you’re just buying specs that look impressive in a product description.
If you want the decision process in a simple checklist format, start with our step-by-step power rack selection framework.
What Is a Home Gym Power Rack and Which Should You Buy?
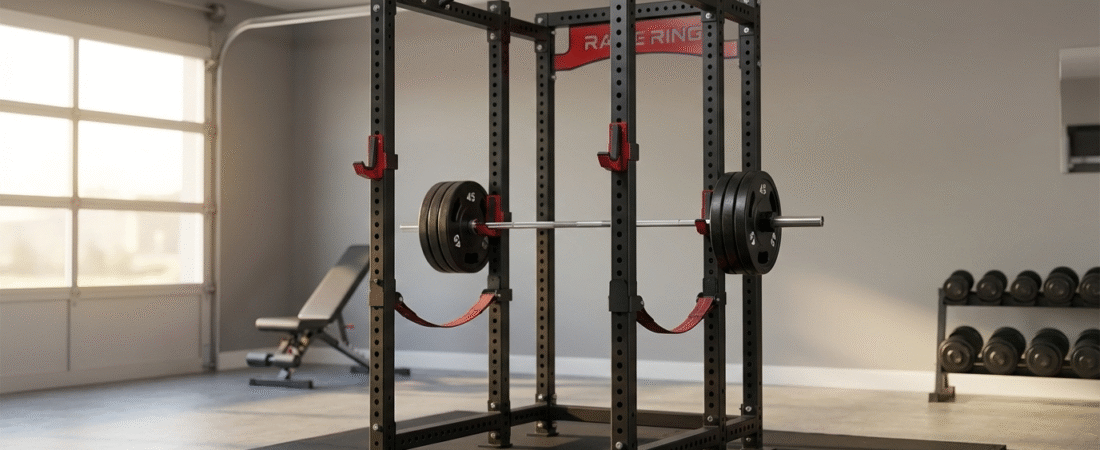
What it is: A home gym power rack is a four-post steel cage structure (48″W x 48″D x 84-90″H) designed for safe solo barbell training. It provides adjustable safety bars that catch failed lifts, J-hooks for racking weights, and pull-up bars for upper body work.
Who needs one: Anyone serious about home strength training who squats, bench presses, or overhead presses regularly without a spotter.
What to buy:
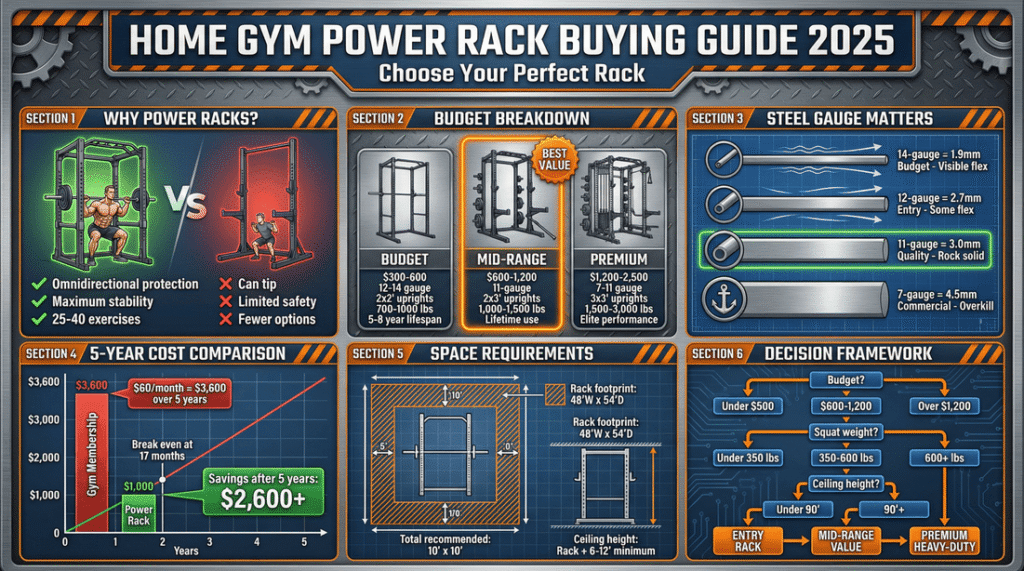
- Beginners (squatting under 275 lbs): $400-$600 budget racks with 12-gauge steel
- Intermediate lifters (squatting 275-400 lbs): $600-$1,200 mid-range racks with 11-gauge steel (best value)
- Advanced lifters (squatting 400+ lbs): $1,200+ premium racks with 7-11 gauge steel
Top 3 recommendations:
- Rep Fitness PR-4000 ($800) – Best value, 11-gauge, lifetime warranty
- Titan T-3 Series ($650) – Budget-friendly, Rogue-compatible attachments
- Rogue RML-390F ($1,100) – Premium quality, folding option available
Critical specs: Look for 11-gauge steel minimum, 2×3″ or 3×3″ uprights, 1,000+ lb capacity, Westside hole spacing in bench zone, and UHMW-lined J-hooks.
Complete buying guide, space requirements, and installation details below.
In this guide:
What Makes Home Gym Power Racks Essential (And Worth the Investment)
The Four-Post Safety Advantage That Changes Everything
A home gym power rack distinguishes itself through complete four-post cage construction.. This isn’t marketing speak—it’s the fundamental difference between training conservatively and pushing genuine limits when you’re alone in your garage at 6 AM.
I learned this the hard way. For my first year of home training, I used squat stands, telling myself the money saved justified the compromise. Then one evening, attempting a PR squat after a long workday, my legs gave out at the bottom. The bar came down hard on the safety bars spanning between those four posts. Without them? The bar would have pinned me to the floor.
The four-post structure provides omnidirectional protection. Fail forward, backward, or sideways during squats, and the safeties catch you. This enclosed cage also delivers superior stability compared to two-post designs. When you unrack 400+ pounds and step back, opposing posts prevent forward tipping. During pull-ups, the four-point floor contact eliminates the swaying that plagues less stable equipment.
The Economics Actually Make Sense
Let’s talk money honestly, because this feels like a big purchase upfront.
Budget power racks start around $300. Mid-range options run $600-$1,200. Premium racks reach $2,000-3,000. These numbers feel substantial, especially when commercial gym memberships cost $30-60 monthly.
But run the math over five years:
- $60 monthly membership = $3,600 total (zero equity, gone forever)
- $1,000 power rack breaks even in 17 months, then serves you for decades
My gym membership was costing $75 monthly ($900 yearly) at a facility 20 minutes away. Between drive time and the membership fee, I was spending $1,200 yearly in costs and lost time. My $850 rack investment paid for itself in 11 months. Four years later, it’s saved me over $4,000 while improving my training consistency because I can work out at 6 AM or 10 PM without leaving home.
Add the value of training anytime without commute, never waiting for equipment, and complete control over your environment, and the economics become compelling.
One Piece of Equipment, 30+ Exercises
A quality power rack accommodates 25-40 different exercises within its footprint. This versatility explains why experienced lifters consistently rank power racks as their single most valuable equipment purchase.
Core movements include:
- Back squats (high bar, low bar, pause variations)
- Front squats and safety bar squats
- Bench press (flat and incline with adjustable bench)
- Overhead press (standing and seated)
- Pull-ups (multiple grip positions)
- Barbell rows from various heights
- Rack pulls and partial deadlifts
Beyond basic barbell work, racks support band training, inverted rows, and with common attachments, lat pulldowns, dips, and landmine exercises.
Compare that to single-purpose equipment. A leg press machine performs one movement and costs $1,000-2,000. A power rack performs 30+ movements for similar investment, while supporting progressive overload indefinitely through simple weight plate additions.
Understanding Power Rack Construction (What Actually Matters)
Steel Gauge: The Specification That Determines Everything
Steel gauge measures the wall thickness of the tubing forming your rack’s uprights. This specification directly impacts strength, rigidity, and longevity, yet it’s frequently misunderstood because of the counterintuitive numbering system.
Lower gauge numbers mean thicker steel:
- 14-gauge: ~1.9mm thick (budget racks, too thin)
- 12-gauge: ~2.7mm thick (acceptable entry-level)
- 11-gauge: ~3.0mm thick (sweet spot for home use)
- 7-gauge: ~4.5mm thick (commercial grade, overkill)
Why does this matter for your training?
Thicker steel resists flexing under load. When you unrack a heavy squat, thin-walled uprights might bow noticeably. You see it, feel it, and it creates psychological discomfort that affects training intensity.
I upgraded from a 14-gauge rack to an 11-gauge model after two years, and the difference was immediately apparent. The old rack flexed visibly during heavy squats and rattled during pull-ups. The 11-gauge rack stands motionless under identical loading. That stability doesn’t make me stronger, but it lets me focus entirely on the lift rather than equipment concerns.
Steel thickness also determines long-term durability. Rack holes experience thousands of pin insertions over years of use. Thin steel around holes gradually elongates, creating sloppy fit and reduced safety reliability. Thicker steel maintains hole integrity indefinitely.
The 11-gauge standard exists because it hits the sweet spot between being heavy enough to feel completely solid and light enough that you can actually move the rack if needed. Going thicker becomes overkill for home use. Going thinner means you’re compromising on the one purchase you really don’t want to replace in five years.
Post Dimensions and What They Mean for You
Upright cross-sectional size combines with steel gauge to determine overall strength. Common dimensions include:
- 2×2″ uprights: Adequate for beginners only (squats under 300 lbs)
- 2×3″ uprights: Excellent for serious home training (squats up to 600+ lbs)
- 3×3″ uprights: Commercial-grade, optimal for heavy lifters
The 2×3″ dimension has emerged as the sweet spot for home racks. It provides more than adequate strength for heavy training while maintaining manageable weight for assembly. This dimension also enjoys broad third-party accessory compatibility, giving you extensive expansion options.
The 3×3″ standard has become dominant in premium racks because it balances strength with manageable weight and cost. Some budget racks use 2×2″ posts to save on materials, which works functionally but limits attachment options and feels noticeably less stable under heavy loading.
Weight Capacity: Look Beyond the Number
Weight capacity gets discussed constantly, but it’s really a proxy for construction quality rather than a practical limitation for most people.
A rack rated for 1,000 pounds isn’t necessarily stronger than one rated for 700 pounds—it just means the manufacturer tested it differently or used different safety margins in their rating.
What actually matters is whether the rack feels stable when you’re using it. A rack with 3×3″ uprights made from 11-gauge steel will feel solid regardless of the official weight rating. A rack with 2×2″ uprights made from 14-gauge steel will feel wobbly even if it’s technically rated for 500 pounds.
Trust the construction specs more than the capacity number.
Weight capacity ratings vary wildly between manufacturers with no universal testing standard. For an in-depth analysis of what power rack weight capacity numbers actually mean and how to verify them, see our complete safety guide.
For practical purposes, any rack rated above 700 pounds will handle what most home gym users throw at it. Unless you’re regularly squatting over 400 pounds, you’re not stressing the rack anywhere near its limits. Even then, proper racks have safety margins built in.
However, manufacturers advertise static capacity (weight sitting motionless), but training creates dynamic forces. Unracking a 400-pound squat generates 600-800 pounds of impact force. A failed bench press dropped from six inches creates 2-3x the bar’s static weight.
Select racks with capacity ratings 2-3x your heaviest working weights. If you squat 300 pounds currently, look for 800-1,000+ pound capacity. This safety margin accounts for dynamic loading and provides headroom for strength progression.
The J-Hook Detail That Protects Your $300 Barbell
J-hooks might seem like simple metal brackets, but quality variations significantly impact daily training experience and your barbell’s longevity. You make contact with J-hooks dozens of times per session, thousands of times yearly.
UHMW plastic liners separate metal hooks from metal barbells, preventing the gradual knurling wear that occurs with metal-on-metal contact. Quality racks include these liners standard. Budget racks often omit them, using bare metal hooks that damage bars over time while creating harsh clanging noise with every rack.
I damaged a $300 barbell’s knurling over two years using metal J-hooks on my first rack. The center knurling developed smooth, shiny patches where the bar contacted hooks during thousands of squat and bench press repetitions. UHMW liners cost manufacturers $3-5 per set to include, yet prevent hundreds of dollars in barbell damage.
Good J-hooks also:
- Sit securely in holes without rattling or sliding
- Adjust easily with one hand
- Include flip-down safety lips preventing bar roll-off
Premium hooks use “sandwich” construction where UHMW sits between metal plates, keeping the plastic positioned securely while increasing overall strength.
Matching Rack Types to Your Real Training Space
Full-Size Power Racks: Maximum Versatility
Full-size home gym power racks make sense when you have a dedicated gym space, and you’re serious about barbell training long-term. The four-post design creates a complete cage where you’re surrounded by safety. You can fail a squat in any direction and the rack catches it.
Footprint requirements:
- Width: 48-49″ typically
- Depth: 48-54″ typically
- Height: 84-90″ typically
- Total space needed: 10′ x 10′ for comfortable training
- Ceiling clearance: 96″+ minimum (102-108″ ideal for overhead work)
What really sells me on full racks is the versatility:
- Bench inside the rack with safeties set properly
- Rack pulls at any height
- Band pegs for accommodating resistance
- Landmine installation for rotational work
- Maximum attachment compatibility
In a basement with 8-foot ceilings, you’re fine. In a garage with low areas or ductwork, you might be compromising. My garage has 93″ clearance to the door track. A standard 90″ rack left just 3″ for pull-ups, which proved impossibly tight. I selected an 82″ “shorty” rack instead, providing adequate 11″ clearance for my 6′ height.
Half Racks: The Space-Efficient Compromise
Half racks sacrifice some versatility for smaller footprint and lower cost. You get two uprights instead of four, usually with pull-up bars connecting them at the top. You can still squat and bench safely with spotter arms or safeties that extend forward from the uprights.
The real advantage is space efficiency:
- Typically need 3-4 feet of depth instead of 4-5 feet
- Can position against the wall
- Leaves room to walk around comfortably
In a garage where you need to park a car, that difference is massive.
The downside is attachment limitations. Half racks accept fewer add-ons because there’s less structure to attach things to. For pure barbell training, that limitation doesn’t matter. If you want exercise variety beyond the barbell (cable systems, lat pulldowns), it becomes restrictive.
Foldable Racks: Extreme Space Optimization
Foldable racks represent the most extreme space compromise. They mount to the wall and fold up when not in use, leaving just a few inches of protrusion.
For shared spaces where your home gym competes with parking, storage, or living area, they’re genuinely brilliant solutions.
The catch is cost and installation complexity:
- Foldable racks cost $200-400 more than equivalent fixed racks
- Require proper anchoring to wall studs or concrete
- Need drilling into walls or building custom mounting surface
- More involved upfront installation work
Once installed, they’re solid and functional. I’ve trained on all three types, and honestly, the best choice depends entirely on your space constraints. If you have the room, a full rack opens more doors. If space is tight, a half rack or foldable model still lets you do 90% of what matters without dominating your available area.
Choosing Your Power Rack by Budget (With Real Recommendations)
Entry-Level Options: $300-$600
Budget home gym power racks serve beginners establishing first training spaces, casual lifters training 2-3 times weekly, or those who need functional equipment now with plans to upgrade later.
Typical specifications:
- 12-14 gauge steel (acceptable but not ideal)
- 2×2″ or 2×3″ uprights
- 700-1,000 lb capacity
- Basic J-hooks (often no UHMW liners)
- Pin-and-pipe safeties
- Standard 2″ hole spacing
Best budget options:
- Fitness Reality 810XLT (~$300): Ultra-affordable entry point, good for beginners under 250 lb squats
- Titan T-2 Series ($400-500): Better construction than price suggests, 12-gauge steel
- Rep PR-1100 ($450-550): Quality budget option with upgrade path
I started with a Titan T-2, and it served me well for the first 18 months. The 12-gauge steel handled my novice squats (maxing around 275 lbs) without issues. However, as my squat approached 350 pounds, I noticed upright flex during heavier sets. The rack remained safe, but the visible movement became psychologically distracting.
Expected limitations:
- Noticeable flex during heavy lifts (350+ lb squats)
- Basic J-hooks may damage your barbell over time
- Powder coating chips more easily
- Limited premium accessory compatibility
- May require periodic bolt retightening
The expensive mistake I see people make is buying at this extreme without understanding what they’re getting. Spending $300 on a rack with 14-gauge steel and 2×2″ posts saves money upfront but creates a worse training experience that might make you regret the purchase within 2-3 years.
Budget racks typically serve 5-8 years before users outgrow them or desire upgrades. That represents excellent value if you’re uncertain about long-term training commitment or genuinely budget-constrained.
Mid-Range Sweet Spot: $600-$1,200 (Where Most Should Land)
This category delivers the best value for serious lifters. Mid-range home gym power racks provide 90% of premium rack performance at roughly half the cost, making them the optimal choice for committed home gym owners.
Typical specifications:
- 11-gauge steel construction (the sweet spot)
- 2×3″ or 3×3″ uprights
- 1,000-1,500 lb weight capacity
- Westside spacing in bench press zone (1″ holes for precise positioning)
- UHMW-lined J-hooks standard
- Choice of pin-and-pipe or strap safeties
- Multi-grip pull-up bar
- Broad third-party accessory compatibility
Best mid-range racks:
- Rep Fitness PR-4000 ($700-1,000): Exceptional quality-to-price ratio, what I personally use
- Titan T-3/X-3 ($600-800): Rogue Monster Lite compatible at lower cost
- Rogue RML-390F ($900-1,200): Premium quality with folding capability
- Fringe Sport Garage Series ($650-900): Excellent value with lifetime warranty
After outgrowing my budget rack, I invested in a Rep PR-4000. The improvement was substantial and immediate:
- 11-gauge 3×3″ uprights remain completely rigid under any load I can generate
- Westside spacing means my bench press positioning is perfect every session
- Strap safeties operate silently compared to my old metal safeties
These racks support:
- Intermediate to advanced lifters (squats 300-600+ lbs)
- Daily training at high intensity
- Extensive accessory additions over time
- Multiple users with different heights and needs
Most importantly, quality mid-range racks provide lifetime service. Manufacturers commonly offer lifetime warranties on frame components, backing exceptional durability. Unless you’re an elite powerlifter moving 700+ pound squats or opening a commercial facility, mid-range racks meet and exceed your training needs permanently.
Premium Territory: $1,200-$2,500 (Diminishing Returns)
Premium power racks target elite lifters, those wanting absolute best regardless of cost, or buyers following “buy once, cry once” philosophy. The performance difference versus mid-range options proves incremental rather than transformative.
Premium specifications:
- 7-11 gauge steel
- 3×3″ uprights standard
- 1,500-3,000 lb capacities
- Extensive Westside spacing throughout
- Premium sandwich or roller J-hooks
- Multiple safety options included
- Laser-cut precision throughout
Top premium options:
- Rogue Monster Series ($1,500-2,500): Industry-leading quality and ecosystem
- Rep Fitness PR-5000/Ares ($1,200-1,800): Commercial-grade home options
- Sorinex ($2,500+): Boutique manufacturer with custom options
Premium racks justify their cost through:
- Subjectively superior feel (rock-solid with zero flex)
- Whisper-quiet operation from tight tolerances
- Extensive attachment compatibility
- Customization options (colors, branding, special features)
- Highest resale values
But honestly? For home training, these advantages matter less than you might think.
I’ve trained on friends’ Rogue Monster racks and my Rep PR-4000. Yes, the Monster rack feels slightly more solid. But did that translate to better training? Not measurably. Both racks handle everything I throw at them without limitation. The $800 price difference bought my adjustable bench, competition plates, and quality barbell instead.
Consider premium racks if:
- You’re an elite powerlifter (600+ lb squats)
- You want the absolute best available
- Budget isn’t a constraint
- You plan extensive accessory additions
- Resale value matters (Rogue equipment holds value exceptionally)
Spending $2,000 on a premium rack when you’re a beginner with a 185-pound squat is buying capabilities you won’t use for years. That money delivers more training value invested in coaching, programming, or additional equipment.
The capacity difference between budget and premium racks often comes down to steel gauge and weld quality. Learn how steel thickness affects real-world power rack capacity in our detailed analysis.
Critical Features That Impact Your Daily Training
Safety Systems: Your Confidence When Training Alone
Safety systems represent your rack’s core value proposition for solo training. This is the non-negotiable baseline function that separates a power rack from cheaper options like squat stands.
Understanding capacity limits is essential for safety. Our power rack weight capacity guide covers warning signs of overload and when to upgrade.
Pin-and-Pipe Safeties
Steel bars sliding through opposing upright holes, locked in position with pins.
Advantages:
- Foolproof, zero-maintenance protection
- Cannot slip or fail unless entire rack fails
- Included with most racks standard
- Simple, reliable design
Disadvantages:
- Loud when catching dropped bars (neighbors will know)
- Gradually damage barbell knurling from metal-on-metal contact
- Create dents in cheaper bars over repeated use
They’re the budget option that’s totally functional if you don’t mind the noise and occasional bar damage.
Strap Safeties
Industrial webbing suspended between metal brackets.
Advantages:
- Catch bars quietly (apartment-friendly)
- Protect barbell knurling better
- Adjust quickly between exercises
- Take up less space than pins
Disadvantages:
- Require periodic inspection for wear
- Need replacement after years of heavy use (every 5-10 years)
- Cost $80-150 as add-on
I use strap safeties for bench press (quiet, gentle on my competition bar) and pin-and-pipe for squats (maximum confidence). Different exercises benefit from different safety approaches.
Flip-Down Safeties
Metal arms with protective coatings that flip down when needed and flip up out of the way when you don’t need them.
Advantages:
- Durable and quiet
- Convenient for quick adjustments
- Professional look and feel
Disadvantages:
- Most expensive option ($150-250)
- Only available on higher-end racks
- Slightly more complex mechanism
Proper safety positioning:
- Squats: Safeties 2-3″ below your lowest squat depth
- Bench press: Safeties 1-2″ above your chest when bar touches
- Overhead press: Safeties at shoulder height (standing) or chin height (seated)
Test safety positioning with empty bars before loading heavy weights. This simple step prevents the horrible realization mid-set that your safeties sit too low (offering no protection) or too high (blocking your full range of motion).
Westside Spacing: The Feature You’ll Use Every Single Session
Westside hole spacing refers to 1″ spacing in specific zones rather than standard 2″ spacing throughout. This seemingly minor detail dramatically improves bench press comfort and positioning.
With 2″ spacing, you’re forced to choose between a position that’s “almost right but too low” and another that’s “almost right but too high.” Neither feels optimal. That 2″ difference changes shoulder angle by 15-20 degrees, altering bar path and muscle engagement.
Westside spacing (named after Westside Barbell gym) provides 1″ holes in the bench press zone, typically 24-48″ from the floor. This lets you find your perfect starting position regardless of torso length, bench thickness, or arm length.
I thought Westside spacing was marketing hype until experiencing it. Now I can’t imagine benching without it. The ability to position J-hooks precisely for my anatomy rather than compromising makes every bench session feel right from the first warm-up set.
Quality mid-range racks include Westside spacing standard. Budget racks often omit it to reduce manufacturing costs (more holes = more drilling = higher expense). This feature alone justifies spending $100-200 extra for mid-range racks over basic budget options.
Pull-Up Bar Configuration (If You Actually Do Pull-Ups)
Pull-up bar configuration matters if you regularly perform pull-ups, chin-ups, or hanging core work. Some racks have straight bars, some have multiple grip widths, some have angled sections for neutral grip.
I’ve found that having at least two grip width options makes pull-ups much more sustainable long-term because you can vary hand position to manage shoulder stress. A single straight bar gets uncomfortable after months of regular use, potentially leading to overuse injuries.
Look for:
- Multiple grip width options (narrow, medium, wide)
- Neutral grip handles if you have shoulder issues
- Fat grips or standard diameter (personal preference)
- Adequate height for your body (taller lifters need more clearance)
Planning Your Space with Brutal Honesty
The Measurements Nobody Tells You About
Measuring your space accurately is weirdly difficult because you need to account for things that aren’t obvious until you try to use the equipment.
The rack itself might fit in your available floor space, but:
- Can you load plates onto the barbell comfortably?
- Can you walk around the rack to change attachments?
- Is there enough clearance to safely fail a lift without hitting walls?
- Where does the barbell travel during overhead press?
I recommend mapping out your space with painter’s tape on the floor before ordering anything. Use the manufacturer’s dimensions to outline exactly where the rack will sit, then physically walk through your training movements.
Set up an imaginary barbell (or use a PVC pipe) and go through:
- Your squat setup and walkout
- Your bench press approach
- Your deadlift starting position
- Plate loading from both sides
- Walking around equipment
You’ll quickly learn whether the theoretical floor space actually works for practical training.
Space Requirements Beyond the Footprint
Minimum space recommendations:
- Front clearance: 4-6 feet for squat walkouts and plate loading
- Rear clearance: 3-4 feet for deadlifts and equipment storage
- Side clearance: 2-3 feet each side for plate loading
- Overhead clearance: Rack height plus 6-12″ minimum for pull-ups
Total recommended footprint: 10′ x 10′ floor space for comfortable training. You can squeeze into 8′ x 8′ if necessary, but the extra room dramatically improves training experience.
You can’t do overhead presses inside the rack with a standard barbell because you need roughly 8 feet of clearance for a 7-foot bar being pressed overhead. Some manufacturers offer shorter rack versions specifically for low-ceiling installations. These work perfectly well for squats and bench press but eliminate pull-ups as an option.
Ceiling Height: Measure to the LOWEST Obstacle
Ceiling height creates limitations that aren’t fixable after purchase. Measure from your floor to the lowest overhead obstacle—not average ceiling height.
That single light fixture, ductwork run, or garage door track determines your actual clearance. Add 6-12″ to your desired rack height for realistic requirements.
If you have 8-foot (96″) ceilings:
- 84″ rack = 12″ clearance (tight but workable for most people under 6′)
- 90″ rack = 6″ clearance (too tight for comfortable pull-ups)
Lower ceilings need either a short rack designed for restricted spaces or positioning the rack where ceiling height is greatest.
Floor Protection Is Mandatory
Floor protection matters regardless of your floor type.
Concrete floors:
- Can handle weight and impact structurally
- Rubber matting still recommended for noise reduction
- Protects equipment from abrasive concrete surface
- 3/8″ to 1/2″ thick rubber mats work well
Wood floors:
- Absolutely need rubber mats
- Use 3/4″ thick horse stall mats minimum
- Distribute weight over larger area
- Absorb impact from dropped weights
Even concrete basement floors benefit from matting if you want to reduce noise transmission to living spaces above. Horse stall mats from farm supply stores cost $40-50 per 4’x6′ mat and are essentially indestructible.
Doorway Dimensions (The Forgotten Measurement)
Doorway dimensions matter if you’re installing in a basement or interior room. Racks ship partially disassembled, but uprights are still 7-8 feet long.
You need to physically get them through:
- Doorways (standard 32-36″ wide)
- Stairways (watch for turns and railings)
- Basement bulkhead doors
I’ve seen people order racks that couldn’t fit through their basement door, requiring them to either return the equipment (expensive and frustrating) or disassemble it further than the manufacturer intended (risking damage).
Measure twice, order once.
Making the Decision Without Second-Guessing
The Selection Framework That Actually Works
After testing dozens of home gym power racks and helping friends select equipment, I’ve developed a straightforward decision framework that cuts through marketing noise.
Step 1: Define Your Hard Constraints
Start with the non-negotiables:
- Maximum budget (total available, not “ideal”)
- Available space (measured precisely, including overhead)
- Ceiling height (to lowest obstacle)
- Floor type (affects bolting decisions)
- Space sharing (garage that needs to fit car?)
These constraints immediately narrow dozens of options down to a manageable few.
Step 2: Identify Your Training Profile
Be honest about:
- Current max lifts (especially squat, determines capacity needs)
- Training frequency (days per week, intensity level)
- Solo training or partners/family use
- Projected strength goals over next 3-5 years
- Exercise variety needs (pure barbell vs. cables/attachments)
Someone training in a 10×10 garage that also needs to fit a car has completely different needs than someone with a dedicated 400-square-foot basement gym. A beginner squatting 135 pounds needs different features than an intermediate lifter working with 350 pounds regularly.
Step 3: Apply Budget Filters
Budget under $500:
- Focus on Titan T-2, Fitness Reality, Rep PR-1100
- Accept 12-gauge steel as compromise
- Prioritize stability over features
- Plan for potential upgrade in 3-5 years
Budget $600-$1,200:
- Rep PR-4000, Titan T-3/X-3, Rogue RML-390F
- Demand 11-gauge steel minimum
- Require Westside spacing
- Expect lifetime service
Budget over $1,200:
- Rogue Monster, Rep PR-5000, Sorinex
- Premium features and customization
- Best-in-class attachments and ecosystem
- Only if you’re already lifting heavy (400+ squat)
Step 4: Verify Accessory Compatibility
If you plan future additions (lat pulldown, dip station, landmine, etc.), confirm the rack uses standard attachment systems.
The 2×3″ upright with 5/8″ holes has become the de facto standard, offering compatibility with Rogue Monster Lite, Rep PR-4000, and Titan T-3/X-3 accessories from multiple manufacturers.
This open ecosystem provides:
- Maximum choice in attachments
- Competitive pricing from multiple vendors
- Future-proofing as your needs evolve
Avoid proprietary systems that lock you into single-source accessories with limited selection and higher prices.
Common Mistakes That Cost Money and Regret
Mistake 1: Buying Too Small for Your Goals
First-time buyers underestimate strength progression. That rack barely adequate for current 225-pound squats becomes limiting when you’re squatting 350 pounds 18 months later.
Add 2-3x safety margin to current lifts when evaluating capacity. If you squat 250 pounds today, plan for 500-600 pounds in 2-3 years. This isn’t overconfidence—it’s realistic progression for consistent training.
Mistake 2: Ignoring Westside Spacing
Budget racks without Westside spacing save $100 upfront but create bench press positioning compromises forever. That trade-off rarely proves worthwhile for serious lifters who bench press weekly.
The frustration of “too high” or “too low” positioning every single bench session adds up to hundreds of suboptimal workouts over the years.
Mistake 3: Forgetting About Accessories
The base power rack represents just the beginning. Budget an additional $300-800 for accessories you’ll want eventually:
- J-hook upgrades: $60-120
- Safety straps: $80-150
- Band pegs: $20-60
- Dip attachment: $80-200
- Plate storage: $100-300
- Lat pulldown system: $200-600
Buying a $400 rack but discovering later it’s incompatible with the $300 dip station you want creates frustrating limitations. Verify attachment compatibility before purchase.
Mistake 4: Ceiling Height Miscalculation
I made this mistake myself. Ordered an 84″ rack for my garage without accounting for the door track at 88″. The rack technically fit, but pull-ups required bending my knees severely, compromising the exercise.
Measure to the lowest overhead obstacle, not average ceiling height. That garage door track, ductwork, or light fixture determines your actual clearance.
Installation and Getting Started
Assembly Reality Check
Home gym power rack assembly typically requires 2-4 hours with two people. Solo assembly is possible but takes 50% longer and risks alignment issues during final tightening.
The process involves:
- Connecting base frames
- Attaching uprights (heaviest, most awkward step)
- Installing crossmembers
- Squaring and leveling the rack
- Systematically tightening all hardware
Tools needed:
- Adjustable wrenches or socket set (13mm, 16mm, 19mm common)
- Carpenter’s level (3-4 foot length)
- Rubber mallet
- Work gloves
- Patience (seriously—don’t rush this)
Most manufacturers include detailed instructions and assembly videos. The process isn’t complex, just methodical.
The critical step involves squaring the rack before final tightening. Use a level on the base frame and measure diagonal distances to ensure perfect rectangles rather than parallelograms. An out-of-square rack creates binding when adjusting J-hooks and safeties.
I strongly suggest watching assembly videos for your specific model before the delivery arrives. Seeing real people put the rack together in real spaces gives you a much better sense of what you’re committing to than reading specs. You’ll see how the pieces actually fit, how stable the final product looks, and whether the assembly process is straightforward or frustrating.
Bolt Down or Free-Standing?
This decision depends on your training style, floor type, and planned accessories.
Bolt your rack if:
- Performing dynamic movements (kipping pull-ups, muscle-ups)
- Hanging heavy accessories (lat pulldown systems 100+ lbs)
- Training in earthquake-prone regions
- Wanting maximum confidence during heavy lifts
- Installing on smooth concrete
Free-standing works reliably if:
- Training standard barbell movements only
- Rack weighs 350+ pounds
- Stable flooring (concrete or proper subfloor)
- No explosive/dynamic movements
- Adding weight via integrated plate storage
I bolted my rack to the concrete garage floor using 1/2″ wedge anchors. The process took 30 minutes and cost $15 in hardware. The stability improvement was noticeable during pull-ups and gave peace of mind during heavy squats.
Renters or those with wood floors might choose free-standing. Quality racks with adequate weight and proper base design remain stable for standard training without bolting. Adding weight to plate storage integrated into the rack increases ballast and improves free-standing stability.
Your First Workout: Starting Right
After assembly, start conservatively. Spend your first session learning the equipment with empty bars:
- Practice unracking and racking from various hole positions
- Test safety bar positioning for squats, bench press, and overhead press
- Verify all pins, J-hooks, and safeties operate smoothly
- Perform pull-ups from different grip positions
- Get comfortable entering and exiting the cage during movements
- Load and unload plates to understand spatial requirements
This familiarization prevents mid-workout discoveries that something isn’t positioned correctly when you’re under a heavy bar.
My first heavy squat session in my new rack, I discovered my J-hooks sat one hole too high for comfortable unracking. Learning this with 135 pounds was vastly preferable to discovering it with 365 pounds on my back.
Breaking In Your Equipment
New racks often have tight-fitting holes and components. This is normal and improves with use.
During the first few weeks:
- Pins and safeties may require extra force to insert
- J-hooks might fit snugly in holes
- Pull-up bars may feel rough (wear work gloves initially)
- Powder coating may smell slightly during first workouts
These break-in characteristics resolve within 10-20 training sessions as components wear into perfect fit.
Long-Term Care and Maintenance
Routine Maintenance (Every 3-6 Months)
Quality home gym power racks require minimal maintenance but benefit from periodic attention:
Bolt check: Walk around the rack and verify all bolts remain tight. Focus on:
- Base connection points
- Upright-to-base connections
- Crossmember attachments
- Pull-up bar bolts
Heavy training gradually loosens hardware through vibration. Retightening takes 10 minutes and prevents problems.
Hole inspection: Check upright holes for elongation or damage, especially frequently-used positions for squats and bench press. Worn holes compromise safety positioning accuracy.
J-hook liners: Inspect UHMW plastic for wear. Replace when you see:
- Visible grooves from barbell contact
- Cracking or brittleness
- Compression that no longer cushions properly
Replacement liners cost $5-15 and install in minutes.
Powder coating: Touch up chips and scratches to prevent rust. Use matching spray paint or clear coat. Small chips aren’t structural issues but can spread if ignored.
Protecting Your Investment
After every workout:
- Wipe down uprights and crossmembers if you sweat heavily
- Clean chalk residue from J-hooks and pull-up bars
- Remove any moisture (especially in humid climates)
Seasonal considerations:
- Humid climates: Run dehumidifier in gym space, consider rust-preventive spray
- Cold garages: Allow equipment to warm before training (prevents condensation)
- Direct sunlight: Can fade powder coating over years (usually aesthetic only)
My rack sits in an unconditioned garage in Colorado. After four years with zero maintenance beyond occasional bolt-tightening, it shows minimal wear. The 11-gauge steel and quality powder coating have proven remarkably durable through temperature swings from 10°F to 100°F.
When to Upgrade vs. Repair
Upgrade considerations:
- Your squat exceeds 500 lbs and you notice upright flex
- You’ve outgrown attachment compatibility
- You need additional features (more pull-up grips, cable integration)
- Original rack was budget model serving its 5-8 year lifespan
Repair is sufficient when:
- Structural components remain solid
- Only accessories need replacement
- Cosmetic wear doesn’t affect function
- Rack meets your current training needs
Quality mid-range and premium racks rarely need replacement. They typically outlast your home ownership, getting passed to new homeowners or sold for 60-70% of original cost even after 5-10 years of use.
Frequently Asked Questions
What’s the difference between a power rack and a squat rack?
A power rack features four posts creating an enclosed cage with safety bars spanning between opposing uprights. Squat racks use two independent posts without built-in safety systems. Power racks provide superior safety for solo training, greater stability under load, and more exercise versatility, while squat racks offer smaller footprints and lower costs. For serious strength training alone, power racks justify their additional space and investment through comprehensive protection that catches failed lifts from any direction.
How much should I spend on a home gym power rack?
Budget $600-$1,200 for a quality rack that serves you for decades. This mid-range category delivers 11-gauge steel construction, Westside spacing, UHMW-lined J-hooks, and broad accessory compatibility. Entry-level options ($300-500) work for beginners but may require upgrading within 2-3 years as strength progresses. Premium racks ($1,200-2,500) offer incremental improvements that serious lifters appreciate but aren’t necessary for most home training. Avoid spending under $300, as racks at that price point typically use 14-gauge steel that flexes noticeably under heavy loads.
Can I use a power rack in an apartment?
Yes, with proper considerations. Choose strap safeties for quiet operation instead of loud metal pins. Use 3/4″ thick rubber floor mats minimum to dampen noise and protect floors. Verify your floor supports 800-1,200 lbs total weight (rack plus loaded barbell). Confirm ceiling height accommodates your desired rack—consider short models for standard 8-foot ceilings. Train during reasonable hours (avoid early morning or late night) and communicate with neighbors. Many apartment dwellers successfully maintain home gyms by being considerate and using equipment that minimizes noise transmission.
What size power rack fits in a standard garage?
Standard home gym power racks measure 48-49″ wide, 48-54″ deep, and 84-90″ tall. However, allocate 10′ x 10′ total floor space for comfortable training, including clearance for walkouts, plate loading, and movement. Single-car garages (typically 12′ x 22′) can fit a rack with careful positioning. Two-car garages (typically 20′ x 20′) accommodate racks easily with room for additional equipment. Measure ceiling height to the lowest obstacle (garage door tracks commonly limit clearance), not just to ceiling joists. You need rack height plus 6-12″ minimum for pull-ups. Compact half racks (36-44″ deep) work better for garages sharing space with vehicles.
Do I need to bolt down my power rack?
Bolting improves stability but isn’t always necessary. Bolt your rack if: performing dynamic movements like kipping pull-ups or muscle-ups, hanging heavy accessories like lat pulldown systems, training in earthquake-prone regions, or wanting maximum confidence during heavy lifts. Free-standing works reliably for standard barbell training if your rack weighs 350+ pounds, sits on stable flooring (concrete or solid subfloor), and includes adequate base width. Most quality racks come with bolt-down capability but function safely without it for typical home gym use. Renters or those with wood floors often choose free-standing successfully by adding weight via plate storage.
What’s Westside spacing and do I need it?
Westside spacing provides 1″ hole intervals in the bench press zone (typically 24-48″ from floor) rather than standard 2″ spacing throughout. This lets you position J-hooks precisely for your body proportions—torso length, arm length, bench thickness—rather than compromising between options that are “close but not quite right.” With standard 2″ spacing, you’re forced to choose positions where the bar starts too high or too low, changing your shoulder angle by 15-20 degrees and affecting bar path. Quality mid-range racks include Westside spacing standard. This feature alone justifies spending $100-200 extra over basic budget racks for lifters who bench press regularly.
How long does a quality power rack last?
Premium home gym power racks with proper maintenance last 20-30+ years, with many manufacturers offering lifetime frame warranties. Mid-range racks with 11-gauge steel typically serve 15-20 years before showing significant wear. Budget racks may need replacement in 5-8 years depending on usage intensity and load. Regular maintenance extends lifespan across all tiers: wipe down after sweaty sessions, check bolts quarterly, touch up powder coating chips, and replace UHMW liners when worn. The steel frame itself is nearly indestructible—wear typically occurs in moving parts like J-hooks and safety mechanisms. Quality residential power racks outlast most other home gym equipment investments and often transfer with home sales.
What attachments should I plan for with my power rack?
Start with essentials: quality J-hooks with UHMW liners ($60-120 for upgrades), reliable safety bars or straps ($80-150), and functional pull-up bar (usually included). Plan to add within the first year: dip attachment ($80-200 adds upper body pressing variation), band pegs ($20-60 for accommodating resistance), and plate storage ($100-300 organizes your gym). Future considerations include lat pulldown systems ($200-600 adds vertical pulling), landmine pivots ($40-80 for rotational exercises), and specialty bars like safety squat bars ($200-400). Before purchasing your rack, verify it uses standard attachment mounting—2×3″ uprights with 5/8″ holes are most common—ensuring compatibility with accessories from multiple manufacturers rather than proprietary systems.
Is 11-gauge steel really necessary?
Yes, for most serious lifters. 11-gauge steel (~3.0mm thick) represents the sweet spot for home racks—thick enough to eliminate wobble and flex under heavy loads while remaining light enough to move if needed. The difference between 11-gauge and 14-gauge (~1.9mm) becomes immediately apparent during use. Thinner steel flexes visibly during heavy squats (350+ lbs), rattles during pull-ups, and creates psychological discomfort that affects training intensity. 11-gauge steel also maintains hole integrity over thousands of pin insertions, while thinner steel gradually elongates and loosens. Unless you’re genuinely budget-constrained and squatting under 250 lbs, prioritize 11-gauge construction. It’s one specification where the upgrade genuinely impacts your training experience for the entire life of the rack.
Can I bench press safely alone in a power rack?
Absolutely—this is one of the primary reasons to own a power rack. Set safety bars or straps at chest height (1-2″ above your chest when the bar touches). If you fail a rep, the bar lands on the safeties instead of your chest. This setup is actually safer than benching with a human spotter who might not react quickly enough or provide inconsistent help. The key is proper positioning: test with empty bars first, ensuring safeties sit high enough to catch a failed rep but low enough to allow your full range of motion. Strap safeties work particularly well for bench press because they catch quietly and won’t damage your barbell’s knurling over repeated use like metal pins can.
How much ceiling height do I need?
You need minimum 96″ (8 feet) ceiling clearance for a standard 90″ rack with basic pull-ups, though 102-108″ is ideal for comfortable overhead work. Measure to the lowest overhead obstacle—garage door tracks, ductwork, light fixtures, or ceiling joists—not average ceiling height. If you have exactly 96″ clearance with a 90″ rack, you’ll have just 6″ for pull-ups, which is extremely tight. Consider these options for low ceilings: short racks designed for restricted spaces (82-84″ tall), positioning the rack where ceiling height is greatest, or accepting that pull-ups happen outside the rack using a doorway pull-up bar. You cannot safely do overhead presses inside the rack with standard 7-foot barbells in spaces under 96″ clearance.
Quick Decision Checklist
Before finalizing your purchase, verify you can answer “yes” to these questions:
Space and Fit:
- I’ve measured my space including clearance for movement (10′ x 10′ recommended)
- Ceiling height accommodates rack height plus 6-12″ minimum
- I’ve verified doorway dimensions allow equipment delivery
- Floor can support 800-1,200 lbs total weight
- I’ve mapped the footprint with tape and walked through movements
Rack Specifications:
- Minimum 11-gauge steel (or 12-gauge if budget-constrained)
- Weight capacity 2-3x my heaviest current lifts
- 2×3″ or 3×3″ uprights (avoid 2×2″ unless beginner under 250 lb squat)
- J-hooks include UHMW plastic liners (or budget for upgrades)
- Pull-up bar includes multiple grip options
Features and Compatibility:
- Westside spacing in bench press zone (unless budget prevents)
- Safety system appropriate for my needs (straps vs. pins)
- Standard attachment compatibility (not proprietary system)
- Manufacturer reputation and customer service verified
- Warranty covers frame for at least 5-10 years
Budget and Value:
- Total budget includes rack plus accessories ($300-800 additional)
- I’m not overspending on features I won’t use within 2-3 years
- Budget matches my training commitment level
- I’ve watched actual assembly and user review videos
Long-Term Planning:
- Rack suits projected strength goals for next 5 years
- Accessory expansion options match my training interests
- Installation requirements understood (bolting vs. free-standing)
- Maintenance requirements are manageable
Final Thoughts: The Investment That Compounds
Selecting your home gym power rack represents one of your most consequential fitness equipment decisions. This single piece of steel framework determines your training safety, exercise variety, and progression potential for the next 10-20 years.
The best power rack isn’t necessarily the most expensive option. It’s the rack that fits your space, matches your training intensity, accommodates your budget, and provides room for progression as your strength develops.
A $800 mid-range rack serving you reliably for two decades delivers vastly more value than a $400 budget rack requiring replacement after three years or a $2,500 premium rack whose capabilities exceed your needs indefinitely.
After four years of home training, I can’t imagine returning to commercial gyms. My garage power rack has supported everything from my first awkward 135-pound squats to recent 405-pound sets. It’s witnessed countless early morning training sessions before work, late evening workouts after long days, and weekend training that would have been impossible with gym commutes and schedules.
The equipment investment paid for itself within 18 months. The time saved and training consistency gains? Those benefits compound indefinitely.
The difference between someone who trains consistently for decades and someone whose fitness routine fades after six months often comes down to removing friction. Every barrier between you and training—commute time, facility hours, equipment availability, other people—increases the likelihood that you’ll skip sessions.
A power rack in your garage or basement removes nearly all those barriers. Bad weather? Doesn’t matter. Gym closed? Irrelevant. Equipment taken? It’s always available. Feeling self-conscious? You’re alone.
That reduction in friction compounds over years into training consistency that transforms your strength, health, and physique in ways that no single workout ever could.
Choose wisely based on actual needs rather than marketing claims, and you’ll build a training space that rivals commercial facilities while costing less than two years of gym membership—then serves you for two decades beyond that break-even point.
What’s your biggest concern about setting up a home gym power rack? Whether you’re just starting your research or finalizing a purchase decision, I hope this guide has helped clarify what actually matters versus what’s just marketing noise.
The perfect rack doesn’t exist. But the right rack for your specific situation—your space, your budget, your goals, your training style—absolutely does exist. And now you know how to find it.
Additional Resources
Where to Buy:
- Rogue Fitness (roguefitness.com): Premium options, excellent customer service, ships fast
- Rep Fitness (repfitness.com): Best value in mid-range, frequent sales
- Titan Fitness (titan.fitness): Budget-friendly, Rogue-compatible attachments
- American Barbell (americanbarbell.com): Premium boutique options
- Fringe Sport (fringesport.com): Quality mid-range with lifetime warranties
Research and Reviews:
- Garage Gym Reviews (YouTube): Detailed equipment testing
- Coop’s Garage Gym Reviews: Comprehensive written reviews
- r/homegym (Reddit): Active community with real-world experiences
- Home Gym Equipment Facebook groups: Local buying/selling
Financing Options: Most major manufacturers offer 0% APR financing through Affirm or similar services. While I generally recommend saving and buying outright, financing can make sense if:
- You’re certain about your long-term commitment
- The monthly payment fits comfortably in your budget
- You’re replacing an existing gym membership (use that money for payments)
Resale Value: Quality power racks hold value remarkably well:
- Rogue equipment: 70-80% of original price even after 5+ years
- Rep Fitness: 60-70% after several years
- Titan/budget brands: 40-50% due to lower demand
Used market thrives on Facebook Marketplace, Craigslist, and r/homegym. If you outgrow your rack or need to relocate, resale typically recovers 50-70% of your investment.
Start Training Today: While you research and plan your power rack purchase, don’t wait to train. Bodyweight exercises, dumbbells, and resistance bands build strength and establish training habits. The rack amplifies an existing training practice—it doesn’t create one from nothing.
Your future self will thank you for making this investment. Not just because you’ll be stronger, but because you’ll have proven to yourself that consistency matters more than perfection, that investing in yourself pays dividends, and that removing friction from important habits changes everything.
Now go measure your space, set your budget, and make the decision. Your home gym awaits.