This article contains affiliate links to products we’ve researched and recommend. If you purchase through our links, we may earn a small commission at no extra cost to you. This helps us create free content like this guide. We only recommend equipment we believe provides genuine value. Read our full disclosure policy
Introduction
Building strength at home shouldn’t mean compromising your safety or limiting your potential. Yet thousands of fitness enthusiasts struggle to find the right home gym racks for their training needs. Commercial gym memberships drain $600-1,200 annually while offering limited access during peak hours, crowded equipment, and inconvenient locations. Training at home with minimal equipment feels risky—especially when pushing heavy weights without a spotter or proper rack system.
Home gym racks solve both problems elegantly. These essential pieces of equipment transform any garage, basement, or spare room into a complete strength training facility, with power racks being the most popular and versatile option.
Over 2.3 million Americans invested in home gym equipment in 2024, with power racks consistently ranking as the most valued purchase among dedicated lifters. The reason is simple: power racks deliver gym-quality training with superior safety, complete exercise versatility, and long-term cost savings that pay for themselves within 12-18 months.
This comprehensive guide walks you through everything you need to make an informed decision about home gym racks, particularly power racks which form the foundation of serious home training.
We’ll explore what makes power racks essential for home training, compare different rack types and their ideal applications, examine the key specifications that separate excellent racks from mediocre ones, and provide a clear framework for selecting the perfect rack for your space, budget, and training goals.
Whether you’re a beginner building your first home gym or an experienced lifter upgrading your equipment, you’ll find actionable insights backed by testing data, user experiences, and expert analysis. By the end, you’ll understand exactly which power rack matches your needs and how to maximize your investment for years of productive training.
What Are Home Gym Racks? Understanding Power Racks and Equipment Types
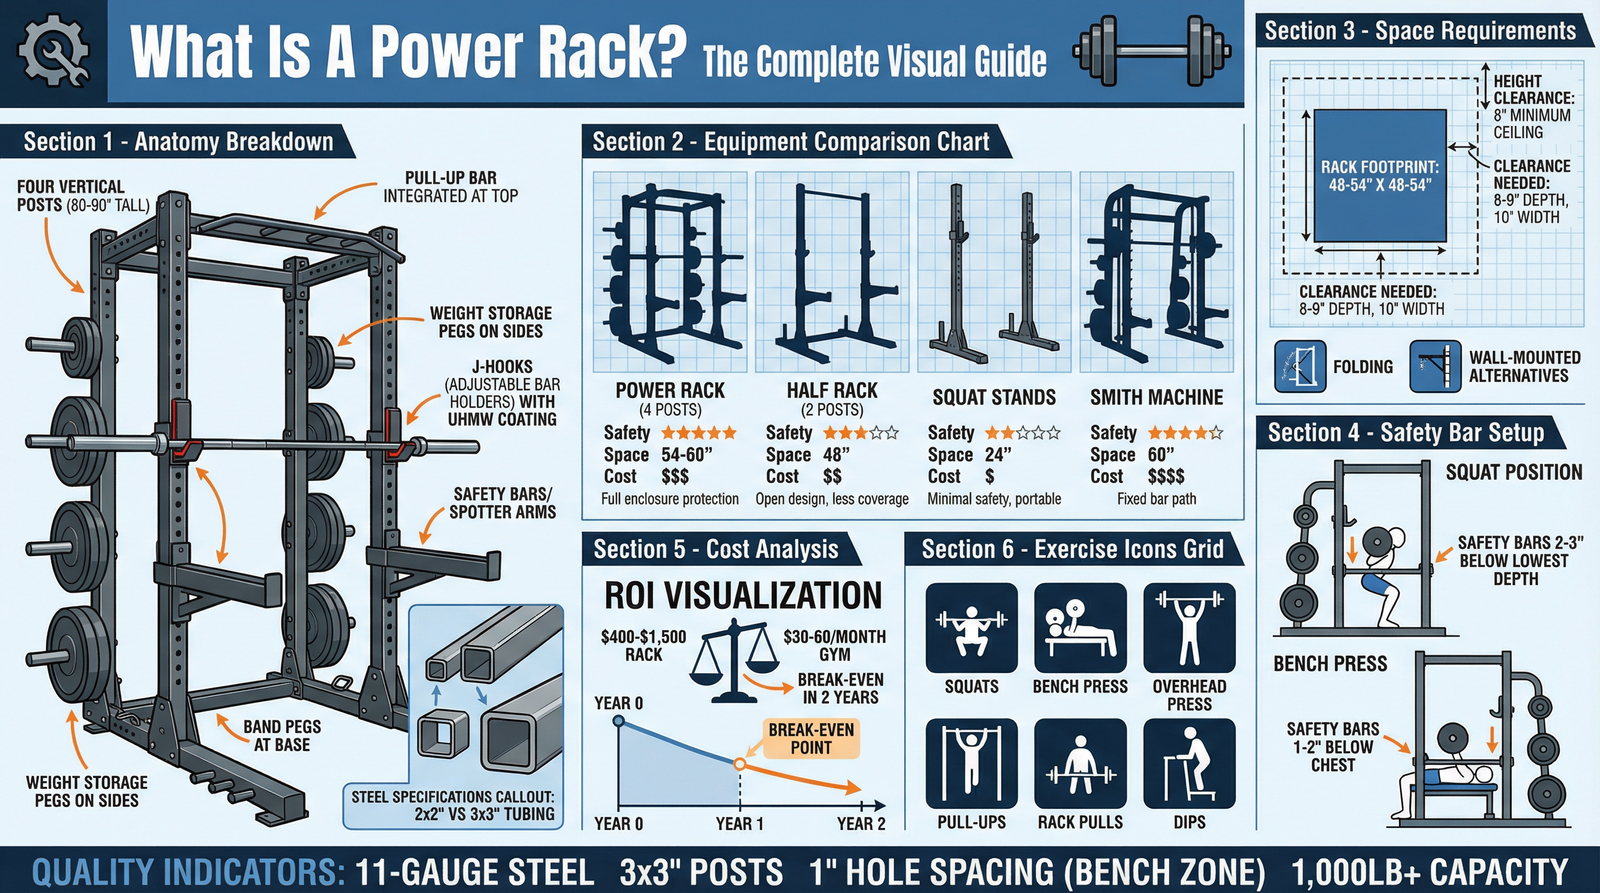
A power rack (also called a power cage or squat cage) is a freestanding steel frame structure designed to hold a loaded barbell at various heights while providing built-in safety mechanisms that catch the bar if you fail a lift. The rack consists of four vertical posts connected by horizontal bracing, creating a cage-like structure you train inside. Adjustable J-hooks hold the barbell at your starting position, while safety bars positioned below your lift path catch the weight if you can’t complete a repetition.
Power racks represent the most popular category of home gym racks, offering comprehensive safety and versatility that makes them ideal for residential training spaces.
This simple yet ingenious design makes power racks the gold standard for safe solo strength training. Unlike basic squat stands that only hold the bar, power racks surround you with protective framework and safety systems that function like having a permanent spotter—crucial when training alone with challenging weights.
Power racks accommodate the fundamental compound exercises that build strength: squats, bench press, overhead press, barbell rows, deadlift variations, and pull-ups. The adjustable height system lets you position the bar perfectly for your body proportions and each specific exercise. Most racks feature holes every 2-3 inches along the uprights, giving you precise control over starting positions and safety bar placement.
Power Rack Components Explained
Understanding power rack components helps you evaluate quality differences and make informed comparisons between models.
Uprights (Posts): The four vertical steel tubes form the rack’s skeletal structure. Uprights typically measure 2×2″, 2×3″, or 3×3″ in cross-section, with larger dimensions offering greater stability and weight capacity. Quality racks use 11-gauge steel (approximately 3mm thick) or thicker, while premium models employ 7-gauge steel (4.5mm) for commercial-grade durability. The uprights feature numbered holes drilled at regular intervals—typically every 2 inches throughout most of the height, with 1-inch “Westside spacing” in the bench press zone for fine-tuned adjustments.
J-Hooks (Bar Holders): These removable brackets slide into the upright holes and cradle your barbell at the desired height. Quality J-hooks feature UHMW plastic liners that protect your barbell’s knurling from metal-on-metal contact while providing smooth bar placement and removal. Budget racks often use bare metal J-hooks that can damage bars over time. Some advanced J-hooks include flip-down safety lips that prevent the bar from rolling off forward.
Understanding each component is one thing — knowing which specs genuinely separate a rack you’ll love from one you’ll regret is another. Our guide to the 5 power rack features most buyers overlook covers the deeper decision criteria that don’t always show up in the headline spec sheet.
Safety Bars (Spotter Arms): Horizontal bars that position inside the rack below your lift path serve as your mechanical spotter. If you fail a squat or bench press, the safety bars catch the loaded barbell before it can pin you. These come in several designs: traditional pin-and-pipe safeties that slide through both sides of the rack, strap safeties made from high-tensile nylon that create a catching surface, or adjustable spotter arms that cantilever from one side for easier entry and exit. The safety system represents your rack’s most critical feature—never compromise here.
Pull-Up Bar: Integrated across the top of most racks, pull-up bars add essential upper body pulling movements to your training. Basic models offer a straight bar, while better racks provide multiple grip widths and positions. Some premium racks include fat grips, angled grips, or even globe-style multi-grip bars that reduce wrist and elbow stress during high-volume pull-up training.
Base Frame: The horizontal steel connecting the bottom of the uprights provides structural rigidity and prevents racking. Heavier base frames with cross-members offer superior stability, especially for free-standing racks that aren’t bolted to the floor. Some racks feature front-mounted feet that extend forward, providing additional tip-resistance when performing pull-ups or attaching heavy accessories.
Cross-Members: Horizontal and diagonal bracing between uprights creates the rack’s structural integrity. More cross-members generally mean better stability, though they can sometimes interfere with exercise execution or attachment placement. Premium racks use strategically placed bracing that maximizes rigidity without limiting functionality.
Hardware: The quality of bolts, washers, and connection points determines how well your rack maintains stability over years of use. Stainless steel hardware resists corrosion, while grade 8 or higher bolts ensure connections don’t loosen during training. Some manufacturers use proprietary connection systems that eliminate hardware entirely, creating cleaner aesthetics and potentially superior strength.
Finish: Powder coating protects the steel from rust and wear while providing a durable, attractive surface. Quality powder coating should be thick enough (3-4 mils minimum) to resist chipping when weight plates or accessories contact the rack. Budget racks often use thin paint that chips easily, exposing bare steel to moisture and oxidation. Premium finishes include textured surfaces that hide minor scratches and provide better grip for certain movements.
How Power Racks Enable Safe Solo Training
The power rack’s safety system transforms risky solo training into a controlled, sustainable practice. When you squat heavy weights alone, the difference between a successful workout and a dangerous situation often comes down to a single failed repetition. Without a spotter, that failed rep could trap you under hundreds of pounds—a scenario that has caused serious injuries in home gyms.
Learn more about how to determine if a rack can safely handle your lifting loads and warning signs of overload.
Power racks eliminate this risk through properly positioned safety bars. Before each set, you adjust the safeties to a height just below your bottom position for that specific exercise. For squats, this means setting them 2-3 inches below your lowest squat depth. For bench press, position them 1-2 inches above your chest when the bar touches. This precise placement creates a safety net that only engages when something goes wrong.
When you can’t complete a repetition, you simply lower the bar onto the safety bars in a controlled manner. For squats, you descend slightly deeper than your normal bottom position until the bar contacts the safeties, then step out from under it. For bench press, the safeties catch the bar before it reaches your chest, allowing you to slide out from underneath. This system gives you the confidence to push genuine training limits without the fear of catastrophic failure.
The psychological benefit proves equally valuable. Knowing you have reliable safety systems lets you approach challenging sets with proper intensity rather than holding back due to safety concerns. This translates to better training stimulus and faster strength gains. Research on training volume and intensity consistently shows that lifters who can safely push to technical failure make superior progress compared to those who stop prematurely due to safety concerns.
Power racks also enable advanced training techniques that would be impossible or dangerous without safety systems. Pin squats, where you start from a dead stop with the bar resting on safety pins, build explosive strength from specific positions. Safety bar bench press variations let you train past failure by setting safeties to catch the bar at various heights. Rack pulls (partial deadlifts) require setting the bar on safeties at precise heights to target specific ranges of motion.
The four-post cage design provides stability for exercises beyond basic barbell lifts. When performing pull-ups, the enclosed structure prevents the swaying and tipping that can occur with standalone pull-up bars. Band training becomes more effective when you can anchor resistance bands to multiple points on the rack’s framework. Even bodyweight exercises like inverted rows gain stability from the rigid structure and adjustable bar heights.
For families or training partners of different heights and experience levels, power racks accommodate everyone safely. A 5’2″ beginner and a 6’4″ advanced lifter can both train on the same rack by simply adjusting J-hooks and safeties to their individual requirements. This versatility makes power racks ideal for households where multiple people share equipment.
Understanding the different types of power rack safety systems and proper setup is essential for maximizing training safety and effectiveness.
Types of Home Gym Racks (High-Level Overview)
Not all home gym racks serve the same purpose or fit the same space. Understanding the four main categories of home gym racks helps you narrow your search to options that match your specific situation.
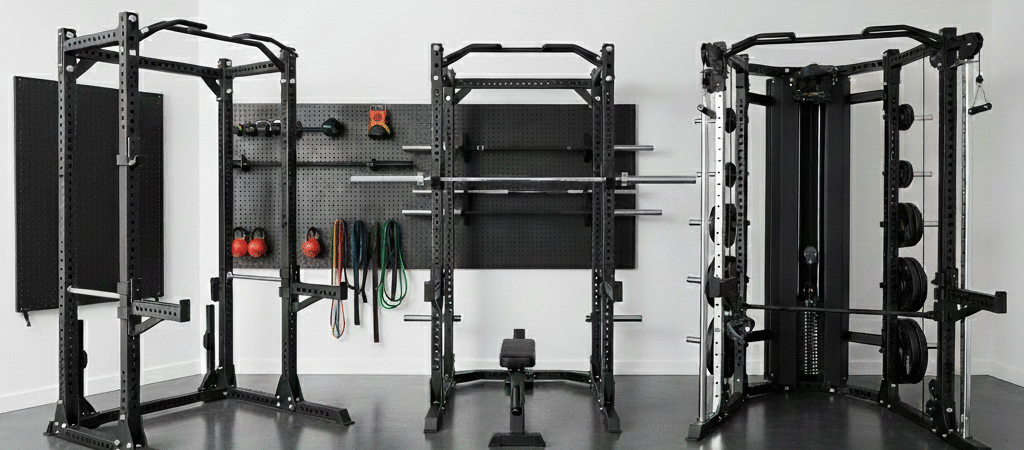
Full Power Racks
Full power racks feature four posts creating a complete cage structure around your training area, offering maximum safety, stability, and versatility. These represent the gold standard for serious home gyms and the most popular choice among experienced lifters.
The enclosed design provides safety bars on all sides, letting you train with confidence regardless of which direction you might fail a lift. Full racks typically measure 48-60 inches wide, 48-60 inches deep, and 84-108 inches tall, requiring dedicated floor space but delivering unmatched functionality.
Full power racks excel for lifters who train heavy, work alone consistently, or want maximum exercise variety through accessories. The four-post structure creates stable mounting points for lat pulldown systems, dip attachments, landmine pivots, and plate storage systems. This expandability turns your rack into a complete training ecosystem rather than just a squat and bench press station.
Weight capacities on full racks range from 1,000 pounds for budget models to 3,000+ pounds for commercial-grade options. The enclosed structure inherently offers better stability than half racks or stands, especially when performing dynamic movements like kipping pull-ups or heavy band work.
The primary drawback is footprint. Full racks consume approximately 20-30 square feet of floor space (not counting the area needed to load/unload plates or perform exercises). In smaller home gyms, this substantial footprint can limit additional equipment options.
Full power racks represent the gold standard among home gym racks, offering maximum safety and versatility for serious lifters.
Explore our complete full power rack guide (Coming Soon)
Half Racks
Half racks (also called half cages) provide a middle ground between full power racks and basic squat stands. These typically feature two or three posts with safety spotter arms that extend outward rather than connecting to an opposite set of posts.
The reduced footprint saves 12-18 inches of depth compared to full racks while maintaining most safety and functionality benefits. Half racks work exceptionally well when positioned against a wall, with the open back allowing easier bar loading and more efficient use of limited space.
Safety systems on half racks use adjustable spotter arms that cantilever from the main uprights. These arms provide reliable catching capability for squats and bench press, though they cover a slightly smaller area than full rack safeties. Quality half racks include spotter arms rated for 500-1,000 pounds, adequate for most home training scenarios.
Half racks excel for garage gyms where depth is limited, training spaces shared with vehicles, or situations where you frequently need to fold or move equipment aside. Many half racks include wheels or skids that make repositioning easier than moving a full cage.
The trade-off comes in slightly reduced stability during dynamic movements and fewer attachment mounting options. While you can still add dip bars, landmines, and storage, the two-post design provides fewer mounting locations than four-post racks. Pull-up performance may feel less stable without the enclosed structure, particularly for kipping or weighted variations.
Half racks provide an excellent middle ground in the home gym racks category, delivering most benefits of full cages with reduced footprint.
Learn more about half rack benefits and limitations → (Coming Soon)
Squat Stands
Squat stands strip strength training down to the essentials: two independent posts that hold your barbell at the desired height. This minimalist approach delivers the smallest footprint and lowest price point while sacrificing built-in safety systems.
Each stand typically measures just 24-30 inches wide and 12-18 inches deep, allowing placement virtually anywhere. You can position stands for squats, move them for bench press, then push them aside when not in use—flexibility that appeals to lifters with extremely limited space or shared training areas.
Squat stands suit experienced lifters who understand proper technique, know their limits, and can safely bail from failed lifts without mechanical safeties. They work well as portable training solutions for athletes who train in multiple locations or need equipment that travels easily.
The obvious limitation is safety. Without built-in spotter bars, you must either train conservatively, have a human spotter present, or develop reliable techniques for safely dumping the bar during failed lifts. This makes stands less appropriate for beginners or anyone pushing genuine training limits alone.
Stability varies significantly among squat stand designs. Basic models can tip or shift during use, particularly when unracking heavy weights or if the stands aren’t perfectly level. Premium adjustable squat stands with wide bases and quality construction offer better stability but cost nearly as much as budget full racks.
Squat stands represent the most minimalist option in home gym racks, prioritizing portability and space efficiency over built-in safety features.
For readers working with tight basements, shared garages, or limited floor space, see our full breakdown of compact power racks for small spaces.
Compare squat stands vs full racks → (Coming Soon)
Wall-Mounted & Folding Options
Wall-mounted racks and folding designs maximize space efficiency by utilizing vertical wall space rather than consuming floor area. These innovative solutions let you install a functional power rack in garages, apartments, or multi-purpose rooms where a permanent freestanding rack would be impractical.
Wall-mounted rigs bolt directly to wall studs (or preferably solid concrete/block walls), creating a permanently installed structure that folds flat against the wall when not in use. When deployed, these racks extend 24-48 inches from the wall and provide full safety bar coverage. After training, you fold the arms up, creating clearance to park vehicles or use the space for other purposes.
Installation requires solid structural support—typically multiple wall studs for wood framing or concrete anchors for masonry walls. When properly installed in suitable wall structures, these racks handle 800-1,200 pounds safely. However, improper installation in weak walls poses serious safety risks, making professional assessment worthwhile for anyone considering this option.
Folding power racks offer similar space-saving benefits in a freestanding design. These use hinged components that collapse the rack’s depth from 48-60 inches down to 12-16 inches. Some models fold completely flat, others fold partially while maintaining stability, and the best designs include locking mechanisms that secure the folded position.
The primary consideration with space-saving racks is the setup/takedown time. If you train frequently, spending 5-10 minutes unfolding and re-securing your rack before every workout becomes tedious. These designs work best for lifters who train 2-3 times weekly and genuinely need the space for other purposes between sessions.
Wall-mounted options represent the most space-efficient category of home gym racks, perfect for multi-purpose training areas.
Discover wall-mounted and folding rack solutions → (Coming Soon)
Rack Type Comparison Table
| Feature | Full Power Rack | Half Rack | Squat Stands | Wall-Mounted/Folding |
|---|---|---|---|---|
| Floor Space | 20-30 sq ft | 12-18 sq ft | 6-10 sq ft | 0-20 sq ft (when folded) |
| Height Range | 84-108″ | 84-96″ | 72-90″ | 84-108″ |
| Weight Capacity | 1,000-3,000 lbs | 800-1,500 lbs | 500-1,000 lbs | 800-1,200 lbs |
| Safety System | Full cage safeties | Spotter arms | None (external needed) | Fold-out safeties |
| Stability Rating | Excellent | Very Good | Fair to Good | Very Good (when installed correctly) |
| Price Range | $400-$2,500 | $300-$1,200 | $150-$600 | $500-$1,800 |
| Assembly Time | 2-4 hours | 1-2 hours | 15-30 minutes | 3-5 hours + installation |
| Portability | Low | Medium | High | None (permanent install) |
| Attachment Options | Extensive | Moderate | Minimal | Moderate |
| Best For | Dedicated training space, serious lifters | Space-conscious lifters, garage gyms | Minimalists, experienced lifters | Multi-purpose spaces, apartments |
| Limitations | Large footprint | Less stable for dynamic moves | No built-in safety | Installation complexity |
Use our interactive rack selector to find your match → (Coming Soon)
Home Gym Racks – Why Invest One?
Safety Benefits
The safety argument for power racks proves compelling when you examine injury data from home training environments. Emergency room visits related to weight training equipment increased 35% between 2019 and 2023, with the majority involving unsupported barbell exercises performed without proper safety equipment.
Power rack safety systems prevent the most common and dangerous training injuries: being pinned under a failed squat or bench press. These scenarios account for approximately 60% of serious home gym injuries according to Consumer Product Safety Commission data. With properly adjusted safety bars, these incidents become minor inconveniences rather than emergency situations.
The safety advantage extends beyond catastrophic failure prevention. Power racks eliminate the need to compromise your training intensity due to safety concerns. Without reliable safety systems, most solo lifters unconsciously leave 1-2 reps “in the tank” on every set, afraid to push close to failure. This conservative approach limits training stimulus and slows strength gains.
Research published in the Journal of Strength and Conditioning Research shows that lifters with access to safety equipment consistently train closer to true muscular failure, resulting in 12-18% greater strength gains over 12-week training periods compared to those who train conservatively. The psychological confidence provided by power rack safeties translates directly to better training outcomes.
For aging lifters or those with previous injuries, safety systems become even more critical. As reaction time and proprioception decline with age, the margin for error during heavy lifts narrows. A 55-year-old lifter might not successfully dump a failed squat as reliably as a 25-year-old, making mechanical safeties essential for continued safe training.
Families with children benefit from power racks’ inherent safety design. When properly educated, teenage athletes can train safely alone inside a power rack, something no responsible parent would allow with basic equipment. The visible safety systems and enclosed structure create natural boundaries that reduce risky behavior.
Among all home gym racks, power racks with full safety systems provide unmatched protection for solo training.
Exercise Versatility
A quality power rack accommodates 25-40 different exercises, effectively replacing 8-10 pieces of traditional gym equipment. This versatility stems from the adjustable height system, integrated pull-up bar, and numerous attachment points that expand functionality.
Core Barbell Movements:
- Back squats (high bar, low bar, pause variations)
- Front squats
- Bench press (flat, incline with adjustable bench)
- Overhead press (standing, seated)
- Barbell rows (from hang, from floor)
- Rack pulls and partial deadlifts
- Pin squats and pin presses
Bodyweight Training:
- Pull-ups (multiple grip widths and styles)
- Chin-ups
- Inverted rows at various angles
- Hanging knee raises and leg raises
- L-sits and front lever progressions
With Common Attachments:
- Dips (with dip attachment)
- Lat pulldowns (with pulley system)
- Tricep pushdowns
- Face pulls
- Cable curls
- Landmine presses, rows, and rotations
Band Training:
- Banded squats and deadlifts
- Accommodating resistance for bench press
- Speed work with bands
- Mobility and warm-up exercises
This exercise variety allows complete program design within a single piece of equipment. Beginner programs, intermediate progressive overload schemes, and advanced periodization all remain possible without additional machines. For athletes following sport-specific programs, power racks accommodate Olympic lifting variations, strongman-style movements, and functional training protocols.
The adjustable nature means one rack serves multiple users with different body proportions and experience levels. A 5-foot tall beginner and a 6’4″ advanced lifter both find suitable positioning for every exercise simply by moving pins to different holes. This scalability makes power racks ideal for families, training partners, or anyone whose training needs evolve over time.
Compare this to dedicated machines that each perform a single function. A leg press, chest press, lat pulldown, and cable crossover would cost $5,000-8,000 combined, occupy 80-100 square feet, and still provide less movement variety than a well-equipped power rack setup.
Quality home gym racks, particularly full power racks, accommodate 25-40 different exercises, effectively replacing multiple pieces of equipment.
Long-Term Cost Savings
The financial case for power racks becomes clear when analyzing long-term costs against alternatives. Commercial gym memberships average $58 monthly for basic facilities and $120-180 monthly for premium gyms, totaling $700-2,200 annually. Over a decade, membership costs accumulate to $7,000-22,000—far exceeding the cost of quality home equipment.
A complete power rack setup including the rack, barbell, weight plates, and bench typically costs $1,200-2,500 for mid-range equipment. This investment reaches break-even against basic gym membership in 18-24 months, after which your effective cost drops to near zero except for occasional maintenance or additions.
Premium power racks from manufacturers like Rogue, Rep Fitness, or Titan carry lifetime warranties on the frame structure. This means your initial investment potentially serves 20-30 years with minimal maintenance—essentially $50-100 per year amortized over the equipment’s lifespan. Compare this to ongoing gym fees that never build equity or provide owned assets.
The resale market for quality strength equipment remains robust. Popular power rack models retain 60-75% of their original value even after 2-3 years of home use. If circumstances change and you need to sell your equipment, you’ll recoup most of your investment. Gym membership payments, by contrast, provide zero residual value.
Hidden gym costs add up beyond membership fees. Transportation expenses (gas, vehicle wear, or public transit fares) average $30-80 monthly for those driving to gyms 3-4 times weekly. Time costs matter too—commuting 20 minutes each way for 4 weekly workouts consumes nearly 6 hours monthly, time that could be spent training or with family when you have a home gym.
Power racks also eliminate the soft costs of gym membership inconvenience. Missing workouts due to gym closure, crowded equipment, or schedule conflicts reduces training consistency, ultimately slowing progress and diminishing the value of your membership investment. Home power racks remain available 24/7, in any weather, regardless of holidays or equipment availability.
For families, cost savings multiply. A household with 2-3 individuals interested in strength training would pay $1,400-4,800 annually for multiple gym memberships. A single power rack serves everyone for a one-time investment, making the financial advantage even more dramatic.
Investing in home gym racks eliminates ongoing membership fees while providing equipment that lasts decades.
Gym vs Home Gym ROI Calculator
Make an informed decision about your fitness investment. Calculate the true cost of gym membership versus setting up your own home gym, including break-even timeline, total savings, and time efficiency over 5 years.
Space Efficiency
Despite their substantial appearance, power racks deliver exceptional space efficiency when measured by functional training capacity per square foot. A full-size rack occupying 20-25 square feet enables the same exercise variety as 80-120 square feet of traditional gym machines.
The vertical design maximizes utility in the dimension most home gyms have in abundance: height. Rather than spreading equipment across valuable floor space, power racks stack functionality vertically through adjustable components and the overhead pull-up bar. This architectural efficiency proves especially valuable in garages, basements, and spare rooms where floor space is limited but ceiling heights accommodate standard 84-96 inch racks.
Multi-use components eliminate equipment redundancy. The pull-up bar, J-hooks, and safety systems all serve multiple exercises rather than single purposes. Where traditional gym setups might require separate pull-up stations, squat stands, bench press supports, and safety equipment, the power rack consolidates these into one integrated unit.
For home gyms with expanding equipment needs, power racks serve as organizational anchors. Plate storage attachments mount directly to rack uprights, eliminating the floor space occupied by separate plate trees. Band pegs, barbell holders, and accessory storage integrate into the rack structure rather than requiring additional floor space.
The defined footprint also helps with training space management. Once you know your rack occupies a specific 4×5 foot area, you can plan surrounding space for barbells, benches, and movement zones with precision. This defined boundary makes power racks easier to incorporate into multi-purpose rooms compared to scattered equipment that gradually spreads across available floor space.
Ceiling-height considerations sometimes limit rack options, but manufacturers now offer “short” racks designed for 84-inch ceiling heights. These abbreviated models maintain full functionality while fitting basements, apartments, or spaces with dropped ceilings. Some designs feature bolt-on extensions that add height when you relocate to spaces with taller ceilings.
Modern home gym racks maximize vertical space, delivering exceptional functionality per square foot compared to traditional gym equipment.
Not all home gyms have the luxury of tall ceilings, and if you’re building in a basement or low-clearance garage, this best power racks for low ceilings guide shows which compact racks deliver real functionality without compromising safety.
Key Factors When Choosing Home Gym Racks (Overview)
Space Requirements
Understanding your available space before researching specific racks prevents costly mistakes and frustrating returns. Power rack selection begins with accurate measurements of your training area’s dimensions, including length, width, and especially ceiling height.
Ceiling Height Considerations: Most standard power racks require 90-96 inches of clearance from floor to ceiling joists or overhead obstacles. This accommodates 84-90 inch rack heights plus 6 inches for overhead clearance during pull-ups and overhead pressing. Taller individuals need additional clearance—generally adding 6-12 inches for every 6 inches of height above average. A 6’4″ lifter benefits from 102-108 inch ceiling heights to comfortably perform overhead lifts and pull-ups.
Before measuring ceiling height, identify and account for garage door tracks, ductwork, lighting fixtures, or exposed beams that might interfere with rack placement or overhead movements. These obstacles may require specific rack positioning or selecting shorter models.
Floor Space Calculations: Measure not just the rack’s footprint but the total training envelope. Add 4-6 feet in front of the rack for walkout room after unracking squats, 3-4 feet behind for deadlifts or barbell storage, and 2-3 feet on each side for plate loading. A typical full rack needs approximately 10×10 feet of total floor space for comfortable training.
Account for door swings, vehicle parking (in garage gyms), and pathways to other household areas. Your rack placement shouldn’t block primary access routes or force family members to navigate around equipment constantly.
Environmental Factors: Consider floor levelness—power racks require relatively level surfaces (within 1/4 inch variance) for proper stability. Concrete garage floors typically work well, but some basement or attic floors may have significant slope or flex that affects rack performance.
Temperature and humidity variations impact equipment longevity. Unheated garages experience temperature swings that can accelerate rust on budget racks with thin powder coating. Humid basements may require racks with premium finishes or stainless steel hardware.
Choosing the right rack for your garage involves more than just price — our complete power rack for your garage gym buying guide breaks down space requirements, safety features, and long-term value before you buy.
Before purchasing home gym racks, accurately measure your available space including ceiling height and floor dimensions.
Use our space planning calculator below
Home Gym Rack Floor Space Calculator
Calculate the floor space required for your home gym rack. Choose your rack type to see ideal, adequate, and tight space configurations. All measurements are in feet.
- Ideal: Provides ample room for all exercises with maximum safety and comfort
- Adequate: Sufficient space for most workouts with reasonable movement
- Tight: Minimum space needed – requires careful movement and positioning
- Remember to account for additional equipment like plates, bars, and benches
- Consider ceiling height for overhead movements and pull-ups
Weight Capacity
Weight capacity ratings indicate the maximum load a rack can safely support, but understanding what these numbers actually mean requires some nuance.
Understanding how weight capacity ratings work is critical for safety. Our power rack weight capacity guide explains static vs dynamic loads, steel gauge requirements, and how to calculate your real capacity needs.
Manufacturer ratings typically reflect static load—the weight that can rest on the rack indefinitely without structural failure. This matters for storage (loaded barbells sitting on J-hooks between sets) but tells only part of the safety story.
Dynamic vs Static Loading: During actual lifts, forces exceed the bar’s static weight substantially. Unracking a heavy squat creates impact forces 1.5-2x the bar weight as you step back and settle. Failed lifts dropped onto safeties can generate 2-3x impact forces depending on drop height. Quality racks account for these dynamic loads in their engineering, but budget racks with borderline capacity ratings may not.
A general rule suggests selecting racks with stated capacity at least 2-3x your heaviest working weights. If you squat 400 pounds, look for racks rated to 1,000+ pounds to ensure adequate safety margins for dynamic loading.
What Actually Fails: Rack failure rarely involves the main uprights collapsing. Instead, overloading typically causes:
- J-hooks bending or pin holes elongating
- Safety bars deflecting excessively or pins shearing
- Weld failures at connection points
- Base cross-members bending, allowing racking
Premium racks address each potential failure point with robust engineering: hardened steel pins, reinforced J-hook brackets, thicker safety bars, and extensive welding or bolt connections.
Testing Standards: Few manufacturers conduct independent testing or publish detailed engineering specifications. Claims like “1,500 lb capacity” may lack rigorous verification. Look for brands with reputations for conservative ratings backed by user experiences rather than trusting numbers alone.
Commercial gym-grade certifications (when present) indicate more thorough testing protocols. Racks bearing ASTM standards or similar certifications underwent structured testing procedures that verify capacity claims.
Different home gym racks offer vastly different weight capacities, from 700 lbs for budget models to 3,000+ lbs for commercial-grade equipment.
Deep dive into weight capacity ratings → (Coming Soon)
Build Quality Indicators
Distinguishing genuinely quality racks from those with good marketing requires examining specific construction details.
Steel Gauge: Upright thickness directly impacts strength and rigidity. Common gauges include:
- 14-gauge (1.9mm): Budget territory, adequate for light use
- 12-gauge (2.7mm): Entry-level acceptable quality
- 11-gauge (3mm): Standard for mid-range racks
- 7-gauge (4.5mm): Premium commercial grade
Thicker steel resists flex during use, maintains hole tolerances longer, and provides greater weld surface area for stronger joints. However, gauge alone doesn’t determine quality—inferior steel alloys at 11-gauge may underperform quality 12-gauge construction.
Upright Dimensions: Cross-sectional size affects both strength and attachment compatibility:
- 2×2″ uprights: Adequate for basic training, limited attachment options
- 2×3″ uprights: Good strength-to-cost ratio, broad attachment compatibility
- 3×3″ uprights: Premium strength and rigidity, highest-end attachments
Larger uprights also provide more surface area for stability when free-standing, reducing tip-over risk during dynamic movements.
Hole Pattern and Spacing: Hole quantity and spacing determine adjustment precision:
- 2-inch spacing: Standard throughout most of the rack
- 1-inch “Westside spacing”: Fine adjustments in the bench press zone (typically 24-48 inches from floor)
- Laser-cut vs drilled holes: Laser cutting provides tighter tolerances and cleaner edges
More holes don’t always equal better. Some racks feature excessive holes that weaken structural integrity without providing meaningful additional adjustment positions.
Welding Quality: Inspect welds in product photos or in-person. Quality welds show consistent bead patterns, full penetration, and smooth finishing. Poor welds exhibit irregular beads, gaps, or excessive spatter—indicators of rushed manufacturing that may fail prematurely.
Powder Coating: Finish thickness and application quality affect long-term durability:
- Thin coatings chip easily when contacted by plates or accessories
- Quality powder coating measures 3-4 mils thick minimum
- Textured finishes hide minor scratches better than glossy surfaces
- Even coverage without drips or thin spots indicates careful application
Scratch through to bare metal in one corner with your fingernail—quality coating resists this simple test while thin paint scratches easily.
Build quality varies significantly across home gym racks, with steel gauge and construction methods determining long-term durability.
Complete build quality assessment guide → (Coming Soon)
Budget Considerations
Power rack pricing spans from $200 economy models to $3,000+ commercial-grade equipment, with distinct value propositions at each tier.
Budget Tier ($200-$500): Entry-level racks from Fitness Reality, CAP Barbell, or basic Titan models serve beginners with lighter weights and less frequent training. Expect 14-12 gauge steel, 700-1,000 lb capacity ratings, basic J-hooks and safeties, and limited attachment options.
These racks handle beginner-to-intermediate training loads acceptably but show limitations as strength progresses. Consider budget racks as stepping stones with 2-3 year service lives before upgrading becomes desirable.
Mid-Range Tier ($500-$1,200): This category offers the best value for serious home gyms. Rep Fitness PR-1100/4000 series, Titan T-3/X-3, and Rogue Echo/RML-390F deliver 11-gauge steel, 1,000+ lb capacities, quality J-hooks with UHMW liners, reliable safety systems, and broad attachment compatibility.
Mid-range racks accommodate beginner-through-advanced training, support heavy powerlifting loads, and provide expansion paths through compatible attachments. Most lifters find these racks serve their needs permanently, making the mid-range tier the sweet spot for cost-to-performance ratio.
If you’ve narrowed your search to two of the most popular options in the $500–$900 range, our Titan T3 vs REP PR-4000 comparison breaks down exactly how they stack up across steel, warranty, and long-term value.
Premium Tier ($1,200-$2,500+): Rogue Monster series, Sorinex, Prime Fitness, and Rep’s Ares line feature 7-gauge steel, 1,500-3,000 lb capacities, commercial-grade components, extensive attachment ecosystems, and lifetime frame warranties.
Premium racks justify their cost for dedicated lifters who train daily, move heavy weights, want the best attachment options, or prefer buy-once-cry-once philosophy. The quality difference is tangible but matters most to experienced users who can appreciate the enhanced stability, smoother adjustments, and broader customization options.
Total Cost Considerations: Remember that rack price represents just 40-60% of complete setup costs. Budget additionally for:
- Barbell: $150-450
- Weight plates: $300-800 for 300 lb set
- Bench: $150-500
- Flooring/platform: $100-300
- Accessories: $200-600
A realistic budget for complete power rack gym starts at $1,500 for economy setups and reaches $3,000-4,000 for quality mid-range equipment.
Home gym racks span from $200 economy models to $3,000+ commercial-grade equipment, with distinct value propositions at each price tier.
Explore our detailed buying guide with budget recommendations → (Coming Soon)
Attachment Compatibility
A rack’s attachment ecosystem determines its long-term expansion potential and ultimate value delivery.
Standardization Matters: Some manufacturers use proprietary attachment systems that lock you into their accessory ecosystem. Others build racks compatible with “standard” patterns used across multiple brands. Understanding compatibility before purchasing prevents frustration when you later want to add attachments.
The 5/8″ hole diameter with specific spacing patterns (often based on Rogue’s ecosystem) has become a de facto standard. Racks matching this pattern access attachments from multiple manufacturers, providing greater selection and competitive pricing.
Common Attachment Categories:
Dip Attachments ($80-200): Matador-style dips, corner-mounted stations, or full dip bars expand upper body pushing options. Check maximum weight ratings and ensure your rack provides stable mounting points at appropriate heights.
Lat Pulldown Systems ($200-600): Cable-based systems mount to rack tops, adding pulling movements that complement pull-ups. Weight stack capacity, pulley smoothness, and cable routing affect functionality.
Landmine Pivots ($40-100): These rotating sleeves create anchors for landmine presses, rows, and rotational training. Simple post-mounted designs work best for most applications.
Band Pegs ($20-60): Mounting points for resistance bands enable accommodating resistance training. Multiple peg locations at various heights expand band training options.
Plate Storage ($100-300): Post-mounted or corner-mounted plate holders organize weight plates while utilizing rack structure rather than consuming floor space.
Monolift Attachments ($200-500): Advanced attachments that hold the bar while you position underneath, then swing away for the lift. Popular in powerlifting training but add cost and complexity most home users don’t need.
Before committing to a specific rack, research what attachments you’ll likely want within 1-2 years. Verify those attachments exist for your chosen rack or that aftermarket options from other brands will fit. Starting with an open-ecosystem rack provides maximum flexibility as your needs evolve.
Browse our complete accessories guide → (Coming Soon)
Getting Started: Quick Decision Framework
Total Time: 30 minutes
STEP 1: Measure Your Space
Ceiling height: _____”
Floor space (LxW): _____’ x _____’
Obstacles (doors, utilities): _____________
Floor type: ☐ Concrete ☐ Wood ☐ Other
STEP 2: Define Your Budget
Rack budget: $_____
Total setup budget: $_____
Timeline: ☐ Buy now ☐ Phase over 3-6 months
STEP 3: Assess Your Training Profile
Experience: ☐ Beginner ☐ Intermediate ☐ Advanced
Max squat (current or goal): _____ lbs
Training frequency: _____ days/week
Solo training: ☐ Always ☐ Sometimes ☐ Never
STEP 4: Determine Your Must-Haves
☐ Safety bars/spotter arms (essential for solo training) ☐ Pull-up bar ☐ Specific attachment compatibility (list): _____________ ☐ Folding/space-saving capability ☐ Ability to bolt down ☐ Specific brand/warranty
STEP 5: Filter Your Options
If your ceiling is under 90″: → Look at “shorty” rack models or consider wall-mounted options
If your budget is under $500: → Focus on Titan T-2, Fitness Reality, Rep PR-1100, budget squat stands
If your budget is $500-$1,200: → Excellent options: Rep PR-4000, Titan T-3/X-3, Rogue RML-390F, Fringe Sport
If your budget exceeds $1,200: → Premium choices: Rogue Monster, Rep Ares, Sorinex, Prime
If you need space-saving: → Folding racks (Rogue RML-390F, PRx), wall-mounted rigs, or quality squat stands
If you train heavy (500+ squat): → Minimum 11-gauge steel, 1,000+ lb rating, quality safety system
STEP 6: Research Specific Models
Based on your filters above, identify 3-5 specific rack models that meet your criteria. Read detailed reviews, watch video demonstrations, and join home gym communities to ask current owners about their experiences.
STEP 7: Verify Specs Before Purchase
Confirm exact dimensions fit your space with 6″+ clearance
Verify weight capacity exceeds your needs by 2x minimum
Check attachment compatibility for future additions
Review warranty terms (lifetime frame warranty ideal)
Confirm return policy (in case of issues)
STEP 8: Plan Your Setup
Order flooring/platform materials
Prepare assembly area
Arrange help if needed (2 people recommended)
Schedule 2-4 hours for assembly
Plan first workout program
Popular Home Gym Racks Brands: Budget to Premium Options
Budget-Friendly Options
Titan Fitness Titan built their reputation on affordable equipment that delivers acceptable quality for home use. Their T-2 and T-3 series racks provide entry-to-mid-range options with surprising capability given their prices.
The T-2 series (starting around $300) features 2×2″ uprights with 12-gauge steel, suitable for lifters working with under 400 lb squats. Basic but functional J-hooks and safety bars handle lighter training loads adequately.
Titan’s T-3 series ($ 400-600) steps up to 2×3″ uprights and 11-gauge construction, creating meaningful improvements in stability and capacity. These racks compete favorably with options costing 50% more from other brands. The T-3 maintains compatibility with many Rogue Monster Lite attachments, providing access to a broad accessory ecosystem.
Titan’s quality control shows more variation than premium brands—some customers receive perfect equipment while others deal with crooked holes, chipped powder coating, or missing hardware. Their customer service handles issues reasonably well, though response times exceed premium brands.
Fitness Reality Fitness Reality specializes in ultra-budget equipment sold primarily through Amazon. Their 810XLT squat stand ($150-250) and power cage models ($300-450) serve beginners with limited budgets.
These racks use thinner steel (14-gauge common), basic hardware, and minimal features. Safety capabilities prove adequate for beginners squatting under 300 lbs but show limitations as strength progresses. The low price makes them acceptable starter equipment with the understanding that serious lifters will outgrow them within 1-2 years.
Fitness Reality’s advantage lies in Amazon’s hassle-free returns if issues arise and the extremely low barrier to entry for building a home gym.
Budget-friendly home gym racks from Titan and Fitness Reality provide acceptable quality for beginners and lighter training loads.
Mid-Range Leaders
Rep Fitness Rep Fitness emerged as a home gym favorite by offering near-premium quality at mid-tier prices. Their PR-1100, PR-4000, and PR-5000 series provide clear upgrade paths matching various budgets and needs.
The PR-4000 series ($700-1,100 depending on configuration) represents exceptional value: 3×3″ uprights, 11-gauge steel, 1,000 lb capacity, Westside hole spacing, quality UHMW-lined J-hooks, and compatibility with Rogue accessories. Many experienced lifters who could afford premium equipment choose PR-4000s because they deliver 90% of premium performance at 60% of the cost.
Rep’s customer service consistently earns high marks, with knowledgeable representatives, reasonable shipping times, and fair handling of any issues. Their website provides clear specifications, comparison tools, and genuine customer reviews that help buyers make informed decisions.
The main drawback is availability—popular models often sell out, requiring waitlists or settling for alternate finishes. Rep’s Colorado-based warehouse serves the western U.S. well but eastern customers may face higher shipping costs.
Fringe Sport Fringe Sport occupies a similar market position to Rep Fitness, offering quality equipment at competitive prices with strong customer service. Their Garage Series and Competition Series racks serve home gyms and commercial facilities respectively.
Fringe emphasizes American-made options alongside imported equipment, giving buyers choice based on budget and preference. Their racks feature quality construction, thoughtful design details, and compatibility with standard accessories.
Fringe Sport’s smaller scale compared to Rogue or Rep means more limited selection but also enables responsive customer service and flexibility in customization.
Mid-range home gym racks from Rep Fitness and Fringe Sport deliver near-premium quality at competitive prices.
Premium Brands
Rogue Fitness Rogue dominates the premium home gym market through extensive product lines, consistent quality, and the industry’s largest attachment ecosystem. Their RML-390F folding rack, R-3 power rack, and Monster series define what serious home gyms aspire to.
Rogue racks feature 11-gauge (RML series) or 7-gauge (Monster series) steel, meticulous manufacturing, extensive Westside hole spacing, premium UHMW J-hooks, and lifetime warranties on frames. The powder coating resists chipping remarkably well, and hardware quality ensures bolts stay tight through years of use.
The attachment ecosystem represents Rogue’s strongest advantage—dozens of first-party options plus countless third-party manufacturers building Rogue-compatible accessories. This compatibility ensures you’ll never lack expansion options regardless of how your training needs evolve.
Prices reflect the premium positioning: $800-1,400 for RML series, $1,500-3,000 for Monster series. Many buyers consider Rogue the “buy once, cry once” choice that eliminates wondering if they should have bought better initially.
Rogue’s Ohio manufacturing enables faster shipping to eastern U.S. customers compared to Rep Fitness, though western buyers may face higher freight costs.
Sorinex Sorinex builds equipment for elite commercial gyms, professional sports teams, and discerning home users. Their racks represent the absolute top tier in terms of design innovation, build quality, and customization options.
Expect to pay $2,000-5,000+ for Sorinex racks with lead times extending several weeks for custom orders. The quality justifies the cost for buyers who want the absolute best, appreciate American manufacturing, and value unique customization options not available elsewhere.
Most home gym owners find Sorinex exceeds practical needs, but for those seeking ultimate quality without compromise, Sorinex delivers.
Prime Fitness Prime occupies a niche between conventional power racks and fully custom commercial installations. Their equipment emphasizes biomechanics, innovation, and premium materials.
Prime racks incorporate features like adjustable width, specialized bar catches, and integration with their proprietary pulley systems. Prices align with Sorinex, making Prime appropriate for dedicated lifters with substantial budgets who appreciate engineering innovation.
The best home gym racks from Rogue and Sorinex represent the highest quality available, built to commercial gym standards.
Read our comprehensive brand comparison → (Coming Soon)
Next Steps After Choosing Your Home Gym Racks
Ready to choose your rack? Use these resources to finalize your decision:
Essential Guides:
- Complete Power Rack Buying Guide – Deep dive into selection criteria (Coming Soon)
- Best Power Racks 2026 – Our tested top picks (Coming Soon)
- Budget Racks Under $500 – Maximum value options (Coming Soon)
- Rogue vs Titan vs Rep Comparison – Head-to-head brand analysis (Coming Soon)
Technical Deep Dives:
- Weight Capacity Guide – Understanding ratings
- Steel Gauge Explained – Build quality factors (Coming Soon)
- Dimensions & Space Planning – Ensure proper fit (Coming Soon)
After Your Purchase:
- How to Assemble a Power Rack
- Essential Accessories – Expand functionality (Coming Soon)
- 25 Power Rack Exercises – Complete exercise library (Coming Soon)
- Maintenance Guide – Protect your investment (Coming Soon)
Free Downloads:
- 📄 Home Gym Space Planning Template (PDF) (Coming Soon)
- 📊 Rack Comparison Spreadsheet (Excel) (Coming Soon)
- ✅ Pre-Purchase Checklist (PDF) (Coming Soon)
- 🏋️ 12-Week Beginner Rack Training Program (PDF) (Coming Soon)
Community & Support:
- 💬 Join Our Home Gym Community (Facebook) – 50,000+ members (Coming Soon)
- 📧 Weekly Home Gym Tips Newsletter – Exclusive deals and content (Coming Soon)
- 🎥 YouTube Channel – Video reviews and tutorials (Coming Soon)
- 📱 Follow on Instagram – Daily setup inspiration (Coming Soon)
Frequently Asked Questions
Do I really need a power rack, or will squat stands work?
Squat stands work for experienced lifters who understand proper bailing techniques and train conservatively. However, power racks provide irreplaceable safety benefits for solo training, especially when pushing near-maximal weights. If you’ll train alone frequently and want to progress strength optimally, power racks justify their footprint and cost through enhanced safety and training confidence. Beginners should absolutely prioritize power racks with full safety systems.
What’s the minimum ceiling height I need for a power rack?
Standard power racks require 90-96″ ceiling height minimum—this accommodates 84-90″ rack heights plus 6″ overhead clearance for pull-ups and pressing movements. Taller individuals (6’2″+) benefit from 96-102″ ceilings. If your space offers less, look for “shorty” rack models (around 72-80″ height) or consider wall-mounted folding options that can mount lower on the wall.
Should I bolt my power rack to the floor?
Bolting improves stability during dynamic movements like kipping pull-ups, heavy band work, or when using certain attachments. However, quality racks with sufficient weight capacity and proper design remain stable for standard barbell training when free-standing. Bolt if: (1) you train explosively, (2) your floors allow it (concrete), (3) you want maximum stability. Skip bolting if you rent, have wooden floors, or might relocate your rack. Many successful home gyms use free-standing racks without issues.
How much weight capacity do I actually need?
Select racks with capacity ratings at least 2-3x your heaviest working weights to account for dynamic loading during lifts and safety margin for failed reps. If you squat 315 lbs currently, look for 1,000+ lb capacity. Advanced powerlifters moving 500+ lbs should seek 1,500 lb+ rated racks. Err toward higher capacity—you won’t outgrow it, and better-built racks typically correlate with higher ratings.
What attachments should I budget for initially?
Start with the essentials: quality J-hooks (often included but verify UHMW liners), reliable safety bars or straps, and a decent pull-up bar (usually integrated). Budget $200-400 for additional year-one accessories like dip attachment, band pegs, and basic plate storage. Advanced attachments like lat pulldown systems ($400-600) can wait until you’ve established consistent training patterns and identified specific needs.
Are expensive racks really worth it compared to budget options?
For casual lifters training 2-3x weekly with moderate weights, budget racks ($300-500) serve adequately. Serious lifters training 4-6x weekly, moving heavy weights, or planning decade-long use benefit substantially from mid-range ($600-1,200) or premium ($1,200+) options through better stability, superior attachment options, longer lifespan, and higher resale value. The mid-range tier often provides the best cost-to-performance ratio for dedicated home gym owners.
Can I build a complete home gym around just a power rack?
Yes. A power rack plus barbell, weight plates, and adjustable bench enables comprehensive strength training covering all major movement patterns. Add pull-up capacity (integrated), dip attachments, and band anchors (both affordable), and you’ve replicated 80% of commercial gym strength training capability. This makes power racks the highest-value single equipment purchase for home strength training.
How long does a quality power rack typically last?
Premium racks with proper maintenance last 20-30+ years—many manufacturers offer lifetime frame warranties reflecting this durability. Mid-range racks typically serve 10-15 years before showing wear requiring replacement. Budget racks may need replacement in 5-7 years depending on usage intensity. Regular maintenance (wiping down sweat, occasional rust treatment, tightening bolts) extends lifespan across all tiers.
What’s the difference between 2×2″, 2×3″, and 3×3″ uprights?
These measurements indicate the cross-sectional dimensions of the vertical posts. Larger uprights provide greater strength, stability, and resistance to flexing under load. 2×2″ suits lighter training (under 400 lb squats), 2×3″ handles serious home gym use (400-600 lb squats), and 3×3″ delivers commercial-grade stability for very heavy training or dynamic movements. Larger uprights also offer broader attachment compatibility and better free-standing stability.
Is assembly difficult? Can I do it alone?
Most racks require 2-4 hours assembly time. The process involves basic mechanical skills—reading instructions, using wrenches, and connecting components with bolts. While possible solo, a second person makes assembly significantly easier, particularly when aligning holes and holding components during bolting. No specialized tools required—typically just adjustable wrenches or socket set. Many manufacturers provide assembly videos that clarify the process.
Related Resources
Rack Selection & Comparison:
- Compact Power Rack Guide
- Interactive Rack Selector Tool – Find your match in 2 minutes
- Complete Home Gym Power Rack Guide – Complete category guide
- Half Rack Pros & Cons – When to choose half racks (Coming Soon)
- Folding Rack Solutions – Space-saving options (Coming Soon)
Buying Guides:
- 2026’s Best Home Gym Power Rack Guide
- Budget Rack Roundup – Best value options (Coming Soon)
- Premium Rack Comparison – High-end models (Coming Soon)
- Brand Comparison – Titan T3 vs Rep PR-4000
- Rogue Fitness Review
Technical Specifications:
- Power Rack Weight Capacity Guide
- Steel Gauge Guide – Build quality (Coming Soon)
- Hole Spacing Standards – Westside vs standard (Coming Soon)
- Power Rack Safety Systems – Protection systems
Setup & Installation:
- How to Assemble a Power Rack
- Floor Protection Options – Platform building (Coming Soon)
- Power Rack for Your Garage Gym – Optimization tips
- Power Racks for Low Ceilings – Basement and Garage Installation
Training & Usage:
- 25 Essential Rack Exercises – Complete library (Coming Soon)
- Proper Squat Technique – Form guide (Coming Soon)
- Safe Solo Training – Safety protocols (Coming Soon)
- Beginner Programs – Get started right (Coming Soon)
Maintenance & Care:
- Rack Maintenance Schedule – Keep it lasting (Coming Soon)
- Rust Prevention – Protect your investment (Coming Soon)
- Troubleshooting Guide – Fix common issues (Coming Soon)
Last Updated: December 2025 | Next Review: March 2026
Have questions about power racks? Join our community of 50,000+ home gym owners for personalized advice, setup inspiration, and ongoing support.