This article contains affiliate links to products we’ve researched and recommend. If you purchase through our links, we may earn a small commission at no extra cost to you. This helps us create free content like this guide. We only recommend equipment we believe provides genuine value. Read our full disclosure policy
At a Glance: Compact Power Rack Solutions
Compact power racks solve the challenge of serious strength training in limited spaces. Standard racks measure 48-49″ wide by 48-54″ deep, but space-saving options include narrow-footprint models (36-44″ deep), wall-mounted folding systems, and short racks for low ceilings (72-82″ tall vs. standard 90″).
Key considerations: reduced-depth racks may require bolting for stability, folding systems need solid wall structure (concrete or multiple studs), and compact doesn’t mean weak (quality models handle 1,000+ lbs reliably).
Budget ranges from $400-600 for basic compact racks to $1,200-1,800 for premium folding systems.
Most effective compact solutions maintain a standard 48″ width for proper exercise spacing while reducing depth or height. Installation complexity varies: basic compact racks assemble like standard models (2-3 hours), while wall-mounted systems require professional assessment and 4-6 hours of installation time.
Introduction
My first home gym measured exactly 7 feet 11 inches from floor to ceiling joist. I discovered this after ordering a “standard” 90-inch power rack that arrived with great fanfare and immediately became an expensive storage problem. The rack physically fit if I removed the pull-up bar, but that eliminated half the exercises I’d planned. Installing it meant no overhead press, no pull-ups, and constant anxiety about bumping my head during squats.
That expensive mistake taught me something valuable: space constraints don’t eliminate home training options, they just require different solutions. The fitness equipment industry has evolved significantly since those early garage gym days.
Where we once accepted that serious strength training demanded dedicated space with standard dimensions, manufacturers now recognize that millions of us train in basements with low ceilings, apartments with limited floor space, or garages that must accommodate vehicles between workouts.
Compact power rack designs serve this growing market. These aren’t compromised versions of “real” racks. They’re purpose-built solutions that deliver serious training capability within challenging spatial constraints. The best compact options sacrifice footprint without sacrificing safety, stability, or exercise variety. Understanding which compromises matter versus which prove insignificant separates successful small-space gyms from frustrating equipment mistakes.
If you’re still evaluating full-size versus compact options, our complete Home Gym Racks Buying Guide breaks down every rack type in detail.
This guide examines practical solutions for training in limited spaces. We’ll explore reduced-footprint racks that shrink depth without compromising width, short racks designed specifically for low ceilings, folding systems that collapse when not in use, and the critical specifications that determine whether compact equipment serves your needs or creates new problems. Whether you’re training in a 7-foot basement, sharing garage space with cars, or setting up in a spare bedroom, you’ll find proven approaches that work.
Understanding Compact Power Rack Design
What Actually Makes a Rack “Compact”
The term “compact” gets thrown around loosely in fitness equipment marketing. Some manufacturers label anything smaller than their largest model as compact, creating confusion about what these racks actually deliver. Real compact power racks reduce dimensions in specific ways that address actual space limitations.
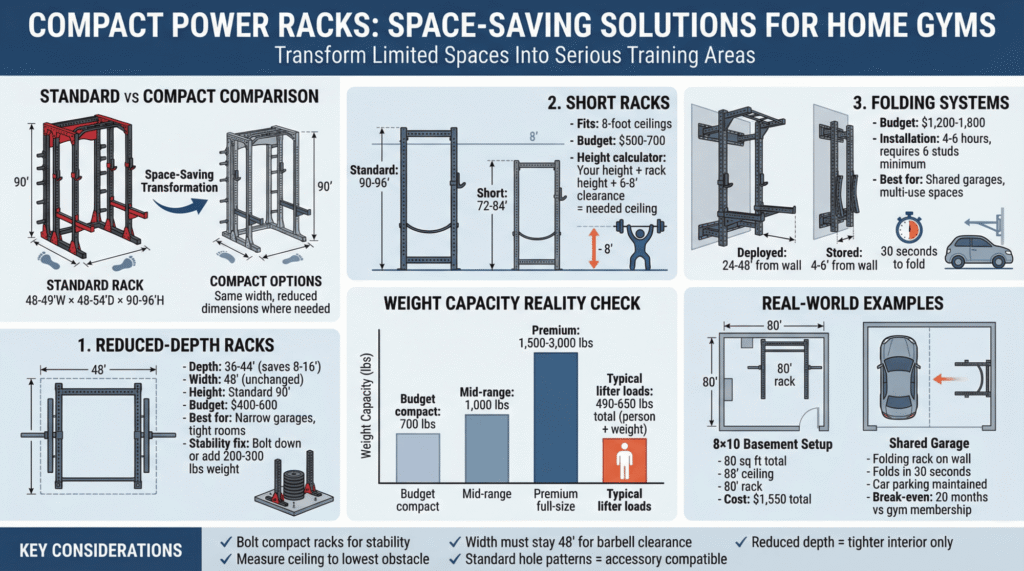
Reduced depth represents the most common compact approach. Standard racks measure 48-54 inches front-to-back. Compact versions shrink this to 36-44 inches, saving 8-16 inches of precious floor space. This depth reduction happens by moving the rear uprights closer to the front posts, creating a narrower training cage without affecting width (which must remain near 48 inches for proper exercise clearance).
For a deeper breakdown of standard rack dimensions and why width matters, see our full Power Rack Buying Guide.
Shortened height addresses low-ceiling environments. Where standard racks stand 90-96 inches tall, short models measure 72-84 inches. These fit 8-foot ceilings (96 inches total height) while still providing pull-up capability and overhead pressing clearance for most users. Some designs feature removable top sections, letting you add height when relocating to spaces with taller ceilings.
Folding mechanisms take compact design further by eliminating the footprint entirely when not in use. Wall-mounted racks fold flat against the wall, projecting just 4-6 inches when stored, versus 48+ inches when deployed for training. Free-standing folding racks collapse from standard depth to 12-16 inches, creating vehicle clearance in shared garages.
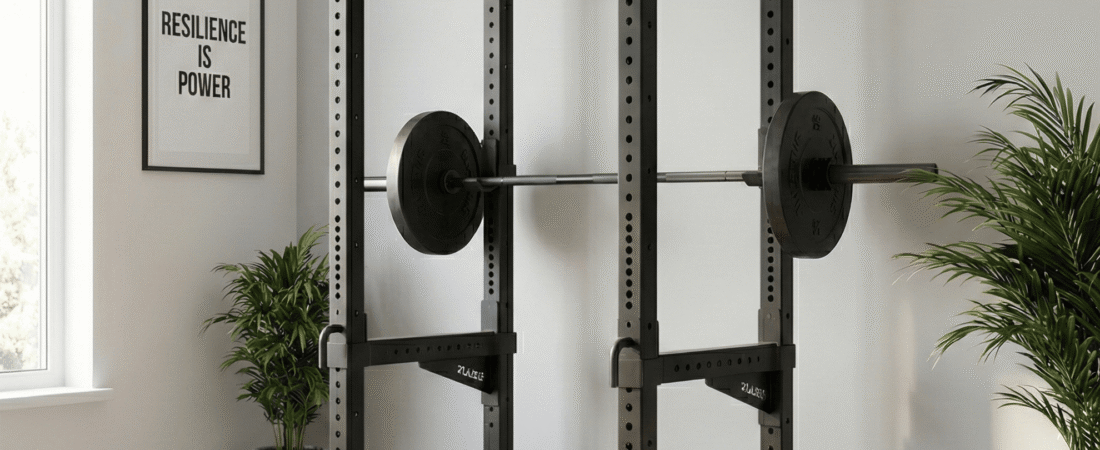
I switched to a reduced-depth rack after my ceiling-height disaster, choosing a 43-inch-deep model over the standard 54-inch rack I’d returned. That 11-inch difference meant the difference between my car fitting in the garage or not. The narrower cage felt slightly more enclosed initially, but within three training sessions, I’d adapted completely. The weight capacity, safety systems, and exercise variety remained identical to full-size racks.
The Trade-Offs That Actually Matter
Compact power racks involve compromises, but understanding which trade-offs affect training versus which exist only on paper helps you make informed decisions.
Reduced stability from narrower bases creates the most significant practical challenge. A rack measuring 48″ wide by 43″ deep has less inherent tip-resistance than one measuring 48″ by 54″. The physics are straightforward: a smaller footprint means less weight required to cause tipping during pull-ups or when unracking heavy loads. This doesn’t make compact racks unsafe; it means they often require bolting to the floor, whereas free-standing racks might work with standard racks.
Tighter interior space matters primarily during setup and movement. You’re training inside a cage measuring 11 inches shallower front-to-back. This affects how you position benches, how much room there is to walk around inside the rack, and, potentially, your walkout distance after unracking squats. For most exercises performed properly, the difference proves negligible. For those who value extra space during setup, the tighter quarters can feel constraining.
Limited attachment mounting affects some compact designs where reduced depth means fewer attachment options. Lat pulldown systems require overhead clearance and depth for weight stacks. Some compact racks can’t accommodate full-size pulley systems without the stack extending beyond the footprint. This matters only if you plan extensive accessories, less so if you’re focused on basic barbell training.
Ceiling clearance with short racks creates the obvious limitation of overhead space. A 78-inch rack in a 96-inch ceiling provides 18 inches of clearance. This works fine for most people’s pull-ups and overhead press. Taller individuals (over 6’2″) or those who prefer abundant overhead room may feel cramped. The shorter overall height also means fewer hole positions along uprights, potentially limiting some adjustment ranges.
None of these trade-offs eliminates serious training. They simply require awareness during equipment selection and occasional adaptation in training approach. The alternative in genuinely space-limited environments isn’t choosing between compact racks and standard racks. It’s choosing between compact racks and no rack at all.
Reduced-Footprint Rack Solutions
Narrow-Depth Power Racks
The most straightforward compact power rack approach maintains standard width (48–49 inches) while reducing front-to-back depth to 36–44 inches. This design preserves proper exercise spacing side-to-side (you can’t narrow the width without limiting barbell and body clearance) while saving depth that many spaces simply can’t accommodate.
The Vulcan Strength Slim Fit Power Rack follows this reduced-depth philosophy while retaining 3×3″ uprights common to heavier-duty systems. By trimming overall depth compared to traditional full cages, it allows placement in tighter garage bays or basement corners without sacrificing the enclosed four-post structure.
Like other narrow-depth racks, it preserves full-width internal bar clearance and traditional safety options between front and rear uprights. The compromise is interior working space — you have slightly less room to move inside the cage, particularly during setup for bench presses or rack pulls — but the structural integrity remains comparable to many full-depth racks when properly secured or weighted.
Choosing between pin-and-pipe or strap safeties can also influence noise and comfort — our Power Rack Safety Systems Comparison explains the differences.
The Titan Fitness T-2 Series also fits this budget category. At 48″ wide by 43″ deep, the T-2 delivers a functional four-post cage with a footprint nearly 20% smaller than many standard racks. The 12-gauge 2×2″ uprights support up to 700 pounds, sufficient for most home training scenarios. Assembly follows typical rack procedures, and the design accommodates basic attachments like dip bars and band pegs.
The limitation in reduced-depth systems typically manifests as instability during dynamic movements. Pull-ups on lighter, free-standing racks can produce noticeable sway because the shortened base provides less resistance to tipping forces. Bolting to concrete floors largely eliminates this issue. For renters or those training on wood floors, adding substantial plate storage weight to the rack’s base increases stability by increasing total system mass.
The REP Fitness PR-1100 takes a similar approach with slightly different proportions: 43″ wide by 43″ deep, creating a nearly square footprint that fits particularly tight spaces. Its 11-gauge steel construction and 700-pound capacity provide reliable support for general strength training, while partial accessory compatibility offers modest upgrade flexibility. In the mid-$400s to $ 500s, it represents strong value within the compact cage category.
I’ve trained on reduced-depth racks across multiple brands while helping clients configure small-space gyms. The depth reduction has a smaller effect on training than the specifications suggest. Yes, you have less “living room” inside the cage. No, this doesn’t materially impact standard barbell movements when executed with proper positioning. The most consistent adjustment involves bench setup — being deliberate about centering before beginning a set. Once dialed in, the experience differs far less than the numbers imply.
Try out our Compact Rack Footprint Visualizer tool below. Be sure to factor in extra width for barbells, attachments etc.
Three-Post Half Rack Designs
Half racks sacrifice the fourth post (rear support) entirely, creating even more compact footprints through fundamental design changes. These lean toward the boundary between “compact racks” and “different equipment categories,” but they serve small-space needs effectively enough to warrant discussion.
The Vulcan Strength Edge Half Rack illustrates how manufacturers achieve three-post stability without excessively expanding the footprint depth. Built with 3x3" uprights and extended rear stabilizer feet, the design relies on base geometry and plate storage posts for counterbalance rather than a full rear cage.
This allows wall-adjacent placement while maintaining structural rigidity under heavier barbell loads. As with most three-post systems, protection comes from forward-facing spotter arms attached to the uprights. Safety coverage exists where the arms are positioned, not across a fully enclosed span, which makes bar path consistency more relevant compared to four-post racks.
The Rogue Fitness RML-390BT offers a similar premium take on the half-rack concept. At 49" wide by 41.5" deep, its footprint competes with reduced-depth full cages while providing broad attachment compatibility through Rogue’s Monster Lite hole pattern. The rear stabilizer feet extend from the uprights to improve balance without adding full rear posts. Like the Vulcan design, it supports wall placement and open training space in front of the rack.
The trade-off in both designs involves the coverage area. Spotter arms extending from uprights provide protection where they’re set, but they don’t span the full width between four posts. This requires more precise movement execution and greater control during heavy attempts. For experienced lifters comfortable with consistent bar paths, three-post racks provide adequate protection. For beginners refining movement patterns, enclosed four-post cages still offer a wider safety margin.
The psychological difference remains significant. Training inside a fully enclosed cage feels different from training in an open three-post system, even when the safety function is comparable. Some lifters prefer the contained structure of four uprights. Others appreciate the openness and reduced visual bulk of a half rack. Neither preference is objectively superior, but both meaningfully influence long-term satisfaction with the equipment.
Short Racks for Low Ceilings
Understanding Height Requirements
Standard power racks stand 90-96 inches tall, requiring a minimum ceiling height of 96-102 inches to account for overhead clearance. Millions of home gym spaces can't accommodate these dimensions. Basements often feature ceilings 84-90 inches (7-7.5 feet) high. Apartments and condos built in recent decades commonly use 96-inch (8-foot) standard ceilings. Garage conversions might have even less clearance after adding flooring and insulation.
Short power racks address this limitation directly by reducing height to 72-84 inches. These fit 8-foot ceilings while preserving pull-up capability and overhead pressing clearance for users up to about 6 feet tall. The reduced height doesn't affect any exercise performed with feet on the ground. The limitation involves overhead clearance for pull-ups and pressing movements.
We cover ceiling measurements and clearance calculations in more detail in our Low Ceiling Power Rack Guide.
My own garage features 93 inches from the floor to the lowest beam. After the ceiling-height rack disaster, I chose an 82-inch model that leaves 11 inches of clearance. This works perfectly for my 6-foot height during pull-ups and overhead press. Would I prefer 18 inches of clearance, like a properly sized rack, in 10-foot ceilings? Sure. Does the difference materially affect my training? Not even slightly.
Titan X-3 Short at 82 inches height represents solid value in this category. The 11-gauge steel and 2x3" uprights match full-height X-3 specifications, maintaining 1,100-pound capacity and compatibility with extensive Titan accessories. At $500-700, depending on configuration, this delivers serious training capability within low-ceiling constraints. The 82-inch height accommodates 8-foot ceilings with enough clearance for most users, though taller individuals (6'2"+) might feel cramped during pull-ups.
Rep PR-4000 in 80" height brings mid-range quality to the short rack category. At 80 inches, this fits even tighter ceiling situations while maintaining Rep's excellent build quality and customer service reputation. The slightly shorter height means fewer hole positions along uprights (approximately 35-40 holes versus 45-50 on standard racks), but this rarely limits practical functionality. Most exercises use hole positions in the middle range anyway, making the reduced adjustability more theoretical than a practical limitation.
Creative Solutions for Extreme Low Ceilings
When ceilings drop below 90 inches, creative approaches become necessary. Removing pull-up bars from short racks saves 3-4 inches of height, potentially making the difference between fitting and not fitting. This sacrifices pull-up training inside the rack but doesn't eliminate the option entirely. Wall-mounted or doorway pull-up bars cost $30-60 and provide pull-up capability independent of your rack.
Recessing racks into floors works for serious garage gym builds on concrete slabs. Cutting a shallow pit (4-6 inches deep) and setting the rack base below floor level effectively "shortens" the rack by that amount. This requires concrete-cutting skills or contractor assistance, proper drainage to prevent water pooling, and acceptance of a permanent floor modification. The approach suits dedicated training spaces where the investment makes sense, less so for temporary setups or rental properties.
Accepting overhead movement limitations represents the simplest solution. If your ceiling genuinely won't accommodate pull-ups inside any rack, focus on movements that work: squats, bench press, rows, and deadlift variations provide comprehensive strength development even without pull-ups. Add rings, bands, or a separate pull-up station elsewhere for pulling movements. Not ideal, but far better than abandoning home training entirely due to ceiling constraints.
Folding and Wall-Mounted Systems
Wall-Mounted Folding Racks
Folding power racks represent the ultimate space-saving solution, literally disappearing when not in use. These permanently mount to walls using lag bolts into studs or concrete anchors into masonry, then fold flat when training finishes. The deployed position provides full four-post cage training capability. The stored position projects just 4-6 inches from the wall.
PRx Performance Profile Rack has dominated this category since popularizing folding racks for home use. The 90-inch or 100-inch height options fold to 5.25 inches from the wall when stored, creating vehicle clearance in garages or opening living space in apartments. When deployed, the rack extends 24 inches from the wall and provides full safety coverage through spanning safeties. The system includes gas spring assists that make folding and unfolding smooth single-person operations, taking under 30 seconds.
The catch involves installation requirements and cost. Wall-mounted racks require mounting to substantial structural support. Wood-framed walls need solid attachment to multiple studs with heavy-duty lag bolts. Concrete or block walls provide ideal mounting surfaces but require concrete anchors rated for dynamic loads. Professional installation assessment costs $100-200 but prevents catastrophic failures caused by improper mounting or insufficient structure.
The price reflects the sophisticated engineering: PRx racks cost $1,200-1,800 depending on configuration, roughly 2-3x the cost of comparable fixed racks. This premium buys genuine space-saving capability impossible with fixed equipment. For those truly constrained by space and able to install properly, folding racks deliver remarkable training capability within minimal footprints.
I helped a client install a PRx rack in his attached garage, where maintaining vehicle parking was non-negotiable. The installation required locating studs precisely (we found and marked six studs across the mounting span), drilling pilot holes, and installing lag bolts with washers into pre-drilled holes. The entire process took about 4 hours with two people. Once mounted securely, the rack functions flawlessly. He trains 4-5 days weekly, folding the rack away in under a minute after each session. Three years later, the system shows zero wear or loosening, justifying the installation effort and premium cost.
Folding Squat Stands and Half Racks
For those who can't mount to walls, free-standing folding racks offer partial space-saving. These typically feature hinged uprights that fold inward, reducing depth from 48+ inches to 12-16 inches. The folding mechanisms vary significantly in quality, with better designs using locking pins that positively secure both the deployed and folded positions.
Rogue Fold Back Wall Mount Rack technically mounts to walls but uses a different mechanism than full-folding racks. The uprights swing back against the wall rather than folding flat, and the system includes fold-away safety spotter arms. At $900-1,200, this costs less than full-folding racks while providing similar space-saving benefits for those with suitable walls.
The limitations of full-folding racks include reduced safety coverage and a narrower training area (no rear uprights, creating a cage structure). These work well as glorified squat stands with space-saving capability, but don't replicate full cage protection. Understanding this distinction helps set proper expectations.
Critical Specifications for Compact Racks
Stability and Bolting Considerations
Compact power rack stability matters more than with standard racks due to the reduced footprint. Smaller base areas provide less resistance to tipping forces from unracking heavy weights, performing pull-ups, or hanging accessories.
Bolting recommendations differ for compact versus standard racks. According to ASTM F1250 equipment safety standards, anchoring equipment significantly reduces tip-over risk. Where full-size racks often work reliably free-standing, compact versions benefit greatly from bolt-down installation.
The 6-8 concrete anchors required for bolting cost $15-30 total and take 30-60 minutes to install. This minimal investment transforms potentially tippy compact racks into rock-solid training platforms.
For those unable to bolt (renters, wood floors, or opposition to permanent modifications), weight loading significantly improves stability. Adding 200-300 pounds of weight plates to storage pegs integrated into the rack base lowers the center of gravity and increases the mass that must move to cause tipping. This doesn't replicate bolted stability perfectly, but it helps substantially.
Base design varies among compact models, affecting stability. Look for:
- Wide stance feet that extend the footprint beyond upright placement
- Heavy-gauge base crossmembers (same thickness as uprights)
- Multiple connection points between the uprights and the base
- Optional weight plate storage integration
Weight Capacity Reality Check
Manufacturer weight capacity ratings for compact power racks typically range from 700 to 1,000 pounds for budget to mid-range models. These numbers sound lower than those of premium full-size racks rated at 1,500-3,000 pounds, raising anxiety about whether compact racks can handle serious training.
The reality? A 700-pound capacity rack serves the overwhelming majority of home training scenarios. Consider: a 200-pound lifter squatting 450 pounds (a respectable intermediate-to-advanced lift) loads 650 pounds total on the rack. This leaves 50 pounds of headroom on a 700-pound rack, admittedly tight. But most home gym owners never approach these loads. A more typical 175-pound lifter squatting 315-pound loads, 490 pounds total, well within any compact rack's capacity, with room for progression.
The exception involves elite-level lifters regularly squatting 500+ pounds. These athletes benefit from premium racks with higher capacity ratings and thicker steel construction. For this small percentage of home gym owners, compact options may legitimately prove inadequate. For the other 95% of us? A quality 700-1,000-pound compact rack handles everything we'll throw at it throughout our training careers.
If you’re unsure how much rack capacity you actually need, our How Much Weight Capacity Do You Need in a Power Rack? article breaks it down by lifter level.
Choosing Your Compact Solution
Matching Racks to Space Constraints
Different space limitations require different compact power rack approaches:
Low ceilings (under 96"): Short racks (72-84" height) provide the obvious solution. Measure your ceiling height precisely, accounting for any beams, ductwork, or lights that reduce clearance. Add your height plus 6 inches, then ensure the rack height plus that clearance fits the available space. A 6-foot person needs approximately 78 inches (72" + 6") minimum for basic pull-up clearance. Add 3-4 inches buffer and you want racks under 82 inches for 96-inch ceilings.
Limited depth (narrow garages, tight rooms): Reduced-depth racks (36-44" deep) maintain full training capability while fitting elongated spaces. These work excellently against walls where depth is limited, but they accommodate standard width and height dimensions. Plan for bolting or significant ballast weight to address stability challenges due to a narrower footprint.
You can see more layout ideas in our Garage Gym Layout Planning Guide.
Shared spaces (garage parking, multi-purpose rooms): Folding systems justify their premium cost by eliminating the footprint between training sessions. Wall-mounted options require suitable walls and professional installation assessment, but deliver maximum space efficiency. Free-standing folding racks cost less and install like standard racks, but save less space (collapsing to 12-16" versus 4-6" for wall-mounted racks).
Apartment or condo training: Consider noise transmission alongside space constraints. Compact racks in apartments benefit from strap safeties (quieter than pin-and-pipe), UHMW-lined J-hooks (which reduce racking noise), and rubber flooring (which dampens impact). Wall-mounted racks require landlord permission and acceptance of the security deposit risk from wall modifications.
Budget Considerations
Entry compact racks ($400-600): Titan Fitness T-2, Rep PR-1100, and basic reduced-footprint models serve budget-conscious buyers acceptably. Expect 12-gauge steel, 700-1,000 lb capacity, basic safety systems, and standard accessories compatibility. These handle beginner-to-intermediate training reliably within genuine space constraints.
Mid-range compact options ($600-1,000): Better steel thickness (11-gauge), improved stability through design, quality UHMW-lined J-hooks, and broader accessory options characterize this category. Vulcan Strength Slim Fit Power Rack, Titan X-3 compact models, and quality half racks deliver excellent long-term value.
Premium space-saving systems ($1,000-1,800): Vulcan Strength Edge Half Rack, PRx Performance racks, and commercial-grade compact designs justify premium pricing through superior engineering, extensive warranties, and maximum space efficiency. Worth the investment for those with extreme space constraints or wanting the absolute best quality regardless of cost.
Real-World Compact Gym Examples
The 8x10 Basement Gym
My client Sarah trained in a basement with an 88-inch ceiling height and roughly 80 square feet of total space. We selected a Rep PR-4000 at 80 inches in height, positioned against one wall to maximize the remaining floor space. The rack footprint measured 49" x 43", leaving approximately 5 feet in front for movement and 3 feet behind for barbell storage and walking.
She bolted the rack to the concrete floor (6 anchors, $18 in hardware, 45 minutes installation). The stable platform handles her 205-pound squats and 135-pound bench press comfortably, with room for years of progression within the 1,000-pound capacity. Adding a folding wall-mounted bench that stores vertically between workouts completed the setup. Total equipment investment: $850 for the rack, $200 for the bench, $400 for the barbell and starter plate set, $100 for the rubber flooring.
Three years later, Sarah trains 4 days a week in that 80-square-foot space. The low ceiling means she performs pull-ups with slightly bent knees, but this hasn't limited her progression from assisted pull-ups to bodyweight sets. The limited floor space requires putting away weights after each exercise rather than leaving multiple barbells loaded, but this takes 30 seconds and doubles as a rest period activity.
The Shared Garage Solution
Another client needed to maintain parking for two vehicles while adding training capability to a two-car garage. We installed a PRx Performance 90-inch folding rack on the side wall, positioning it to deploy into the space occupied by one vehicle when that car wasn't present.
The installation required mounting to the garage's wood-framed exterior wall, locating six studs across the mounting span, and using 5/8" lag bolts. A professional assessment by a contractor confirmed that the wall structure could handle the dynamic loads ($150 consultation fee). Total installation took about 5 hours with two people measuring, leveling, drilling pilot holes, and driving the lag bolts.
The rack deploys in under 30 seconds, extends 24 inches from the wall when open, and folds to just over 5 inches when stored. This client trains 5 mornings a week before work, pulling his car out of the garage, unfolding the rack, training for 45 minutes, then folding everything away and parking before heading to his job. The system has operated flawlessly for 18 months through 300+ workout sessions.
The $1,600 cost for the folding rack seemed high initially, but avoiding gym membership ($80/month) meant break-even in 20 months. More importantly, the folding system solved the binary choice between training space and vehicle parking that would have otherwise prevented any home gym.
Final Thoughts
Space constraints don't eliminate home training options; they require thoughtful solutions. The compact power rack market has matured significantly, offering legitimate training capability within dimensions that seemed impossible a decade ago. Whether you're training in a low-ceiling basement, sharing garage space with vehicles, or setting up in an apartment's spare room, proven equipment options are available.
The key involves matching specific space limitations to appropriate compact solutions. Low ceilings demand short racks. Limited floor space benefits from reduced-depth designs. Shared spaces justify folding systems. Understanding these relationships prevents expensive mismatches between equipment and environment.
After helping dozens of clients build compact home gyms and training in small spaces myself for years, I've reached a clear conclusion: spatial constraints affect training far less than most people assume. Yes, you'll adapt positioning, adjust expectations about clearance, and possibly modify some movement execution. These adaptations become invisible within weeks of consistent training. The alternative of commuting to commercial gyms or abandoning strength training entirely carries far greater long-term cost than working within space limitations.
What space constraints are you working with in your training area? Ceiling height, floor space, shared use, or something else? Share your specific situation in the comments below. Your challenges might help other readers identify solutions they hadn't considered, and we can discuss whether compact racks or alternative approaches best serve your needs.
Frequently Asked Questions
Are compact power racks as stable as full-size racks?
Quality compact power racks with proper installation deliver comparable stability to standard racks for typical home training. The reduced footprint creates less inherent tip-resistance, making bolting to floors more important than with full-size racks. Bolted compact racks feel identical to bolted standard racks during normal training.
Free-standing compact racks benefit from weight loading (adding plates to storage) to improve stability. For training that doesn't involve dynamic movements like kipping pull-ups, properly set up compact racks serve reliably. Elite lifters who squat 600+ pounds might prefer full-size, premium racks, but most home gym owners train comfortably with quality, compact options.
What's the shortest power rack that still allows pull-ups?
The shortest functional rack height depends on your height and acceptable clearance. A 6-foot person needs approximately 78 inches (their height plus arm reach) for basic pull-ups. Add a 4-6 inch buffer, and 82-84 inch racks work for most people under 6'2".
Shorter racks (72-78 inches) accommodate pull-ups for users under 5'8"-5'10". If your ceiling won't fit any rack tall enough for your pull-ups, wall-mounted or doorway pull-up bars ($30-60) solve this separately from your rack purchase. Many successful compact gyms use short racks for squats and pressing with independent pull-up stations
Can I use a compact rack for heavy powerlifting training?
Yes, quality compact power racks handle serious powerlifting when properly selected and installed. Look for 11-gauge steel minimum, 1,000+ pound capacity ratings, and bolt the rack to concrete floors for maximum stability. Rep PR-4000 in compact configurations,
Titan X-3 short models and similar mid-range options reliably support squats exceeding 500 pounds. The reduced footprint doesn't affect weight capacity if the rack is bolted securely. Elite powerlifters regularly squatting 600+ pounds might prefer premium full-size racks for maximum stability, but advanced lifters at 400-550-pound squat levels train successfully in quality compact racks.
Do wall-mounted folding racks really stay secure over time?
Properly installed wall-mounted racks remain secure indefinitely when mounted to an appropriate structure. The critical factors are: attaching to multiple wall studs (minimum 4, ideally 6) with proper lag bolts (5/8" diameter minimum), using structural walls (not drywall over hollow space), and following manufacturer installation specifications precisely.
Professional assessment before installation costs $100-200 but prevents catastrophic failures from inadequate structure. Once correctly installed, bolts should be checked quarterly for first year, then annually. Properly mounted systems show no loosening or movement after thousands of workouts. Poor installation (insufficient mounting points, wrong wall type, undersized fasteners) causes problems, not the folding mechanism itself.
How much depth can I save with reduced-footprint racks?
Standard racks measure 48-54 inches deep front-to-back. Compact power racks typically reduce this to 36-44 inches, saving 8-16 inches of depth. This seemingly small reduction often makes the difference between fitting and not fitting in tight spaces.
The depth reduction doesn't affect width (which must stay near 48 inches for proper barbell clearance) or safety coverage. Reduced-depth racks may feel slightly more enclosed inside the cage, but this doesn't limit the execution of exercises. The trade-off involves reduced stability from a smaller footprint, making bolting or ballast weight more important than with full-depth racks.
What ceiling height do I need for a short power rack?
Short power racks ranging from 72 to 84 inches tall require ceilings 84 to 96 inches high, depending on your height and desired overhead clearance. Calculate needed ceiling height: rack height + your height + 6-8 inches clearance.
A 6-foot person using an 82-inch rack needs a minimum ceiling height of 94-96 inches (82 + 72 + 6-8 = 94-96). People under 5'10" fit comfortably in shorter racks (72-78 inches) under 8-foot ceilings. Taller individuals (over 6'2") struggle with standard 8-foot ceilings regardless of rack height. Always measure ceiling height to the lowest obstacle (beams, ductwork, lights), not just to ceiling joists.
Are compact racks harder to find accessories for?
Most quality compact power racks use standard hole patterns (typically 5/8" holes with 2-3" uprights), ensuring compatibility with a wide range of accessories from multiple manufacturers. Rep, Titan, and Rogue compact models accept the same attachments as their full-size racks.
The limitation involves physical space for some accessories rather than compatibility. Lat pulldown systems require overhead clearance that short racks might not provide. Weight storage might extend beyond the reduced footprint.
Dip bars, band pegs, J-hooks, and safety systems work identically on compact versus standard racks. Before purchasing, verify your chosen compact rack uses a common hole pattern rather than proprietary mounting systems.
Can I add height to a short rack later if I move?
Some manufacturers offer height extensions for short racks, though availability varies by brand and model. The Titan X-3 and Rep PR-4000 short versions can add upper sections when moving into spaces with taller ceilings, though you're essentially buying new top sections at an additional cost.
Most compact racks don't offer official extension options. The practical approach: if you anticipate moving to higher ceilings within 2-3 years, consider storing a short rack and purchasing a taller model later. Quality compact racks maintain 60-70% resale value, so selling your short rack when relocating and buying an appropriate height for the new space often makes more financial sense than attempting modifications.