This article contains affiliate links to products we’ve researched and recommend. If you purchase through our links, we may earn a small commission at no extra cost to you. This helps us create free content like this guide. We only recommend equipment we believe provides genuine value. Read our full disclosure policy
Power Rack Buying Summary
The best home gym power rack is not defined by weight capacity.
It’s the rack that fits your space, supports your training style safely, and won’t limit future upgrades.
Before you buy, confirm:
- Your ceiling height and inside depth actually support your lifts
- The rack has proper safeties and 1” bench-zone spacing (if you bench)
- You’ve committed to a widely supported standard (5/8” or 1”)
- The rack’s ecosystem supports future attachments you may want
If a rack fails any of these checks, it’s likely a dead-end purchase—no matter how strong it claims to be.
How to choose a home gym power rack comes down to fit, safety, and long-term usability—not advertised weight capacity.
The search for the perfect home gym power rack often starts with a misleading metric: weight capacity.
Manufacturers compete to advertise massive load ratings, but these numbers are non-standardized and rarely reflect real-world usability. In practice, the “best” rack is not the strongest or most expensive option—it’s the one that fits your room dimensions, supports your training safely, and won’t limit future upgrades.
This guide cuts through marketing hype with a practical four-step decision framework. You’ll learn how to evaluate critical constraints like ceiling height and inside depth, understand the structural requirements of folding racks, and decode technical terms such as 11-gauge steel and Westside hole spacing. By focusing on features that matter—not theoretical limits—you can choose a rack that becomes a permanent anchor for your home gym rather than a costly dead end.
Find Your Perfect Rack Type
Not sure which power rack is right for your space and training?
Answer a few quick questions and get a rack recommendation based on fit, safety, and future upgrades—not marketing specs.
⏱ Takes about 60 secondsWhat is your usable ceiling height?
(Measure to the lowest obstacle)
How much depth can you dedicate to the rack area?
(Not the whole room—just the rack zone)
Which best describes how you train?
How important is built-in safety when training alone?
Do you plan to add attachments later?
(Lat pulldown, storage, cables, etc.)
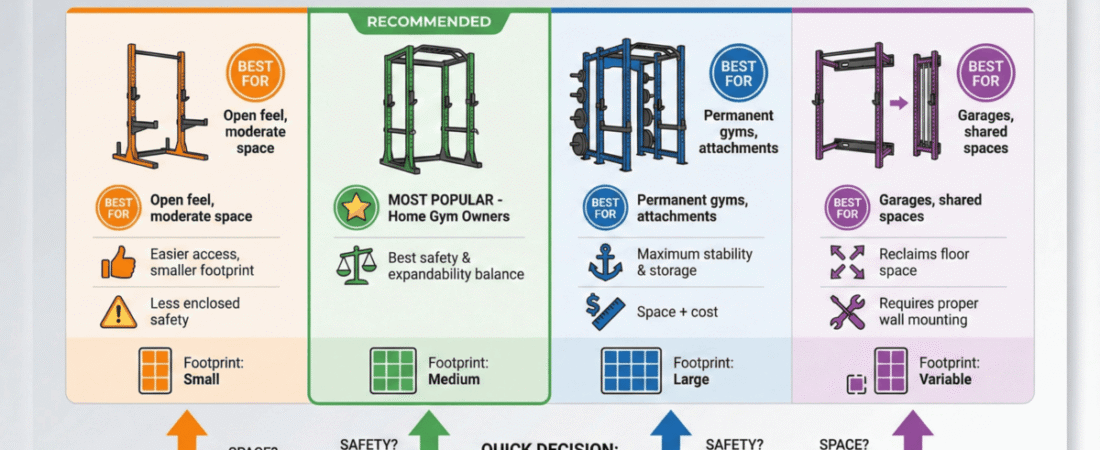
4-Post Power Rack
Best fit for your space and training goals
Why this works for you:
Good to know:
How to Choose a Home Gym Power Rack: The Core Decision Framework
Many buyers jump straight to comparing brands or prices. Instead, start by defining what you need. The right rack is the one that fits your space, supports your lifts safely, and leaves room to grow.
What is the best power rack for a home gym?
The best power rack for a home gym is one that fits your ceiling height, provides enough inside depth for safe lifting, includes proper safeties, and uses a widely supported standard (5/8” or 1”). For most people, a 4-post rack offers the best balance of safety, space, and expandability.
Step 1: Evaluate Space Constraints
Your available space determines which rack categories are even viable. Look beyond floor dimensions to account for vertical clearance and usability.
Ceiling Height
You must account for the total rack height, the added height of the pull-up bar, and your reach during pull-ups. Taller racks improve overhead clearance but require sufficient vertical space.
Footprint vs. Usable Workspace
Exterior dimensions don’t tell the full story. Inside depth determines squat walkout comfort and whether there’s enough room for incline benching. A shallow interior can feel cramped even if the footprint looks reasonable.
Structural Requirements
If you’re considering a folding rack to reclaim garage space, verify that your wall structure supports proper mounting. Without a solid installation, stability is compromised.
What size power rack do I need?
Most home gym owners need a rack that fits their ceiling height, offers sufficient inside depth for squats and benching, and allows safe pull-up clearance. Inside depth matters more than exterior footprint.
If your available space is limited, you may need to consider reduced-depth or short-height options — our complete guide to compact power racks for small spaces explains these solutions in detail.
Step 2: Define Your Training Style
Your rack’s design should reflect how you actually train.
The “Big 3” Lifter
If your focus is the squat, bench, and deadlift, prioritize stability, high-quality safeties, and precise bench-zone adjustability. A 4-post full rack is often the sweet spot, offering full-cage safety with a manageable footprint.
The “Rack-as-a-Gym” User
If the rack will serve as a full training hub, prioritize a strong attachment ecosystem—lat pulldowns, cables, and storage. A 6-post rack provides maximum stability and integrated storage, but requires more space and budget.
The Space-Saver
If you need an open training feel or are working with limited space, a half rack or folding rack may be appropriate. Be aware that half racks provide less enclosed safety and often rely on spotter arms.
Step 3: Verify Safety and Stability
Never choose a rack based on weight capacity alone. These ratings vary by brand and testing method and are far less important than real-world design features.
Before finalizing your choice, verify the rack's capacity meets your needs. Our detailed power rack weight capacity safety guide explains how to calculate real capacity requirements, including dynamic loading factors.
Is rack weight capacity important?
Rack weight capacity is less important than stability, safeties, and hole spacing. Capacity ratings vary by brand and testing method and should be treated as general guidance, not a deciding factor.
Safeties
For solo lifters, quality safeties—pin/pipe, flip-down, or straps—are non-negotiable.
Bench-Zone Precision
Look for 1-inch hole spacing in the bench zone (often called Westside spacing). Tight spacing allows precise placement of J-cups and safeties for safe unracking and reracking. Poor spacing compromises bench setup.
Anchoring and Stability
Real-world stability depends on rack weight, footprint, and anchoring method—whether bolted down, flat-footed, or wall-mounted.
Step 4: Plan for Future Expansion
To avoid a “dead-end” purchase, think beyond your current setup.
Standardization
Commit to a widely supported standard. 3×3 uprights made from 11-gauge steel are the durability benchmark for serious home gyms.
Hole Size
Choose between 5/8” holes (widely supported with large ecosystems) or 1” holes (often positioned as premium or commercial-grade).
Ecosystem Compatibility
Your choice determines which attachments—dip bars, lever arms, storage—you can add later. Buying into a strong ecosystem early prevents costly full-rack replacements.
Who This Power Rack Guide Is For (and Not For)
✅ This guide is for you if:
- You train alone and prioritize safety
- You want a rack that grows with your training
- You care more about real usability than marketing specs
- You plan to add attachments over time
- You want to avoid replacing your rack in a few years
❌ This guide may not be for you if:
- You’re only lifting very light weights temporarily
- You want the absolute cheapest option with no long-term plan
- You don’t plan to use a barbell regularly
- You are unconcerned with future upgrades or safety features
What to Prioritize When Choosing a Home Gym Power Rack
If you bench press regularly
Prioritize 1-inch spacing in the bench zone.
This single feature has more impact on bench safety than rack capacity numbers.
If you train alone
Safeties are not optional.
Pin/pipe, flip-down, or strap safeties should be considered mandatory—not accessories.
If you want a rack “once and done”
Commit to 3×3 uprights with a supported hole standard (5/8” or 1”).
This protects your investment and keeps upgrade paths open.
If space is tight
Verify inside depth, not just footprint.
A rack that technically fits but feels cramped will limit how you train.
Power Rack Categories Compared
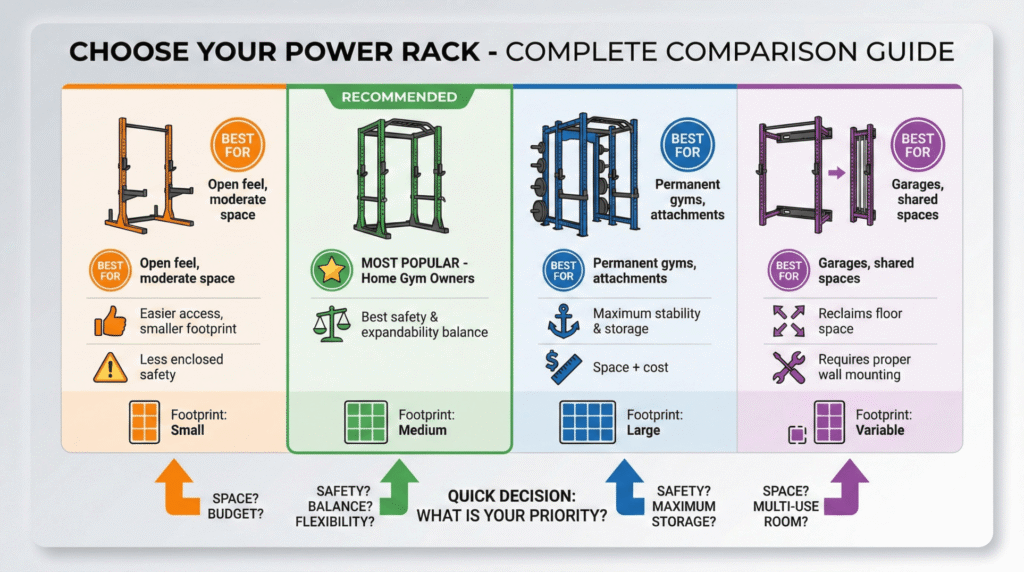
Understanding rack categories helps you self-select the right option without getting lost in brand hype.
If you want a deeper walkthrough of rack types, key specs, and real-world recommendations, see our complete home gym power rack guide.
Entry-Level Setup
Ideal For: Beginner to intermediate lifters on a budget
Goal: Safe barbell training with basic stability
Typical Specs: 2×3 construction or lighter 3×3 frames
Focus: Functional frame and basic safeties over modularity
Here are budget power racks that meet these requirements →
(internal link)
Mid-Tier Setup (Best Value)
Ideal For: Most home gym owners
Goal: Long-term usability without premium pricing
Typical Specs: 3×3 uprights, 11-gauge steel, 5/8” holes
Defining Feature: 1” spacing in the bench zone for precise adjustments
These mid-tier power racks match the specs outlined above →
(internal link)
Premium Setup
Ideal For: Serious lifters building a permanent gym
Goal: Maximum stability, superior finish, and deep customization
Typical Specs: 3×3 11-gauge steel with 1” hardware
Defining Feature: Large attachment ecosystem and heavy-duty performance
If you’re building a permanent gym, these premium power racks fit this category →
(internal link)
Demystifying Power Rack Specs (Plain English)
Upright Size and Steel Gauge
Steel thickness is measured in gauge, where a lower number indicates thicker steel, a standard defined by the steel manufacturing industry (see steel gauge standards).
The structural foundation of a rack is defined by upright dimensions and steel thickness.
The Standard
A serious home gym typically uses 3×3 uprights made from 11-gauge steel.
Understanding Gauge
Lower gauge numbers mean thicker steel. While 11-gauge is widely marketed as the benchmark, smaller uprights (such as 2×3) can still be sufficient for many lifters.
Hole Size (Hardware Standard)
Hole size determines attachment compatibility.
- 5/8” holes: Common in home gyms with broad attachment support
- 1” holes: Often positioned as premium or commercial-grade, supporting heavier-duty attachments
Hole Spacing and “Westside” Patterns
Spacing dictates adjustability.
Bench-Zone Precision
1-inch spacing in the bench zone allows precise J-cup and safety placement.
Outside the Bench Zone
Larger spacing—typically 2 inches—is common and appropriate.
Critical Dimensions: Height and Depth
Rack Height
Taller racks improve pull-up usability and overhead clearance but require sufficient ceiling height.
Inside Depth vs. Footprint
Exterior footprint does not equal usable space. Inside depth affects squat walkouts, bench comfort, and incline clearance.
A Note on Weight Capacity
Weight capacity ratings vary widely by brand and testing method. Treat them as general guidance—not a direct comparison metric.
Common Power Rack Mistakes (and How to Avoid Them)
Mistake 1: Buying Based on Weight Capacity Alone
Reality: Stability and safeties matter more than theoretical limits.
Avoid It: Evaluate design, construction, and safety features first.
Many buyers underestimate capacity needs because they don't account for dynamic forces during lifting. Learn how to properly calculate power rack weight capacity to avoid this mistake.
Mistake 2: Ignoring Hole Spacing
Reality: Poor spacing compromises bench safety.
Avoid It: Choose 1” spacing in the bench zone if you bench press.
Mistake 3: Choosing a Dead-End Standard
Reality: Non-standard sizing limits future upgrades.
Avoid It: Commit to 5/8” or 1” standards early.
Mistake 4: Underestimating Depth
Reality: Shallow inside depth restricts movement.
Avoid It: Confirm inside depth, not just exterior dimensions.
Mistake 5: Treating Safeties as Optional
Reality: Safeties are the most important component for solo lifters.
Avoid It: Prioritize high-quality safeties from the start.
Mistake 6: Improper Folding Rack Installation
Reality: Stability depends entirely on wall structure and mounting quality.
Avoid It: Verify structural support before choosing a folding rack.
❓ What size power rack is best for a home gym?
The best size depends on ceiling height, inside depth, and training style. Most home gym owners benefit from a 4-post rack that balances safety, space, and expandability.
❓ What is Westside hole spacing and why does it matter?
Westside spacing refers to 1-inch hole spacing in the bench zone. This allows precise placement of J-cups and safeties, improving bench press safety and setup.
❓ Should I choose a 5/8” or 1” power rack?
Both are widely supported standards. 5/8” racks offer a large ecosystem and strong value, while 1” racks are often positioned as premium or commercial-grade.
❓ Are folding power racks safe?
Folding racks can be safe if properly installed. Their stability depends entirely on wall structure and correct mounting. Without proper support, stability is compromised.
❓ Is rack weight capacity important?
Weight capacity ratings vary by brand and testing method. Stability, safeties, hole spacing, and anchoring have a greater impact on real-world safety than advertised capacity numbers.
❓ Do I need to bolt my power rack down?
Bolting depends on rack design. Some flat-foot racks are designed to remain stable without anchoring, while folding racks rely entirely on secure wall mounting.
❓ What rack depth is best for squats and benching?
Adequate inside depth allows comfortable squat walkouts and proper bench setup. Shallow racks can feel restrictive even when the footprint fits the room.
❓ Are folding power racks worth it?
Folding racks are ideal for shared or garage spaces, but only when wall structure supports proper installation. Stability depends entirely on mounting quality.
How to Choose the Right Power Rack With Confidence
A power rack is not just equipment—it’s the foundation of your home gym.
Ignore inflated capacity numbers and brand hype. Focus instead on:
- Space compatibility
- Safety features
- Adjustability where it matters
- A standard that won’t box you in later
Choose correctly, and your rack becomes a permanent training anchor.
Choose poorly, and it becomes the most expensive replacement you didn’t plan for.
Final Decision Checklist
Before purchasing, confirm the following:
- ☐ Ceiling height supports the rack and pull-ups
- ☐ Inside depth is sufficient for squats and benching
- ☐ Rack standard chosen (5/8” or 1”)
- ☐ 1” bench-zone spacing (if needed)
- ☐ Anchoring or wall-mount requirements understood
- ☐ Safeties are not compromised
- ☐ Rack supports future attachments
If you follow the process outlined above, how to choose a home gym power rack becomes a practical decision based on fit, safety, and long-term usability—not marketing hype.
Next Step:
If you’ve checked every box above, these power racks align with the space, safety, and upgrade requirements outlined in this guide.
➡️ View recommended power racks here →
(affiliate links disclosed)